
How to Cut Laminate Flooring Without Chipping: Jigsaw vs. Hand Saw Orientation

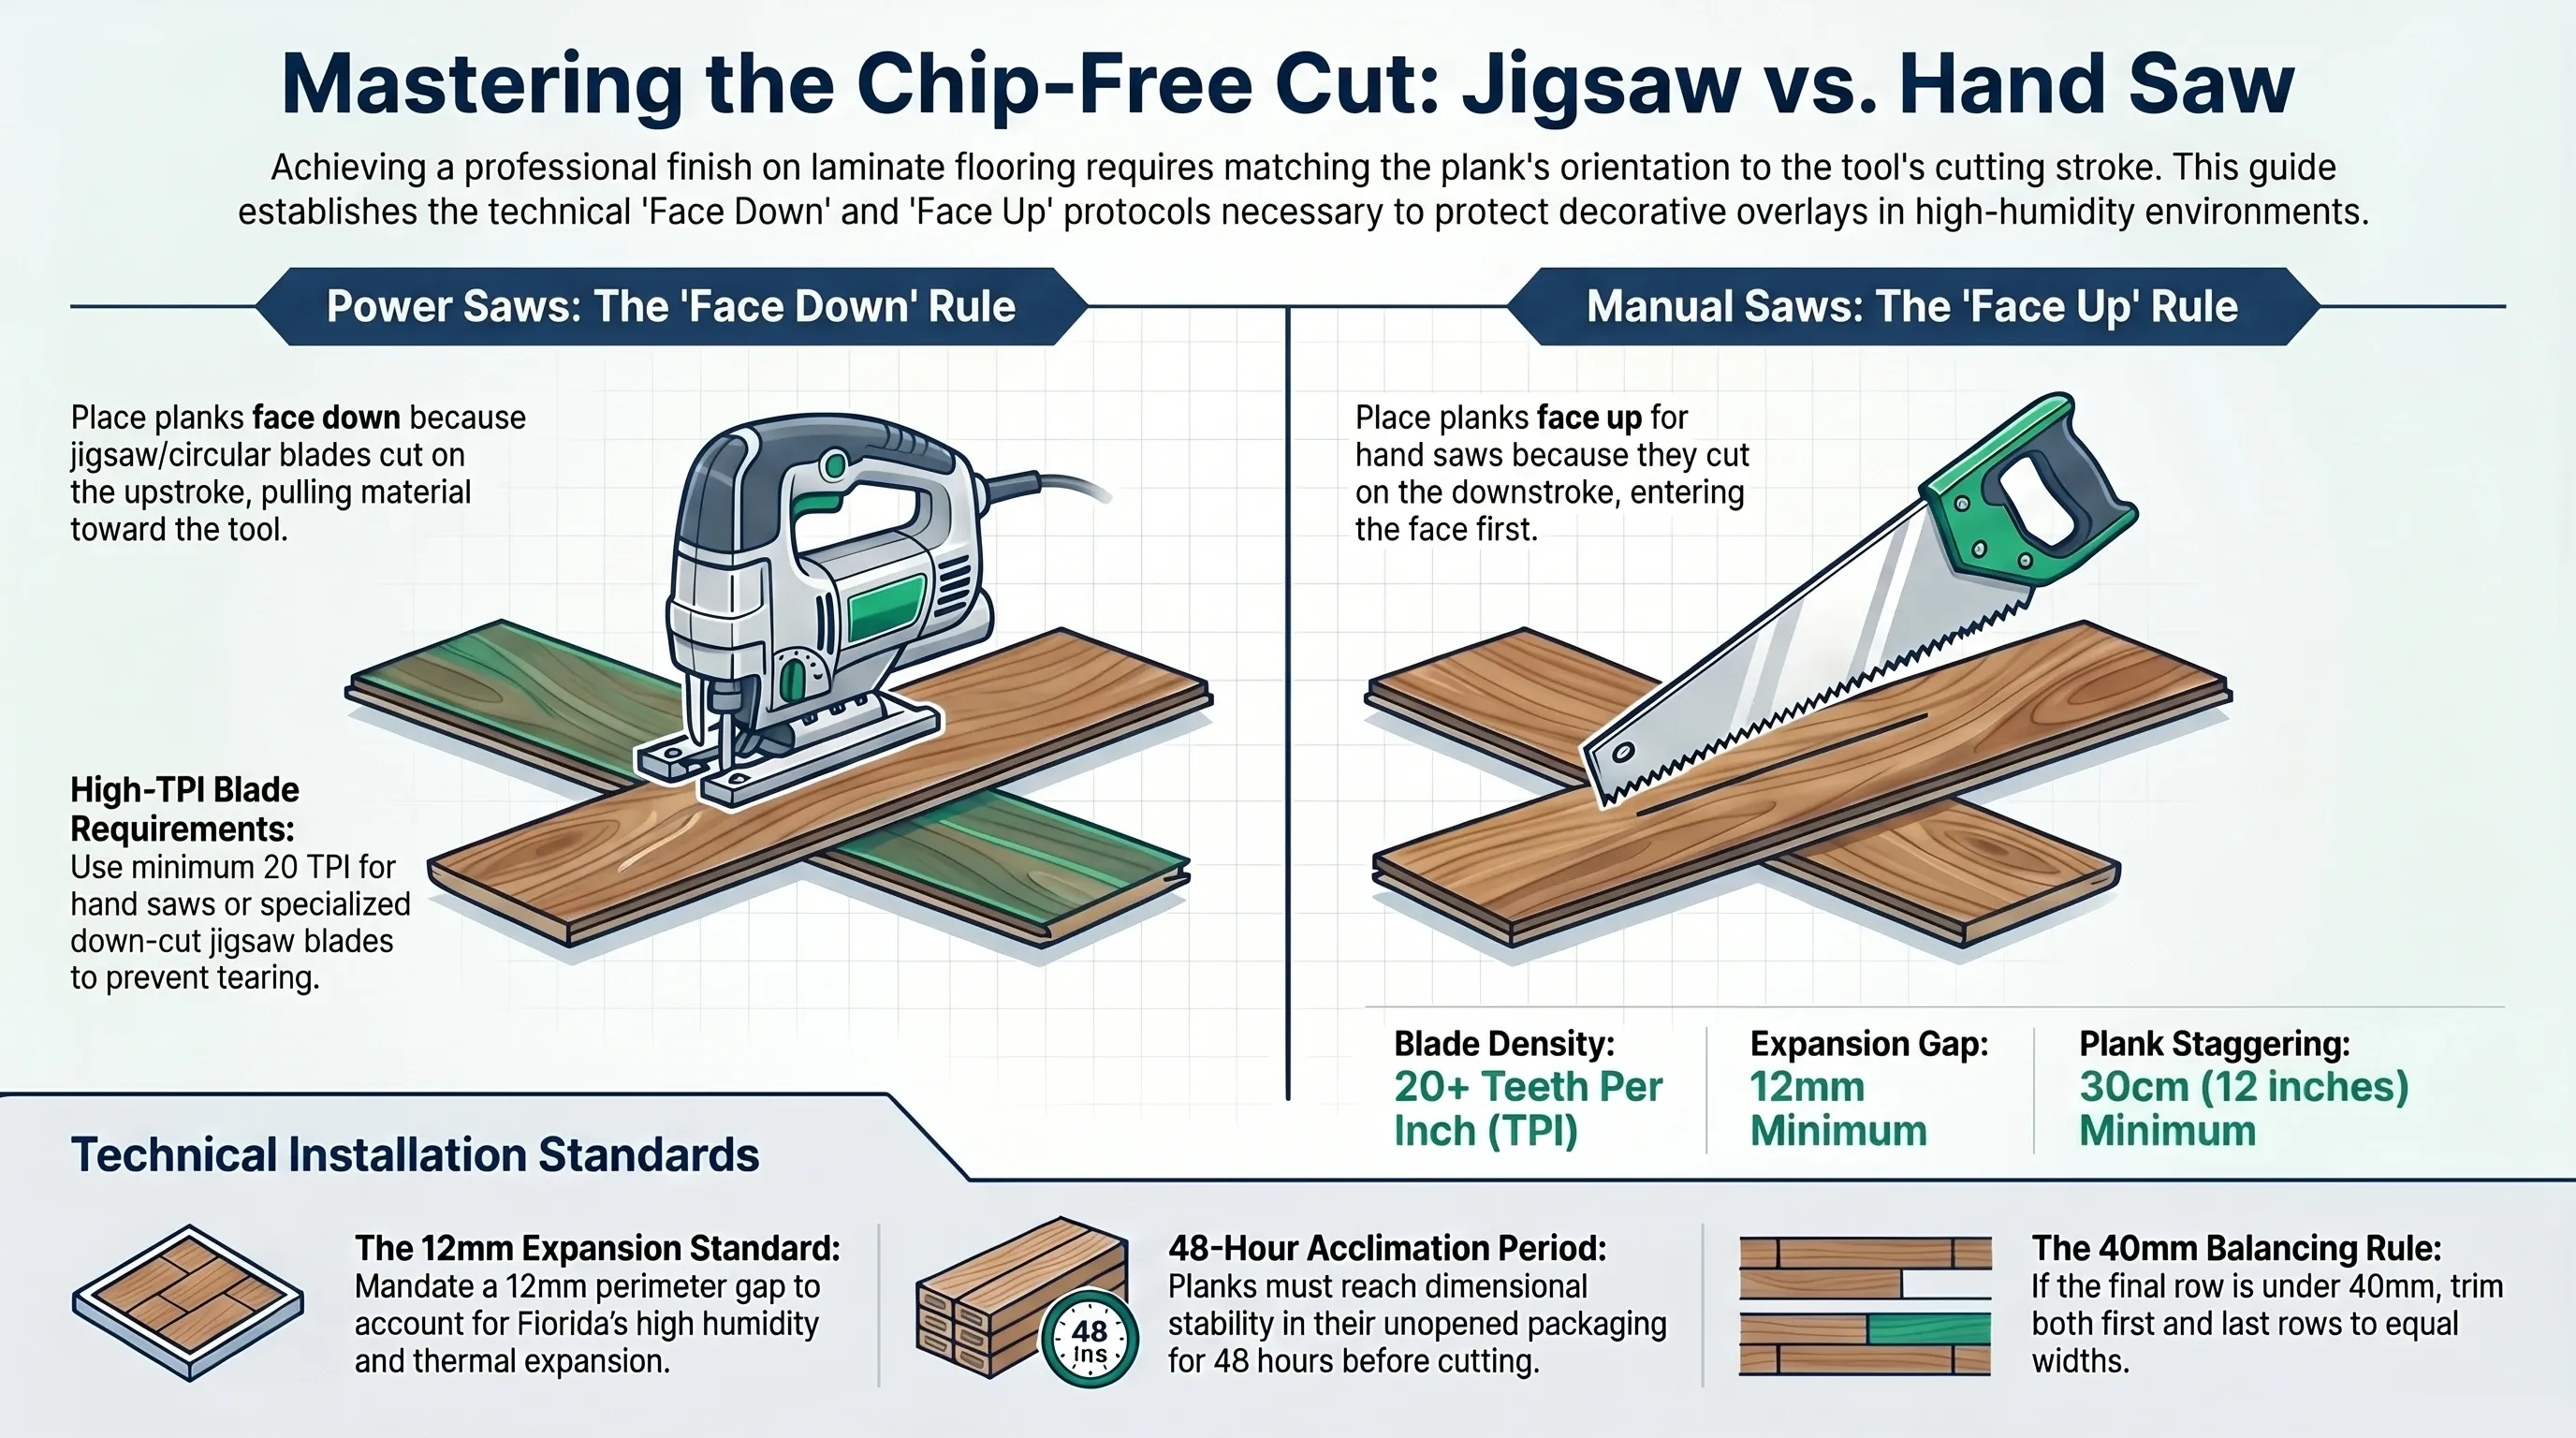
Chip-free cuts on laminate flooring require matching the plank’s orientation to the cutting tool’s stroke direction: Face Down for power saws (jigsaw, circular saw) and Face Up for manual hand saws. Getting this backward on even one cut produces damage that cannot be sanded or hidden later.
The decorative overlay on AC4 and AC5 laminate flooring is a melamine or aluminum-oxide-impregnated paper layer bonded to the HDF core under 400–600 bar of pressure. When a jigsaw blade exits through the decorative face on the upstroke, it fractures the overlay at the cut line regardless of blade sharpness. A single incorrect orientation chips every cut permanently and irreversibly.
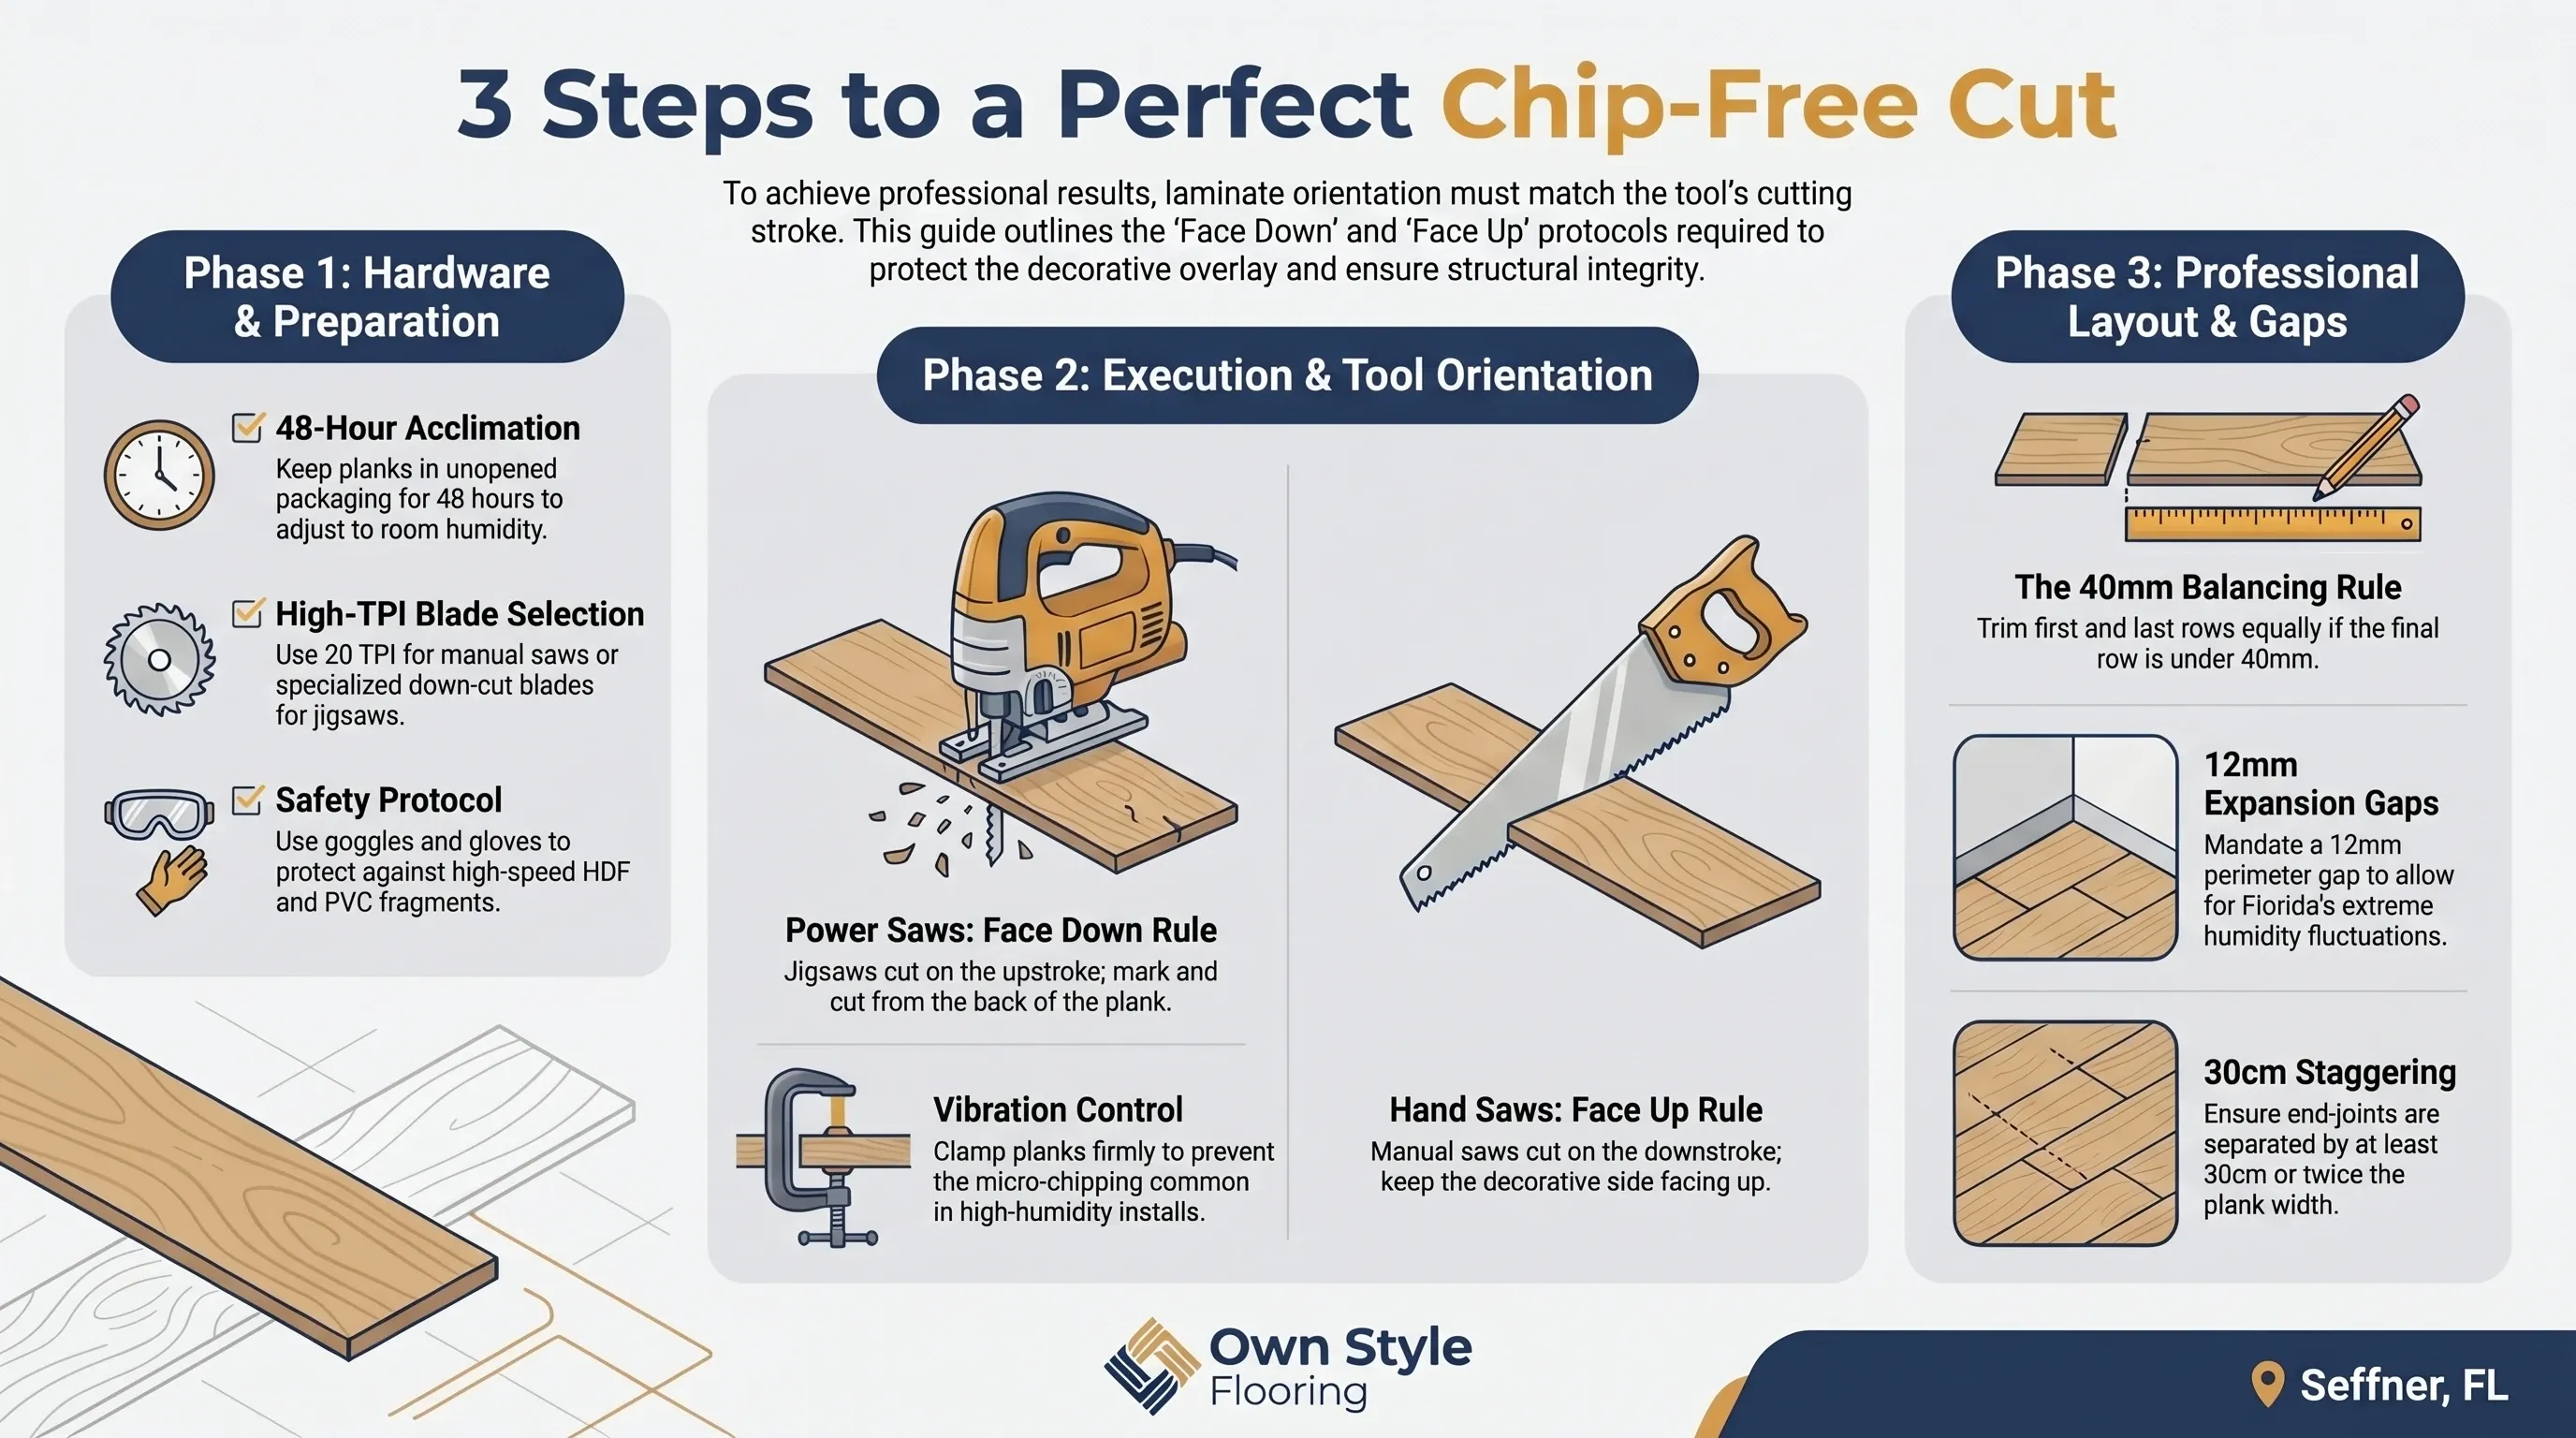
Why Do Power Saws Require the Face Down Orientation?
Jigsaw and circular saw blades cut on the upstroke — the blade teeth point upward and pull material toward the saw’s baseplate on the cutting motion. When a laminate plank is placed Face Down (decorative side against the workbench), the upstroke blade enters through the HDF backing and exits through the backing as well. The overlay never contacts the tooth edge at high velocity.
When the plank is placed Face Up with a power saw, the upstroke teeth exit through the decorative melamine layer at full cutting speed, producing chip-out at the saw kerf that cannot be sanded, filled, or hidden under baseboards because the damage extends 2–4 mm into the visible plank face.
What Blade Specifications Are Required for Chip-Free Laminate Cuts?
Blade selection determines cut quality on the first stroke. Standard wood blades with 6–10 teeth per inch (TPI) are designed for rapid material removal in softwood — a cutting action that tears rather than shears melamine overlay. Laminate flooring requires:
- Jigsaw: A dedicated down-cut blade with 14–20 TPI
- Hand saw: Minimum 20 TPI with a fine cross-cut tooth geometry. Japanese pull saws with 22–25 TPI provide the cleanest hand cuts for intricate work around door casings
- Circular saw: 80-tooth fine-finish blade in carbide-tipped configuration
| Tool | Blade Type | Minimum TPI | Plank Orientation |
|---|---|---|---|
| Jigsaw | Down-cut laminate blade | 14–20 TPI | Face Down (standard) |
| Circular saw | Fine-finish carbide | 80 teeth | Face Down |
| Hand saw | Fine cross-cut | 20+ TPI | Face Up |
| Japanese pull saw | Cross-cut | 22–25 TPI | Face Up |
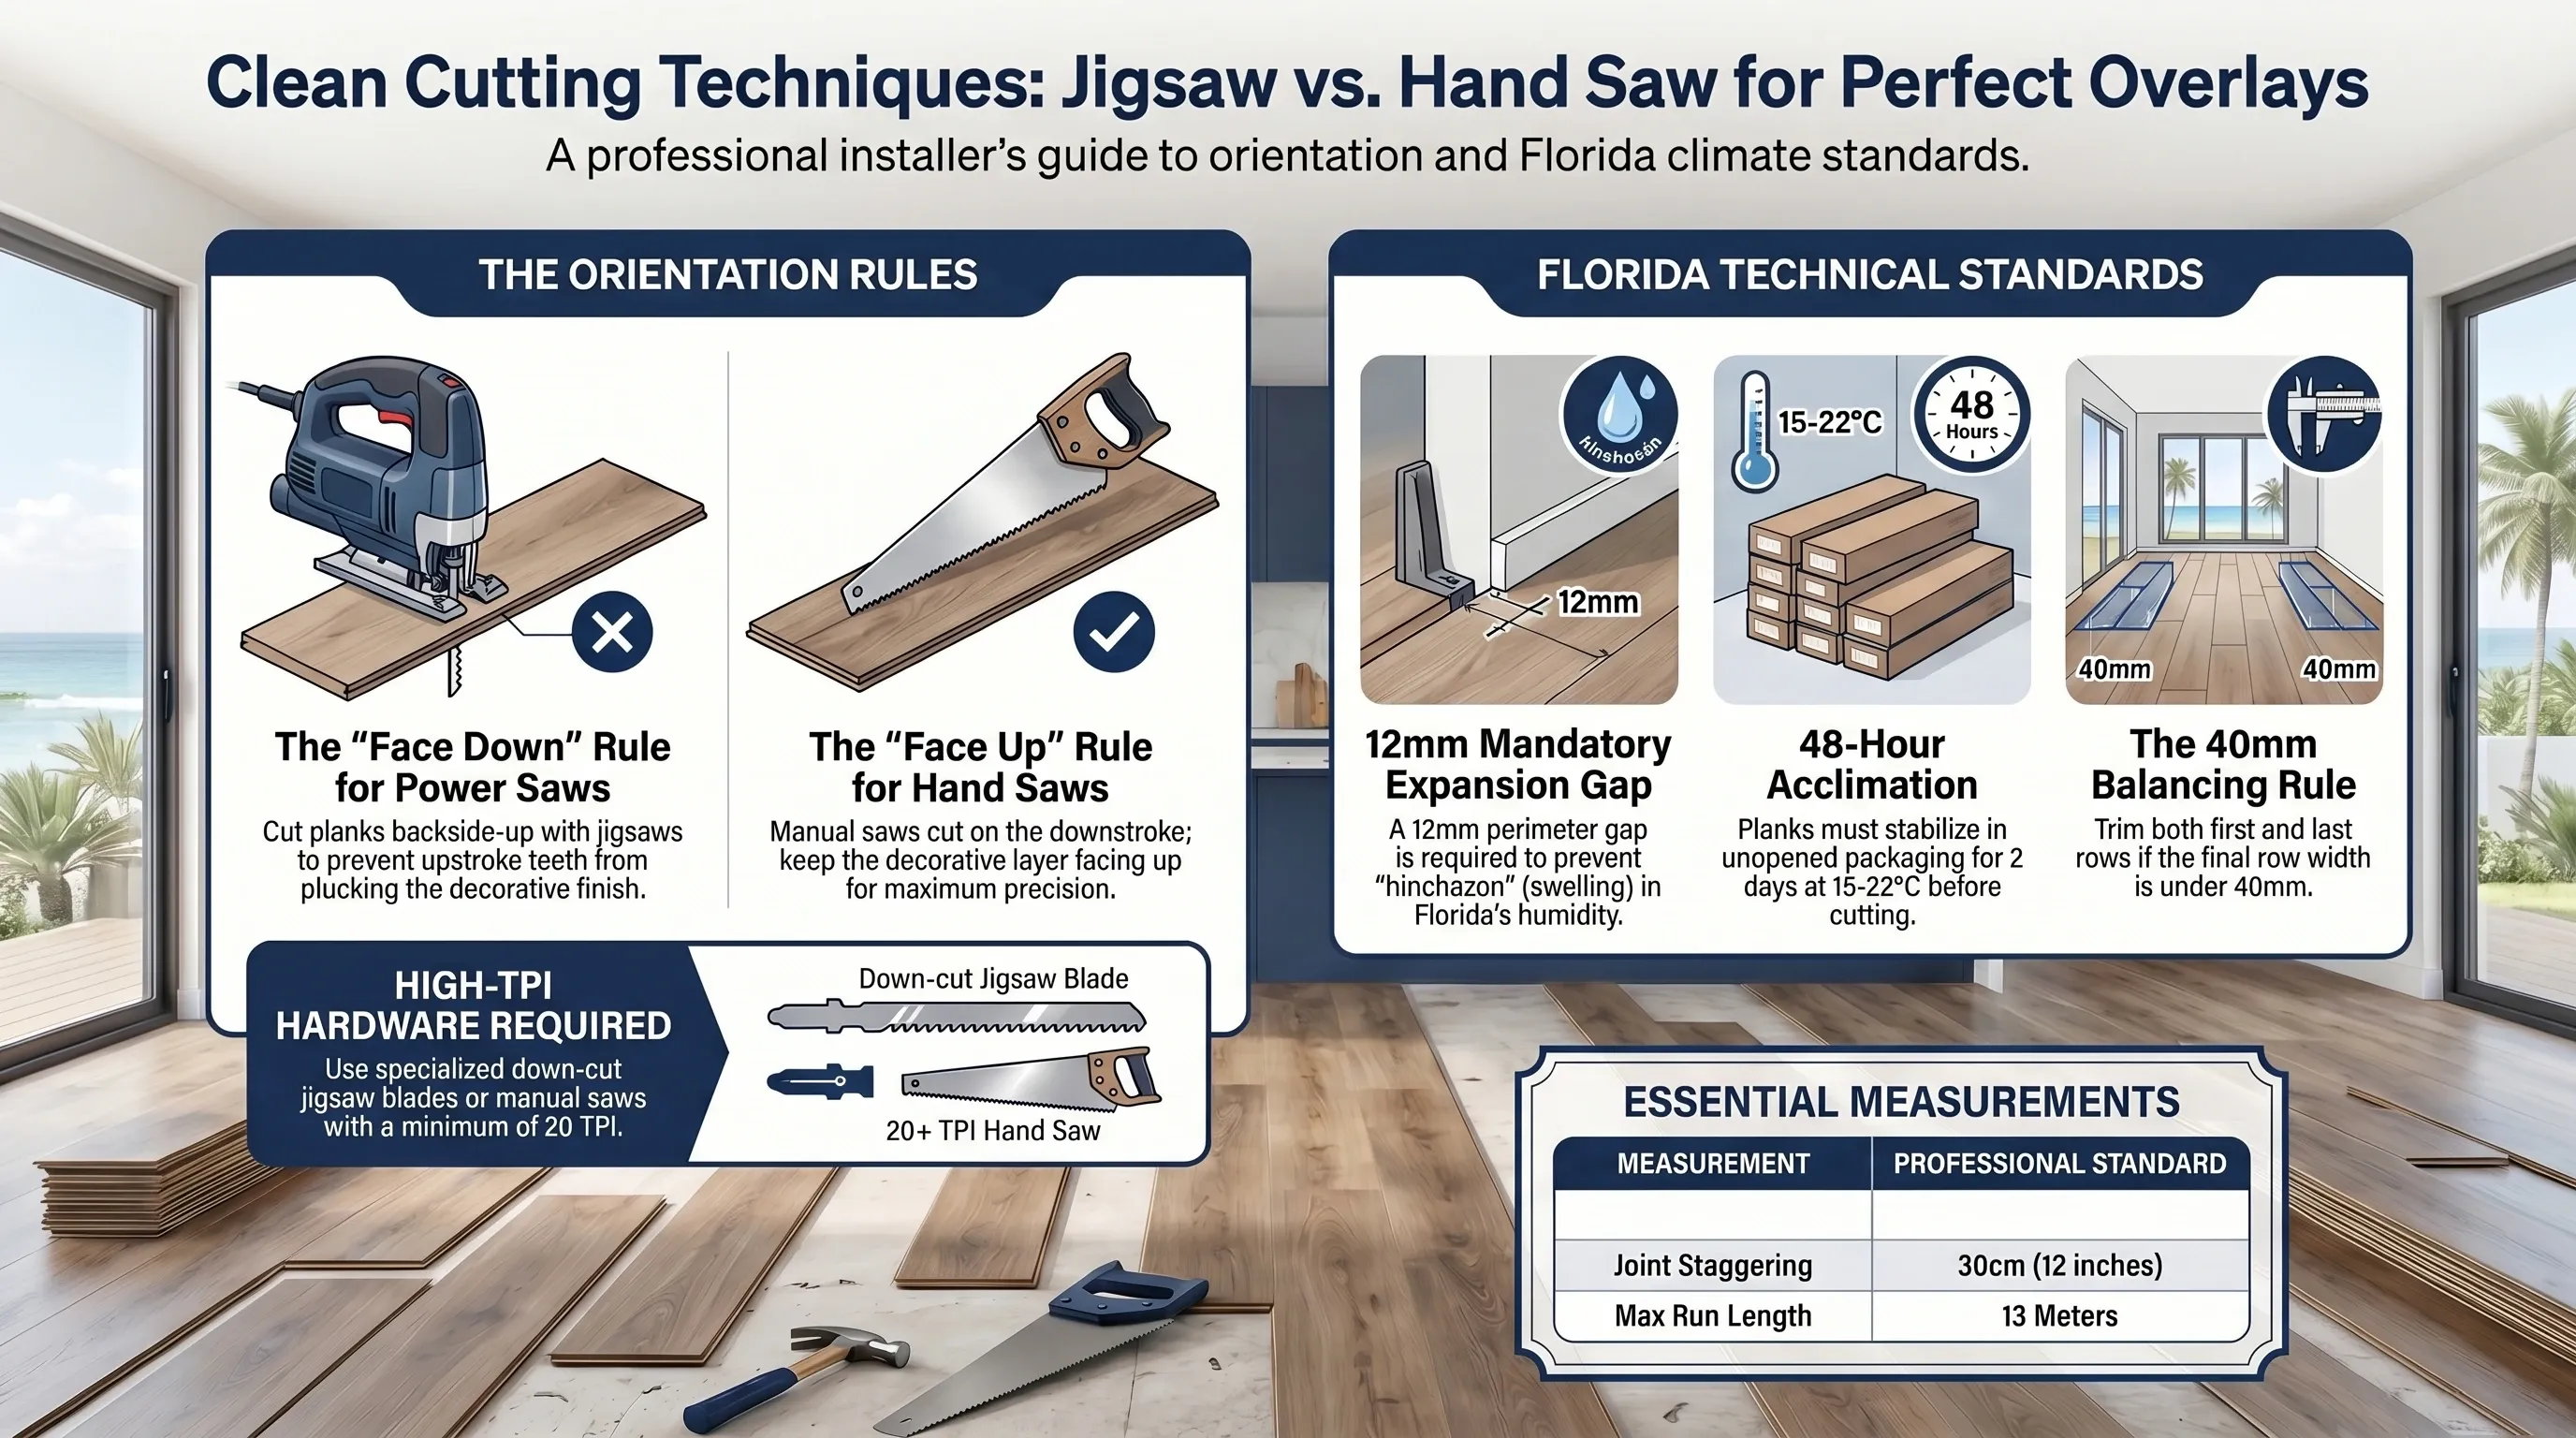
When Should a Hand Saw Be Used Instead of a Power Saw?
Hand saw cuts are required when power tool access is restricted — under door casings, inside closets with limited clearance, or when cutting a single plank in a tight final-row position. The Face Up rule applies to all hand saw cuts: the decorative surface faces the ceiling, the backing faces the workbench, and the saw’s downstroke exits through the backing.
In homes where wood door frames cannot be undercut, hand saw precision at a 20-degree plunge angle — with the plank held against the jamb as a depth guide — produces the exact clearance needed for the plank to slide underneath without power tools in the space.
What Is the Pipe Clearance Formula for Cutting Around Plumbing?
Laminate planks cut around exposed plumbing pipes require a hole larger than the pipe’s outer diameter to maintain the expansion gap on all sides of the pipe circumference. The formula is:
Perforation diameter = Pipe outer diameter + 20 mm
A 25 mm copper pipe requires a 45 mm hole. A 32 mm PVC pipe requires a 52 mm hole. The 20 mm addition provides 10 mm of clearance on each side of the pipe — the minimum expansion buffer for a floating floor in Tampa Bay’s seasonal humidity range.
How Do Row Width Calculations Affect Cutting Before Installation?
Every cut made to laminate planks must reflect the pre-installation row width calculation — not the raw room width. In rooms where walls deviate from square by 3–5 mm over a 10-meter span, the starting row requires a variable-width rip cut that is wider at one wall than the other.
A sliding T-bevel (false square) captures the actual wall angle, and the adjusted width measurement transfers to each plank’s underside before cutting. Measuring without the T-bevel and cutting to a fixed starting width produces a growing gap between the plank edge and the wall that becomes visible from the doorway by the third row.
What Safety Equipment Is Required for Laminate Cutting Operations?
Laminate cutting generates aluminum-oxide dust from AC4 and AC5 wear layers — a respiratory hazard distinct from standard wood dust. High-velocity HDF fragments from jigsaw operations require the following protective equipment on every cut, not just extended cutting sessions:
- Safety goggles: ANSI Z87.1 rated, sealed frame — open-frame glasses do not block lateral HDF fragments at jigsaw blade speeds of 2,000–3,500 strokes per minute
- N95 respirator or better: aluminum-oxide dust accumulates in poorly ventilated garage workshops where ambient humidity limits air exchange
- Cut-resistant gloves: freshly cut laminate edges — particularly AC5 — have an edge sharpness equivalent to sheet metal
What Mistakes Cause Most Chipped Cuts in Tampa Bay Installations?
Most chip-out complaints trace back to a small set of repeatable habits rather than a defective blade or a difficult plank, and each one is checkable before the saw ever touches the material.
- Reusing a wood-cutting blade from a previous job. A blade that cut softwood cleanly last month has already dulled past the point where it shears melamine cleanly instead of tearing it.
- Cutting Face Up out of habit with a jigsaw. Installers used to circular saws sometimes default to the wrong orientation on a jigsaw, producing chip-out on the first several cuts before the pattern is caught.
- Skipping the T-bevel on a Brandon or Riverview home with older, out-of-square walls. A fixed-width rip cut on a wall that is not truly square produces a visible gap that grows row by row.
- Rushing the cut speed on AC5 laminate. The denser wear layer on AC5 requires a slower feed rate than AC3 or AC4; pushing the saw at the same pace tears the overlay instead of shearing it.
- Cutting near pipe penetrations without the +20 mm allowance. A hole cut to the pipe’s exact diameter eliminates the expansion buffer and forces a second, wider cut later in the project.
Catching these five habits during a pre-cut walkthrough costs a few minutes and prevents plank waste that otherwise shows up as a mid-project reorder.
How Does Florida’s Wet Season Affect Cutting and Handling?
Tampa Bay’s June-through-September wet season raises ambient humidity in a garage workshop or job site enough to change how freshly cut laminate edges behave in the hours after cutting.
- Wet season (June–September): cut edges absorb ambient moisture faster, so planks should move from cutting to installation within the same work session rather than sitting exposed overnight.
- Dry season (October–May): cut edges stay stable longer, giving more flexibility to batch-cut multiple rows before installing them.
- Year-round rule: as of 2026, any cut plank left exposed to garage humidity for more than a few hours should be re-measured before installation, since the HDF core at a fresh cut edge absorbs moisture faster than the sealed factory edge.
This matters most for the final row and any pipe-penetration cuts, since those pieces often sit cut and waiting while the rest of the room gets installed first.
Planning a flooring project in Tampa Bay? Every quote starts with a moisture reading of the slab, at no cost. Get your free photo estimate or call (813) 455-5756.
Frequently asked questions
Why does my laminate chip even when I use a new blade?
Chipping with a new blade indicates incorrect plank orientation, not blade failure. Power saws require Face Down orientation — decorative side against the workbench — because the blade upstroke exits through the backing. Hand saws require Face Up orientation for the same reason in reverse. Blade sharpness does not compensate for the wrong direction of tooth exit.
Can I use a standard 24-tooth wood blade to cut AC4 laminate flooring?
No. A 24-tooth wood blade tears the melamine overlay regardless of cutting speed. AC4 and AC5 laminate requires a minimum of 80 teeth for circular saws, 20 TPI for hand saws, and a dedicated down-cut laminate blade for jigsaws. The damage extends 2–4 mm into the visible plank face, making affected planks unusable.
What is the minimum expansion gap for laminate flooring around a pipe?
The minimum expansion gap around any pipe penetration is 10 mm on all sides of the pipe circumference, achieved by drilling a hole equal to the pipe outer diameter plus 20 mm. A 25 mm copper pipe requires a 45 mm hole. This gap allows the floating floor to expand seasonally without contacting the fixed plumbing.
Do I need to balance the first and last rows before cutting?
Yes. Measure the room width, subtract the total expansion gap (minimum 24 mm for both perimeter walls), divide by plank width, and check the decimal remainder. If the final row calculation produces a width below 40 mm, add one full plank width to the remainder and divide by two. Both first and last rows will equal this value.


US standard for measuring relative humidity inside a concrete slab using in-situ probes drilled to 40% of slab depth, read after 72 hours of equilibration.
US standard for measuring moisture vapor emission from a concrete slab using anhydrous calcium chloride, expressed in pounds per 1,000 sq ft per 24 hours.
US standard practice for preparing concrete floors to receive resilient flooring. Covers flatness, cleanliness, and moisture condition before installation.
The building code in force across Florida, including moisture and structural requirements that apply to slab-on-grade residential construction.
European deep-core moisture test that reacts a slab sample with calcium carbide and reads the resulting gas pressure. Supporting knowledge: the applicable US standards are ASTM F2170 and F1869.
Supporting knowledge — not the standard we work toGerman standard series for floor screeds, source of the widely cited 2.0% CM cement and 0.5% CM anhydrite thresholds. Supporting knowledge, not the applicable US standard.
Supporting knowledge — not the standard we work toHigh-Density Fiberboard: the compressed wood-fiber core of most laminate planks. It absorbs water vapor and swells irreversibly, which is why slab moisture matters.
Stone Plastic Composite: rigid vinyl core made of limestone powder and PVC. Dimensionally stable under humidity swings and unaffected by water.
Wood Plastic Composite: vinyl core with wood flour and foaming agents. Softer and warmer underfoot than SPC, and less dimensionally stable.
Luxury Vinyl Plank: multi-layer vinyl flooring in plank format. Fully waterproof as a material, though the subfloor beneath still governs installation.
Abrasion Class rating for laminate wear resistance, from AC1 to AC6. AC4 suits normal residential use; AC5 handles heavy traffic and light commercial.
A sheet layer placed between slab and flooring to block ground moisture vapor. Required over slab-on-grade construction regardless of surface dryness.
Foundation type where the concrete slab sits directly on the ground, dominant in Florida residential construction. Ground moisture migrates upward continuously.
The permitted deviation of a subfloor across a given span. The common benchmark is 3/16 inch over 10 feet; beyond that, deviation transfers into the locking joints.
A pourable cement-based compound that flows to a level surface, used to correct slab deviation. Needs 24 to 72 hours of cure before flooring goes down.
The 8 to 10 mm clearance left between a floating floor and every fixed vertical surface, absorbing seasonal expansion. Bridging it transfers stress to the joints.
Conditioning flooring material inside the room where it will be installed, 48 to 72 hours before installation, so it reaches interior temperature and humidity.
An angle-in locking profile that joins planks without adhesive. The insertion angle is specified by the manufacturer; forcing it deforms the profile permanently.
The raised ridge that forms along plank edges when a floating floor expands without room to move. In Florida the usual causes are slab moisture or a bridged expansion gap.