
Laminate Flooring Transitions: Managing Thresholds and Material Connections
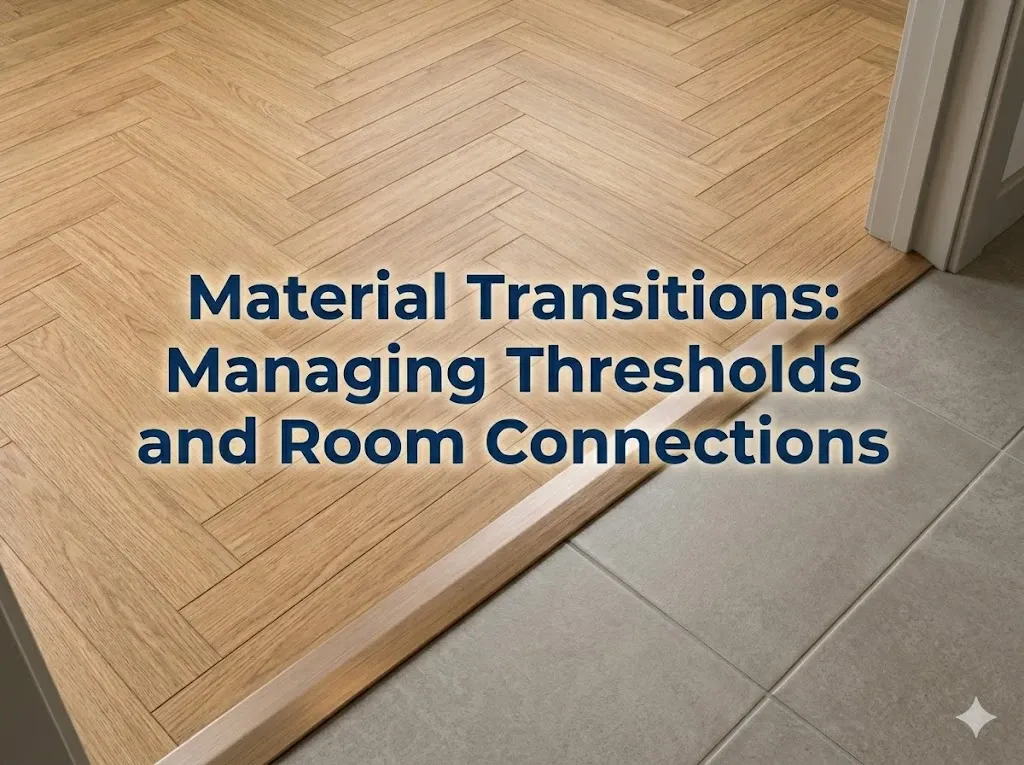
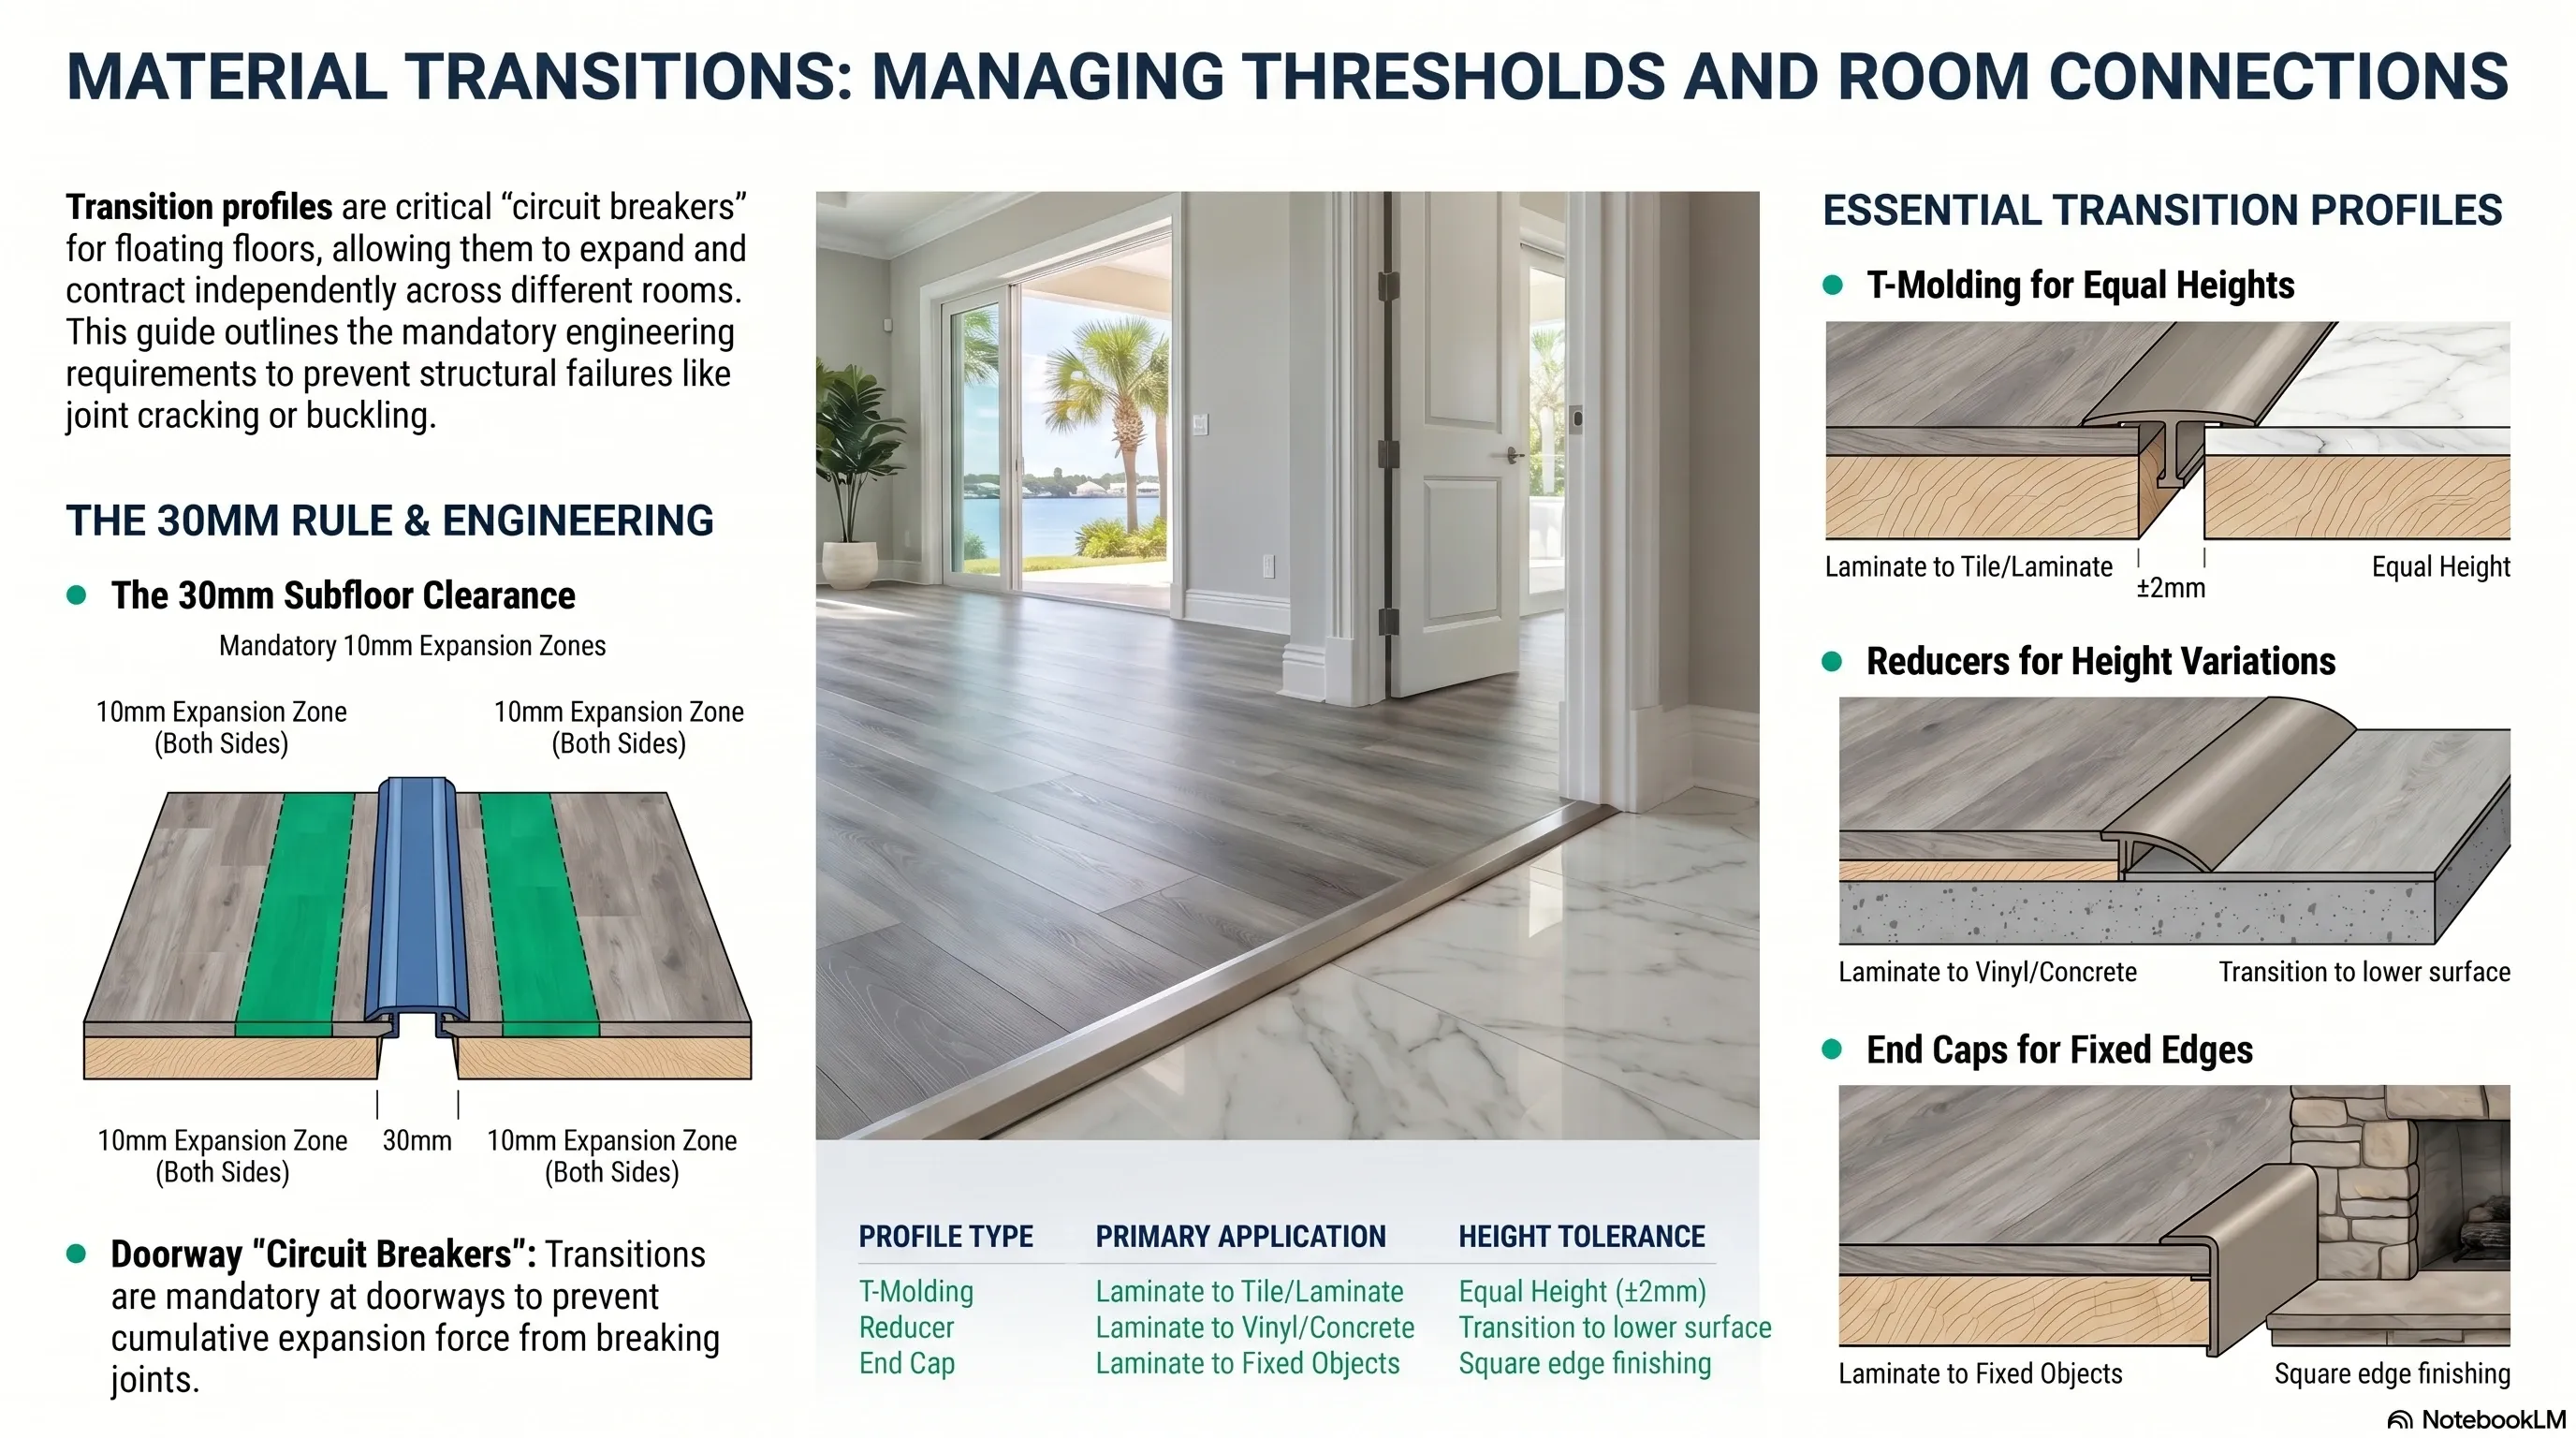
Flooring transition profiles are structural components, not decorative trim. They function as mandatory expansion joints at doorways and material changes. A correct installation requires 30 mm of subfloor clearance at each transition: the profile track anchors in the center, leaving 10 mm of free movement on each side for laminate expansion.
The Myth of the Seamless Floor
While modern laminate is highly durable, it remains a floating system that moves as a single unit. In a large Brandon or Riverview home, the expansion force of a continuous floor spanning three rooms can be powerful enough to lift heavy furniture. Transition profiles act as “circuit breakers,” allowing each room to expand and contract independently based on its specific microclimate — sun-exposed living rooms versus AC-cooled kitchens.
The 30 mm Profile Rule — Physics of the Gap
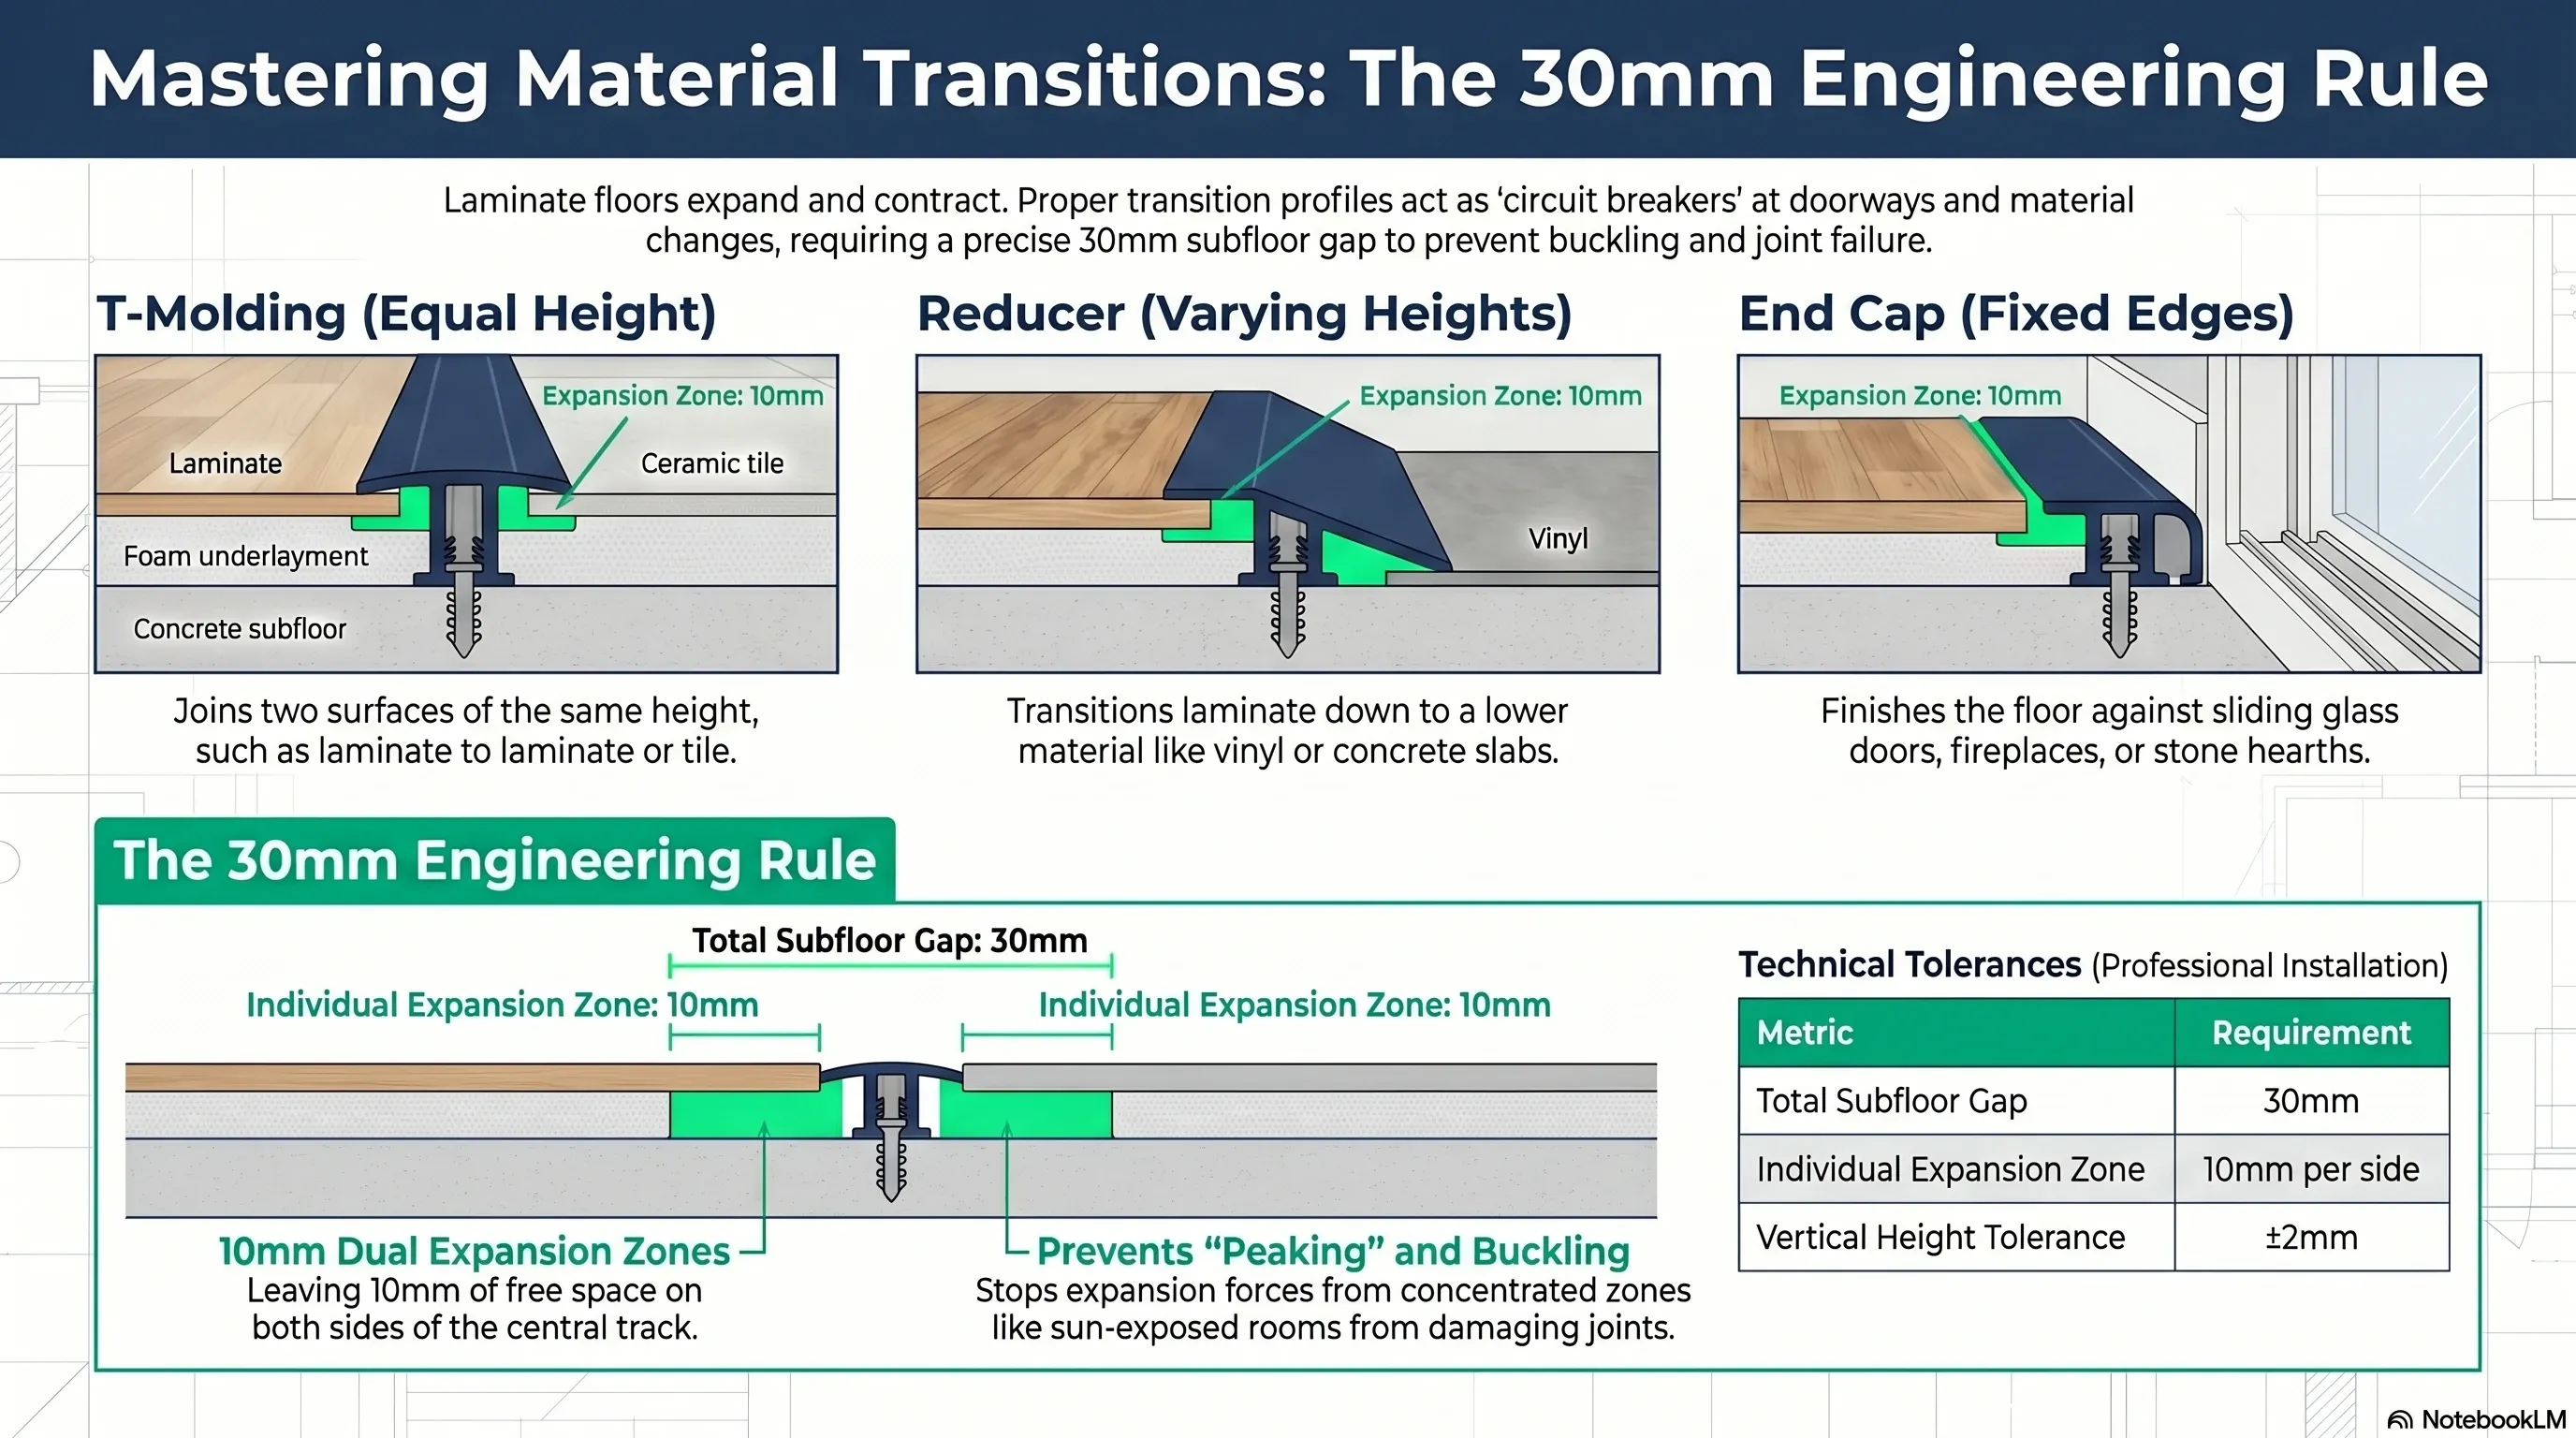
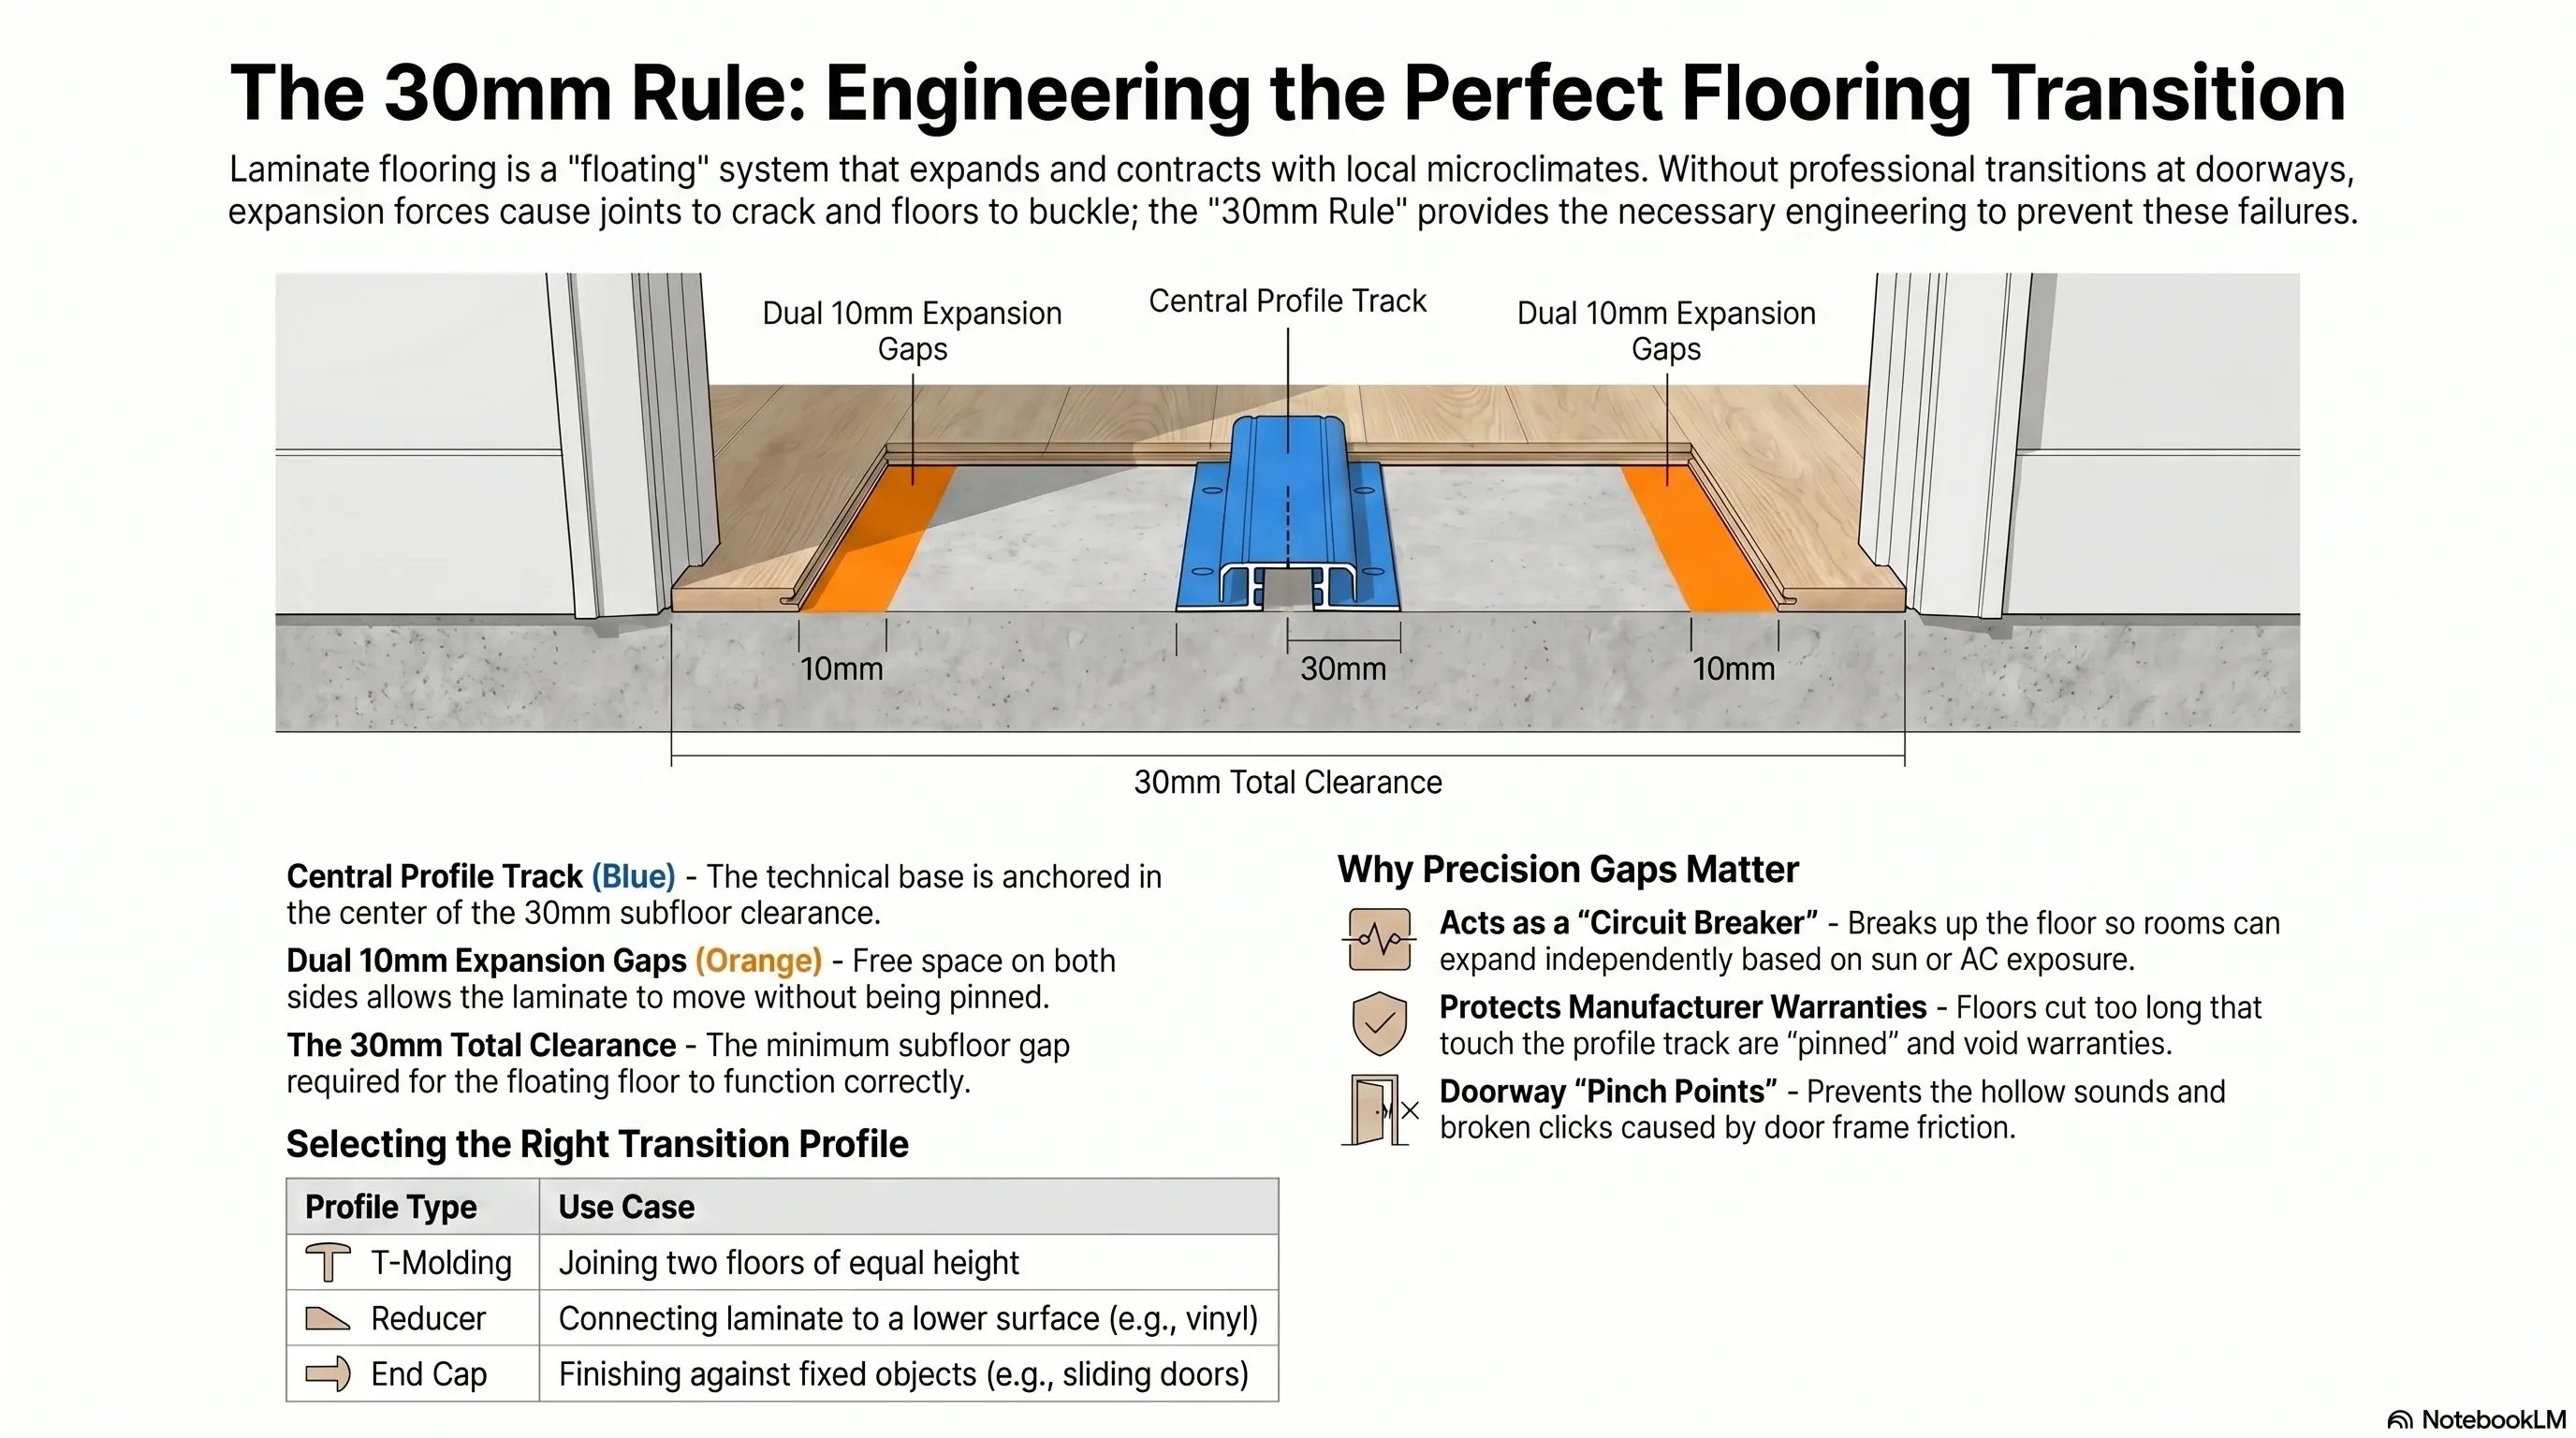
A common error in low-quality installations is cramming a transition profile into a 10 mm gap that was never sized for it. For a profile to function correctly, the subfloor must present a full 30 mm clearance at that threshold, split into three distinct zones:
- Center: Profile track anchored to the subfloor
- Each side: 10 mm of free expansion space for the laminate
If planks are cut too long and touch the profile track, the floor is effectively pinned — which voids the manufacturer’s warranty and guarantees future buckling.
T-Moldings vs. Reducers — Choosing the Right Profile
Profile selection depends entirely on the relative height of the two materials being connected at a given threshold, not on personal preference or what happens to be in stock. Three profile types cover nearly every situation in a Tampa Bay home.
| Profile Type | Application |
|---|---|
| T-Molding | Connecting two floors of equal height (laminate-to-laminate, laminate-to-level tile) |
| Reducer | Joining laminate to a lower surface (thin LVP, exposed concrete) |
| End Cap (Square Nose) | Finishing against fixed objects (sliding glass doors, stone hearths) |
The deviation between connected materials must remain within ±2 mm for a trip-free threshold that meets professional installation standards.
Doorway Transitions — Why They Are Mandatory
Doorways are “pinch points” where the weight of the door frame and narrow passage create high friction for a floating floor. Industry standards make transition profiles obligatory under every door leaf. A single continuous floor through a doorway without a profile is the leading cause of hollow sounds and broken click joints. The profile should align directly under the closed door so it remains invisible when the door is shut.
Connecting to Tile and Carpet
Many Tampa Bay renovations involve keeping existing tile in kitchens while upgrading living rooms to laminate, or leaving carpet in bedrooms while the rest of the home gets a floating floor. Both transitions have a specific correct profile.
- Tile-to-laminate: Color-matched T-molding provides a clean connection while respecting expansion requirements.
- Carpet-to-laminate: A Z-bar or specialized reducer allows carpet to be tucked against the laminate for a professional edge.
In all cases, the laminate maintains its required 10 mm perimeter gap hidden beneath the transition cap.
Does Connecting Laminate to LVP Need a Different Transition Than Connecting to Tile?
The profile category is the same — T-molding for equal heights, reducer for a step down — but the height difference itself tends to be smaller between laminate and LVP than between laminate and tile, since both are typically installed with comparable underlayment builds.
A tile-to-laminate threshold more often needs a reducer because tile plus mortar bed commonly sits taller than a floating laminate assembly, while laminate-to-LVP thresholds in the same home frequently qualify for a simple T-molding once both floors are measured. The determining factor is always the measured height difference at that specific threshold, not an assumption based on which two materials are involved.
What Determines Which Direction a Reducer Slopes?
The reducer always slopes from the higher surface down to the lower one, matching whichever material sits proud of the other at that specific threshold. Laminate meeting a thin LVP or exposed concrete slab typically slopes down from the laminate, since laminate plus underlayment usually builds up more total height than a glued-down LVP or bare slab.
The direction matters for more than appearance. A reducer installed backward, sloping up into the laminate rather than down from it, leaves the laminate edge unsupported and prone to chipping under foot traffic, since the profile’s lip is no longer bearing weight the way it was engineered to.
Do Transition Profiles Need Their Own Expansion Allowance?
Yes, at the anchoring track itself, separate from the 10 mm gaps on either side of it. Aluminum and most rigid-composite transition tracks expand and contract with temperature, though far less than laminate does with humidity — anchoring screws are set in slotted holes specifically to allow this minor movement without cracking the track or pulling loose from the subfloor.
A track face-nailed or glued rigidly at every point, without using the slotted holes as designed, is a common installation shortcut. It shows up as a warped or lifted transition strip within a year or two, independent of how well the laminate itself was installed on either side.
Avoiding Silicone “Shortcuts”
Filling the gap between laminate and another material with silicone or caulk instead of a mechanical profile may look clean for the first week, but silicone cannot resist the mechanical expansion force of the planks. Within one Florida summer, the silicone pulls away or gets crushed, and laminate edges begin to chip. A mechanical profile is the only engineering solution that delivers lifetime performance.
What Does a Real Installed Transition Look Like?
A correctly installed T-molding sits flush with both surfaces, follows the room’s threshold line exactly, and shows no visible gap or caulk bead on either side — the mechanical clearance it protects stays hidden under the cap. In a Tampa Bay home connecting laminate to tile at a hallway threshold, this is often the only visual evidence that an expansion joint exists at all; everything else about the transition is invisible until it is needed.
How Many Transitions Does a Typical Open-Concept Home Need?
More transitions than most homeowners expect before getting a quote. Beyond doorways, any continuous laminate run exceeding roughly 12 meters in one direction needs an interior expansion break even within the same room, and every change of flooring material — kitchen tile meeting a great room, a bathroom threshold, a closet with a different subfloor — adds another.
A 2,000-square-foot open-concept home with a tile kitchen, carpeted bedrooms, and laminate throughout the main living areas commonly needs 8 to 12 transition profiles once every doorway, material change, and long run is accounted for, not the 2 or 3 an initial walkthrough might suggest.
Structural Continuity Through Professional Installation
Transitions are the backbone of a stable floating floor, not an afterthought added at the end of a job. Whether connecting new laminate to bathroom tile or creating an expansion break in a long open-concept living area, precision-cut thresholds with the full 30 mm clearance are what keep the floor silent, stable, and free of the buckling that undersized or skipped transitions eventually cause.
Planning a flooring project in Tampa Bay? Every quote starts with a moisture reading of the slab, at no cost. Get your free photo estimate or call (813) 455-5756.
Frequently asked questions
Can laminate be installed without transitions between rooms?
No. Manufacturers and engineering standards require transition profiles at doorways and at any material change. A continuous floor spanning multiple rooms without these breaks accumulates excessive internal expansion stress that leads to joint failure at the weakest point, and installing without them voids the manufacturer's warranty entirely.
How wide is a standard transition profile?
The visible cap of a T-molding is typically about 40 mm (1.5 in) wide. However, the subfloor requires a 30 mm clearance to accommodate the anchoring track and 10 mm of expansion space on each side.
Do transitions create a trip hazard?
When installed professionally, transition profiles remain very low-profile and follow the ±2 mm height tolerance standard between connected surfaces, making them safe for children and seniors to walk across without a noticeable step or catch point.
What is a multipurpose transition profile?
Many high-end manufacturers provide a 3-in-1 or 5-in-1 profile that can be configured as a T-molding, reducer, or end cap depending on which insert or track base is attached, ensuring a perfect color match across every threshold type in the same flooring order.
How many transitions does a typical Tampa Bay home need?
More than most homeowners expect — commonly 8 to 12 in a 2,000-square-foot open-concept home once every doorway, material change, and long continuous run over 12 meters is counted, not just the 2 or 3 obvious doorways.
Do laminate runs need an interior expansion break even without a doorway?
Yes, once a continuous run exceeds roughly 12 meters in any direction. Even within a single open room, an interior transition or expansion joint is required at that distance to keep accumulated expansion force from concentrating at the nearest click-lock joints.



US standard for measuring relative humidity inside a concrete slab using in-situ probes drilled to 40% of slab depth, read after 72 hours of equilibration.
US standard for measuring moisture vapor emission from a concrete slab using anhydrous calcium chloride, expressed in pounds per 1,000 sq ft per 24 hours.
US standard practice for preparing concrete floors to receive resilient flooring. Covers flatness, cleanliness, and moisture condition before installation.
The building code in force across Florida, including moisture and structural requirements that apply to slab-on-grade residential construction.
European deep-core moisture test that reacts a slab sample with calcium carbide and reads the resulting gas pressure. Supporting knowledge: the applicable US standards are ASTM F2170 and F1869.
Supporting knowledge — not the standard we work toGerman standard series for floor screeds, source of the widely cited 2.0% CM cement and 0.5% CM anhydrite thresholds. Supporting knowledge, not the applicable US standard.
Supporting knowledge — not the standard we work toHigh-Density Fiberboard: the compressed wood-fiber core of most laminate planks. It absorbs water vapor and swells irreversibly, which is why slab moisture matters.
Stone Plastic Composite: rigid vinyl core made of limestone powder and PVC. Dimensionally stable under humidity swings and unaffected by water.
Wood Plastic Composite: vinyl core with wood flour and foaming agents. Softer and warmer underfoot than SPC, and less dimensionally stable.
Luxury Vinyl Plank: multi-layer vinyl flooring in plank format. Fully waterproof as a material, though the subfloor beneath still governs installation.
Abrasion Class rating for laminate wear resistance, from AC1 to AC6. AC4 suits normal residential use; AC5 handles heavy traffic and light commercial.
A sheet layer placed between slab and flooring to block ground moisture vapor. Required over slab-on-grade construction regardless of surface dryness.
Foundation type where the concrete slab sits directly on the ground, dominant in Florida residential construction. Ground moisture migrates upward continuously.
The permitted deviation of a subfloor across a given span. The common benchmark is 3/16 inch over 10 feet; beyond that, deviation transfers into the locking joints.
A pourable cement-based compound that flows to a level surface, used to correct slab deviation. Needs 24 to 72 hours of cure before flooring goes down.
The 8 to 10 mm clearance left between a floating floor and every fixed vertical surface, absorbing seasonal expansion. Bridging it transfers stress to the joints.
Conditioning flooring material inside the room where it will be installed, 48 to 72 hours before installation, so it reaches interior temperature and humidity.
An angle-in locking profile that joins planks without adhesive. The insertion angle is specified by the manufacturer; forcing it deforms the profile permanently.
The raised ridge that forms along plank edges when a floating floor expands without room to move. In Florida the usual causes are slab moisture or a bridged expansion gap.