
The One-Third Staggering Rule: Why Joint Offset Prevents Floor Failure

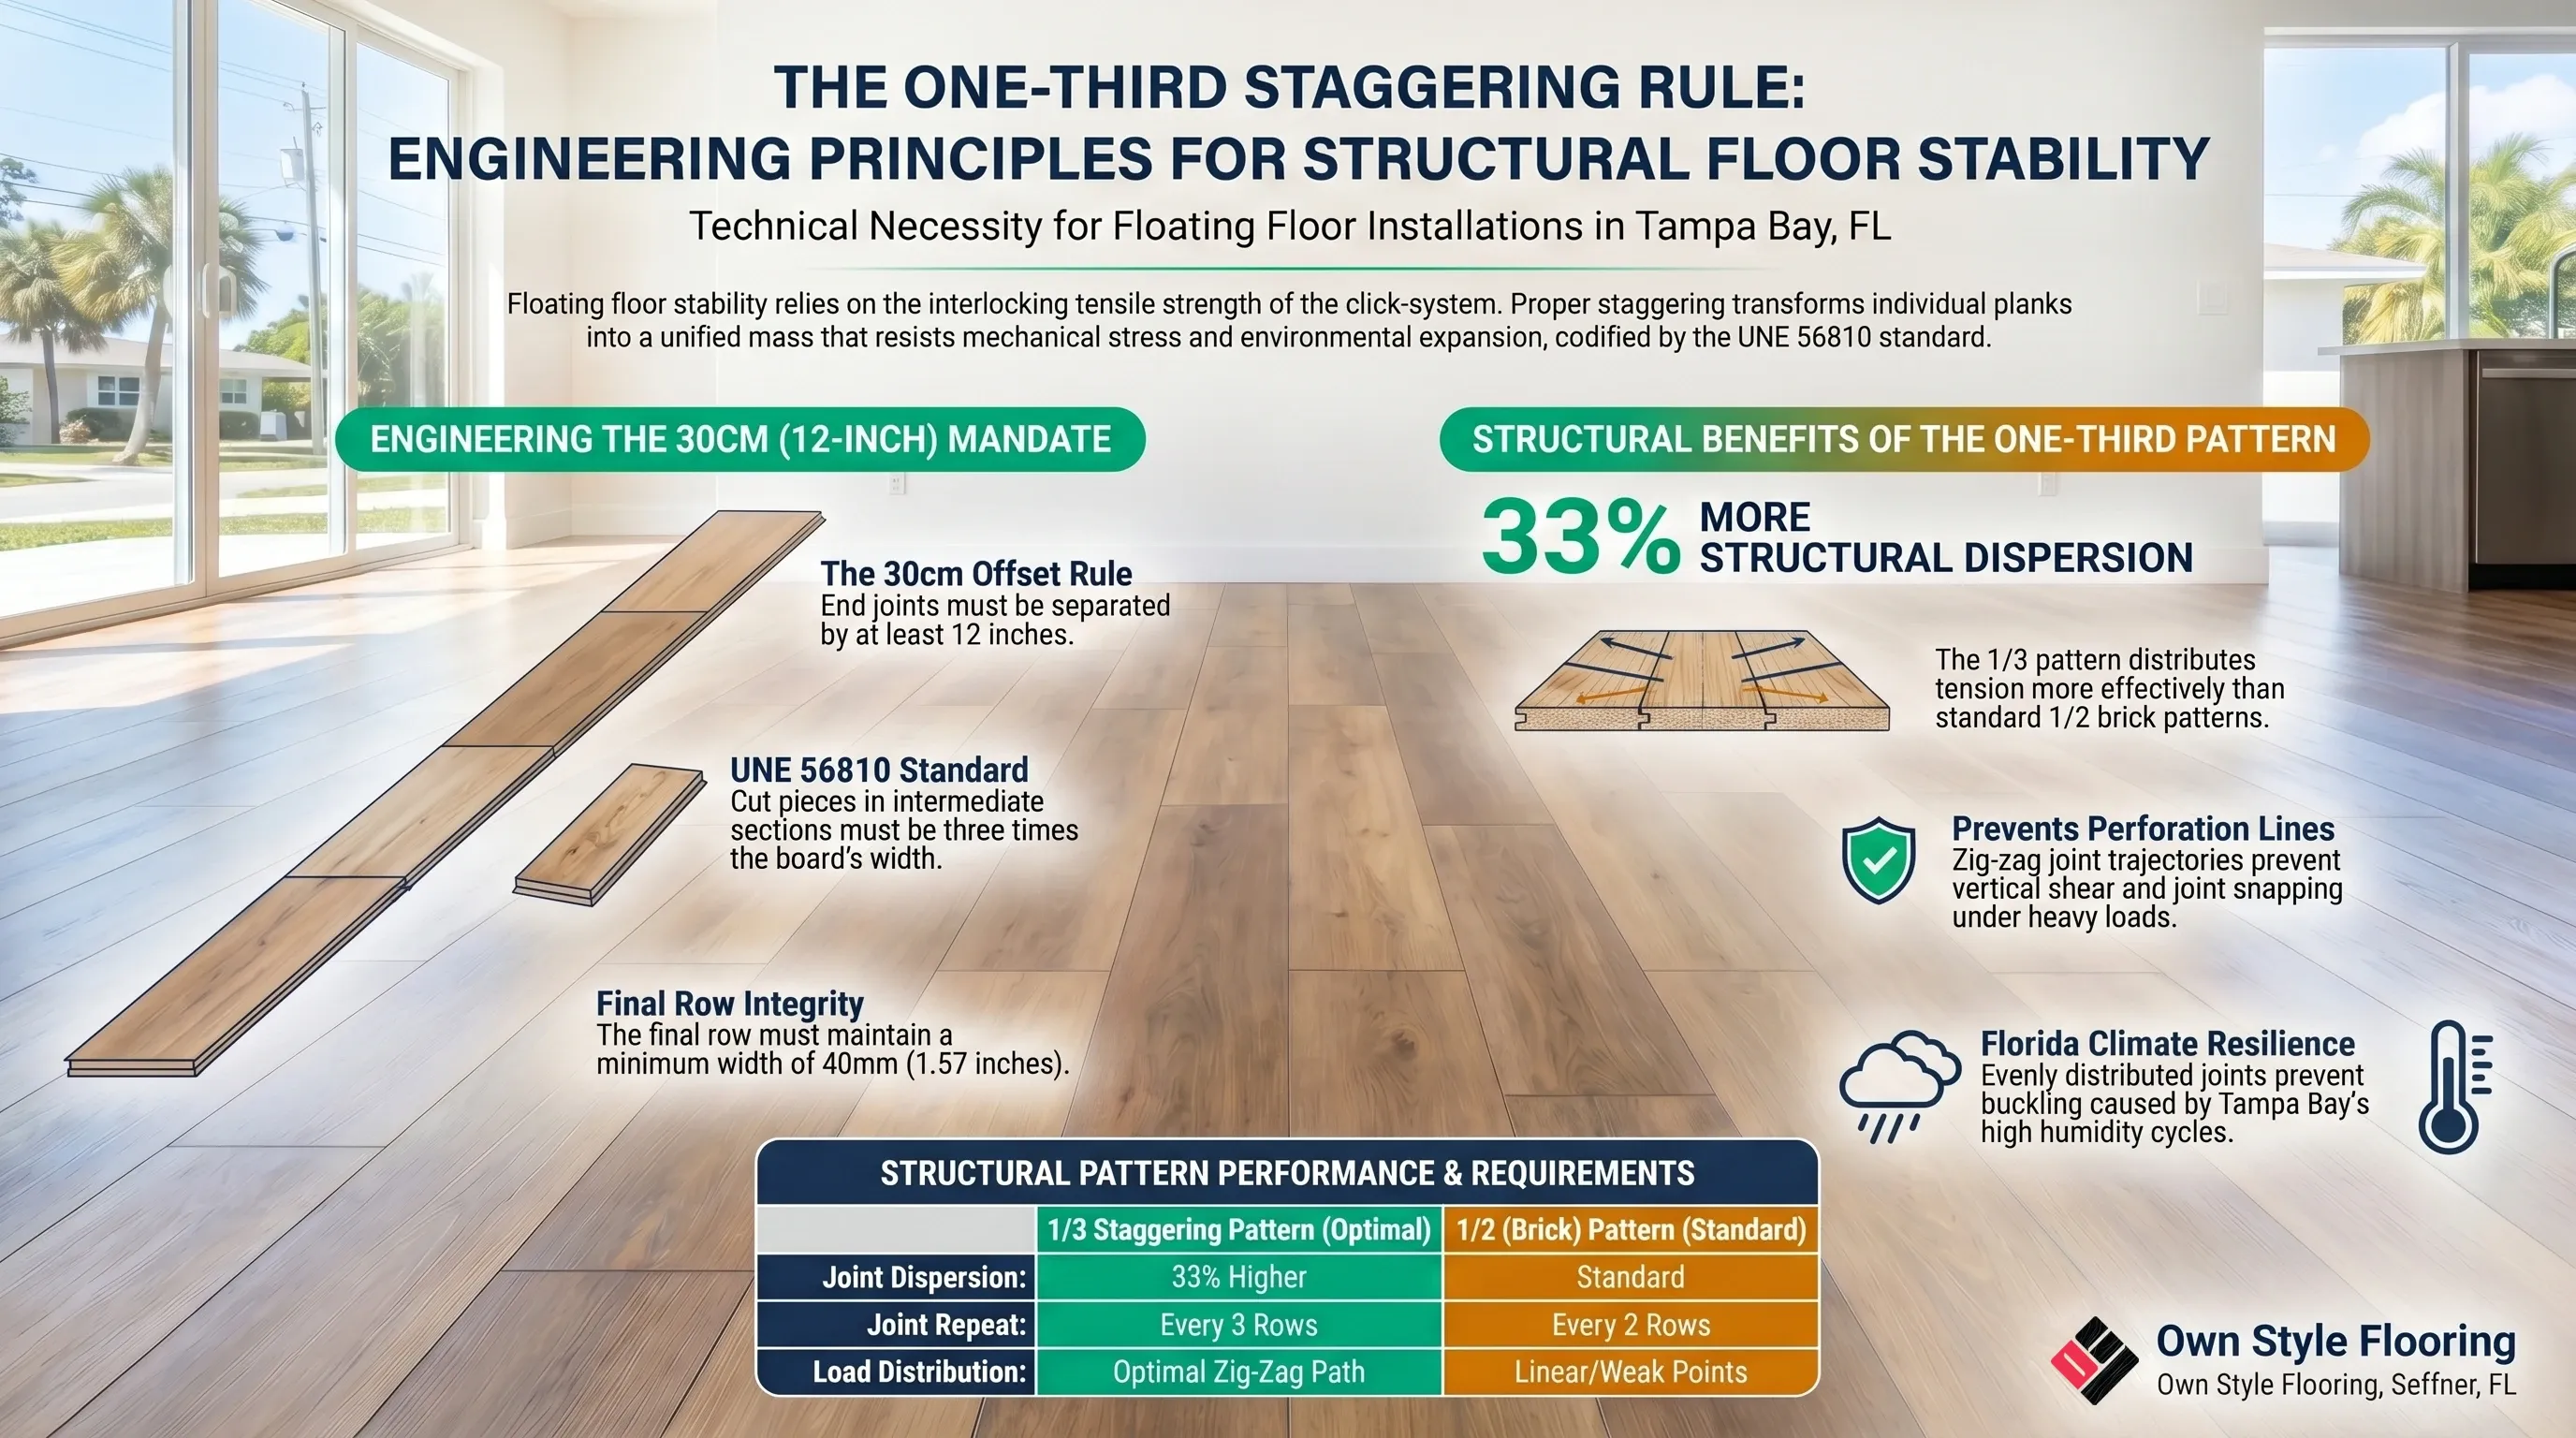
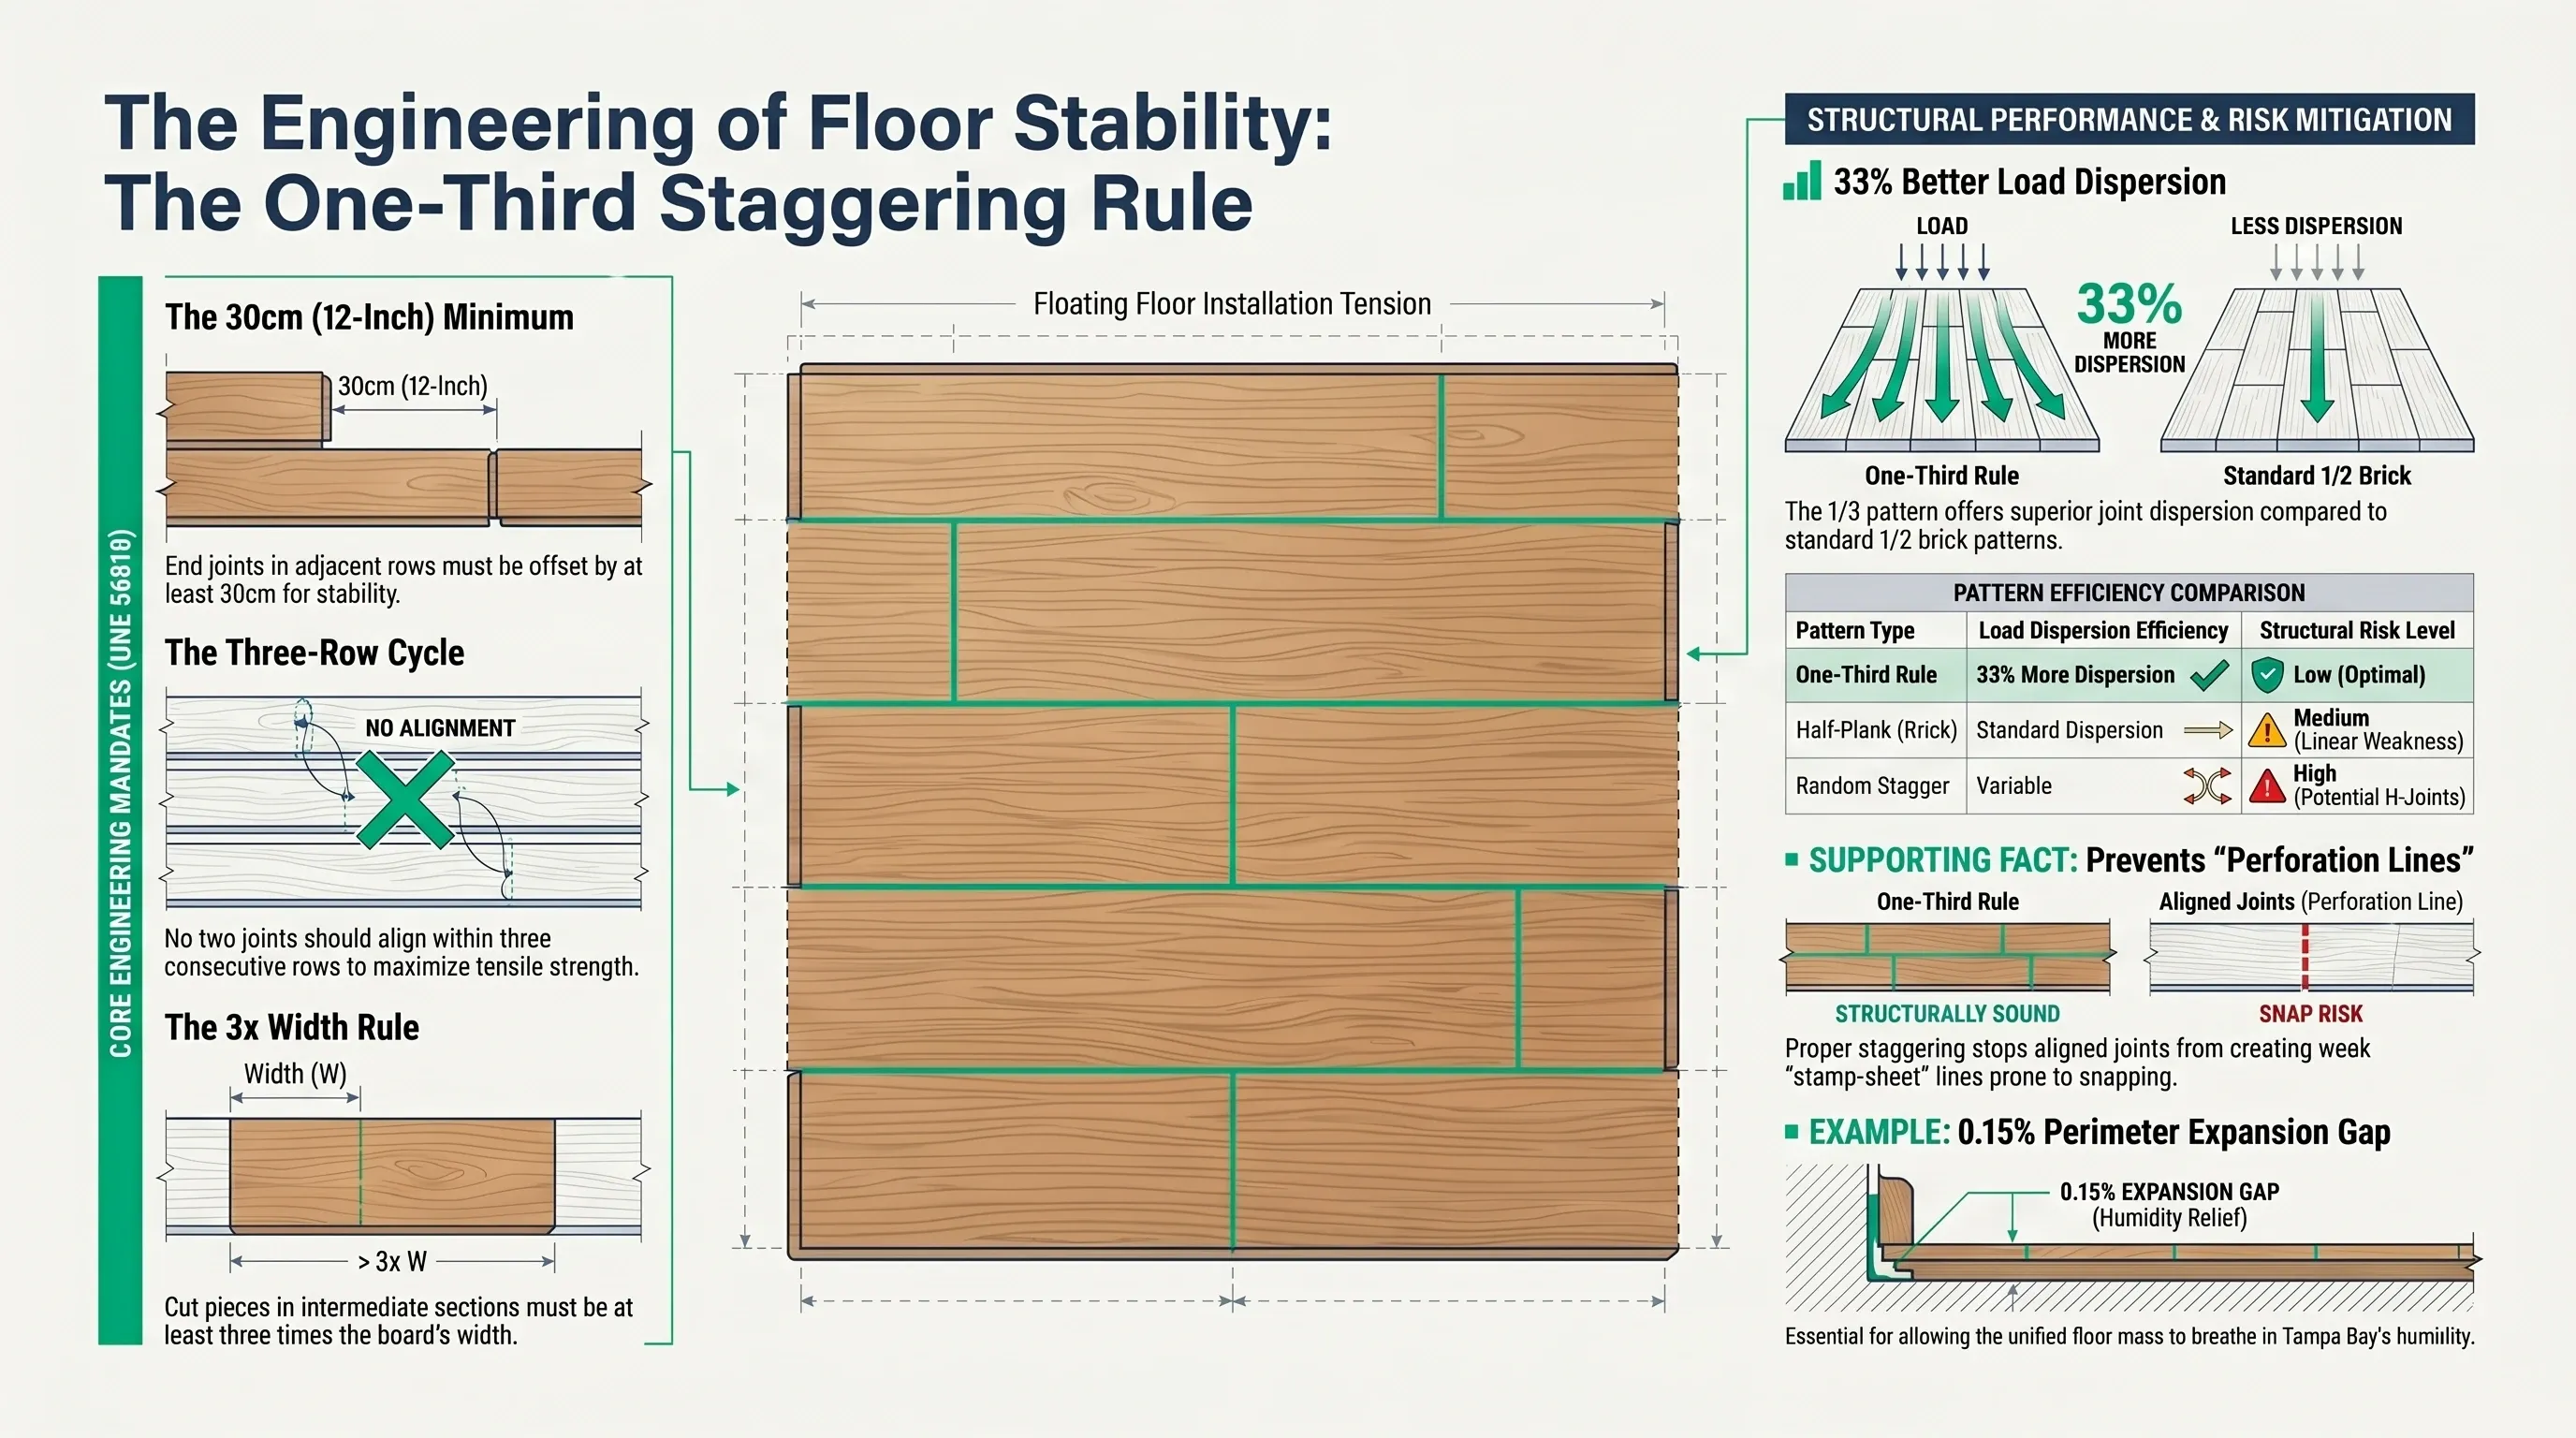
The one-third staggering rule requires that end joints in adjacent laminate rows are offset by at least 30 cm, roughly 12 inches, with no two joints aligning within three consecutive rows — a specific pattern codified in EN 13329 Point 5, not a general guideline.
In Brandon, Riverview, and other Tampa Bay homes, where floating floors expand and contract as a unified mass through daily humidity cycles, correct stagger distributes structural load across the entire floor surface. Poor stagger creates perforation lines — linear weak zones where click-lock joints concentrate expansion force until the tongue-and-groove profile fractures under foot traffic or furniture weight.
Why Does a Floating Floor Depend on Joint Geometry Rather Than Adhesive?
A floating floor derives stability from collective mass, friction against the subfloor, and the interlocking tensile strength of the click-lock system — not from any mechanical bond to the subfloor surface. This assembly functions as a single structural diaphragm only when joints are correctly offset.
Each plank transfers load laterally to its neighbors through the click profile. When joints are staggered correctly, a localized load — such as a 200-lb piece of furniture — disperses across 6–8 adjacent planks. When joints align, that same load concentrates on a single click interface, exceeding the 0.5 mm lateral tolerance of standard Uniclic profiles.
What Does the 30 cm Minimum Offset Rule Require Under EN 13329?
| Stagger requirement | EN 13329 specification | Minimum value |
|---|---|---|
| Joint offset between adjacent rows | Point 5 | 30 cm (12 inches) |
| Cut piece minimum length (intermediate rows) | Point 6 | 3× plank width |
| Final row minimum width | Professional protocol | 40 mm (1.57 inches) |
| Subfloor level tolerance | DIN 18202 / EN 13329 | 2 mm over 1 m span |
The standard also requires that the final row must not measure less than 40 mm in width; if preliminary calculations produce a narrower remainder, the first row must be pre-trimmed so the first and last rows balance at equal widths.
How Do H-Joints and Perforation Lines Form?
H-joints form when end joints in every other row align in the same position — creating a continuous “H” shape across two adjacent rows visible from above. Perforation lines form when small, repeated offsets (under 10 cm) create a diagonal chain of closely spaced joints across multiple rows.
Both defects create paths of minimum resistance through the floor diaphragm. In open-plan layouts exceeding 40 sqm, H-joints and perforation lines fail first in the center of the room, where perimeter expansion gaps provide no structural relief.
Why Is the One-Third Pattern Structurally Superior to the Brick Pattern?
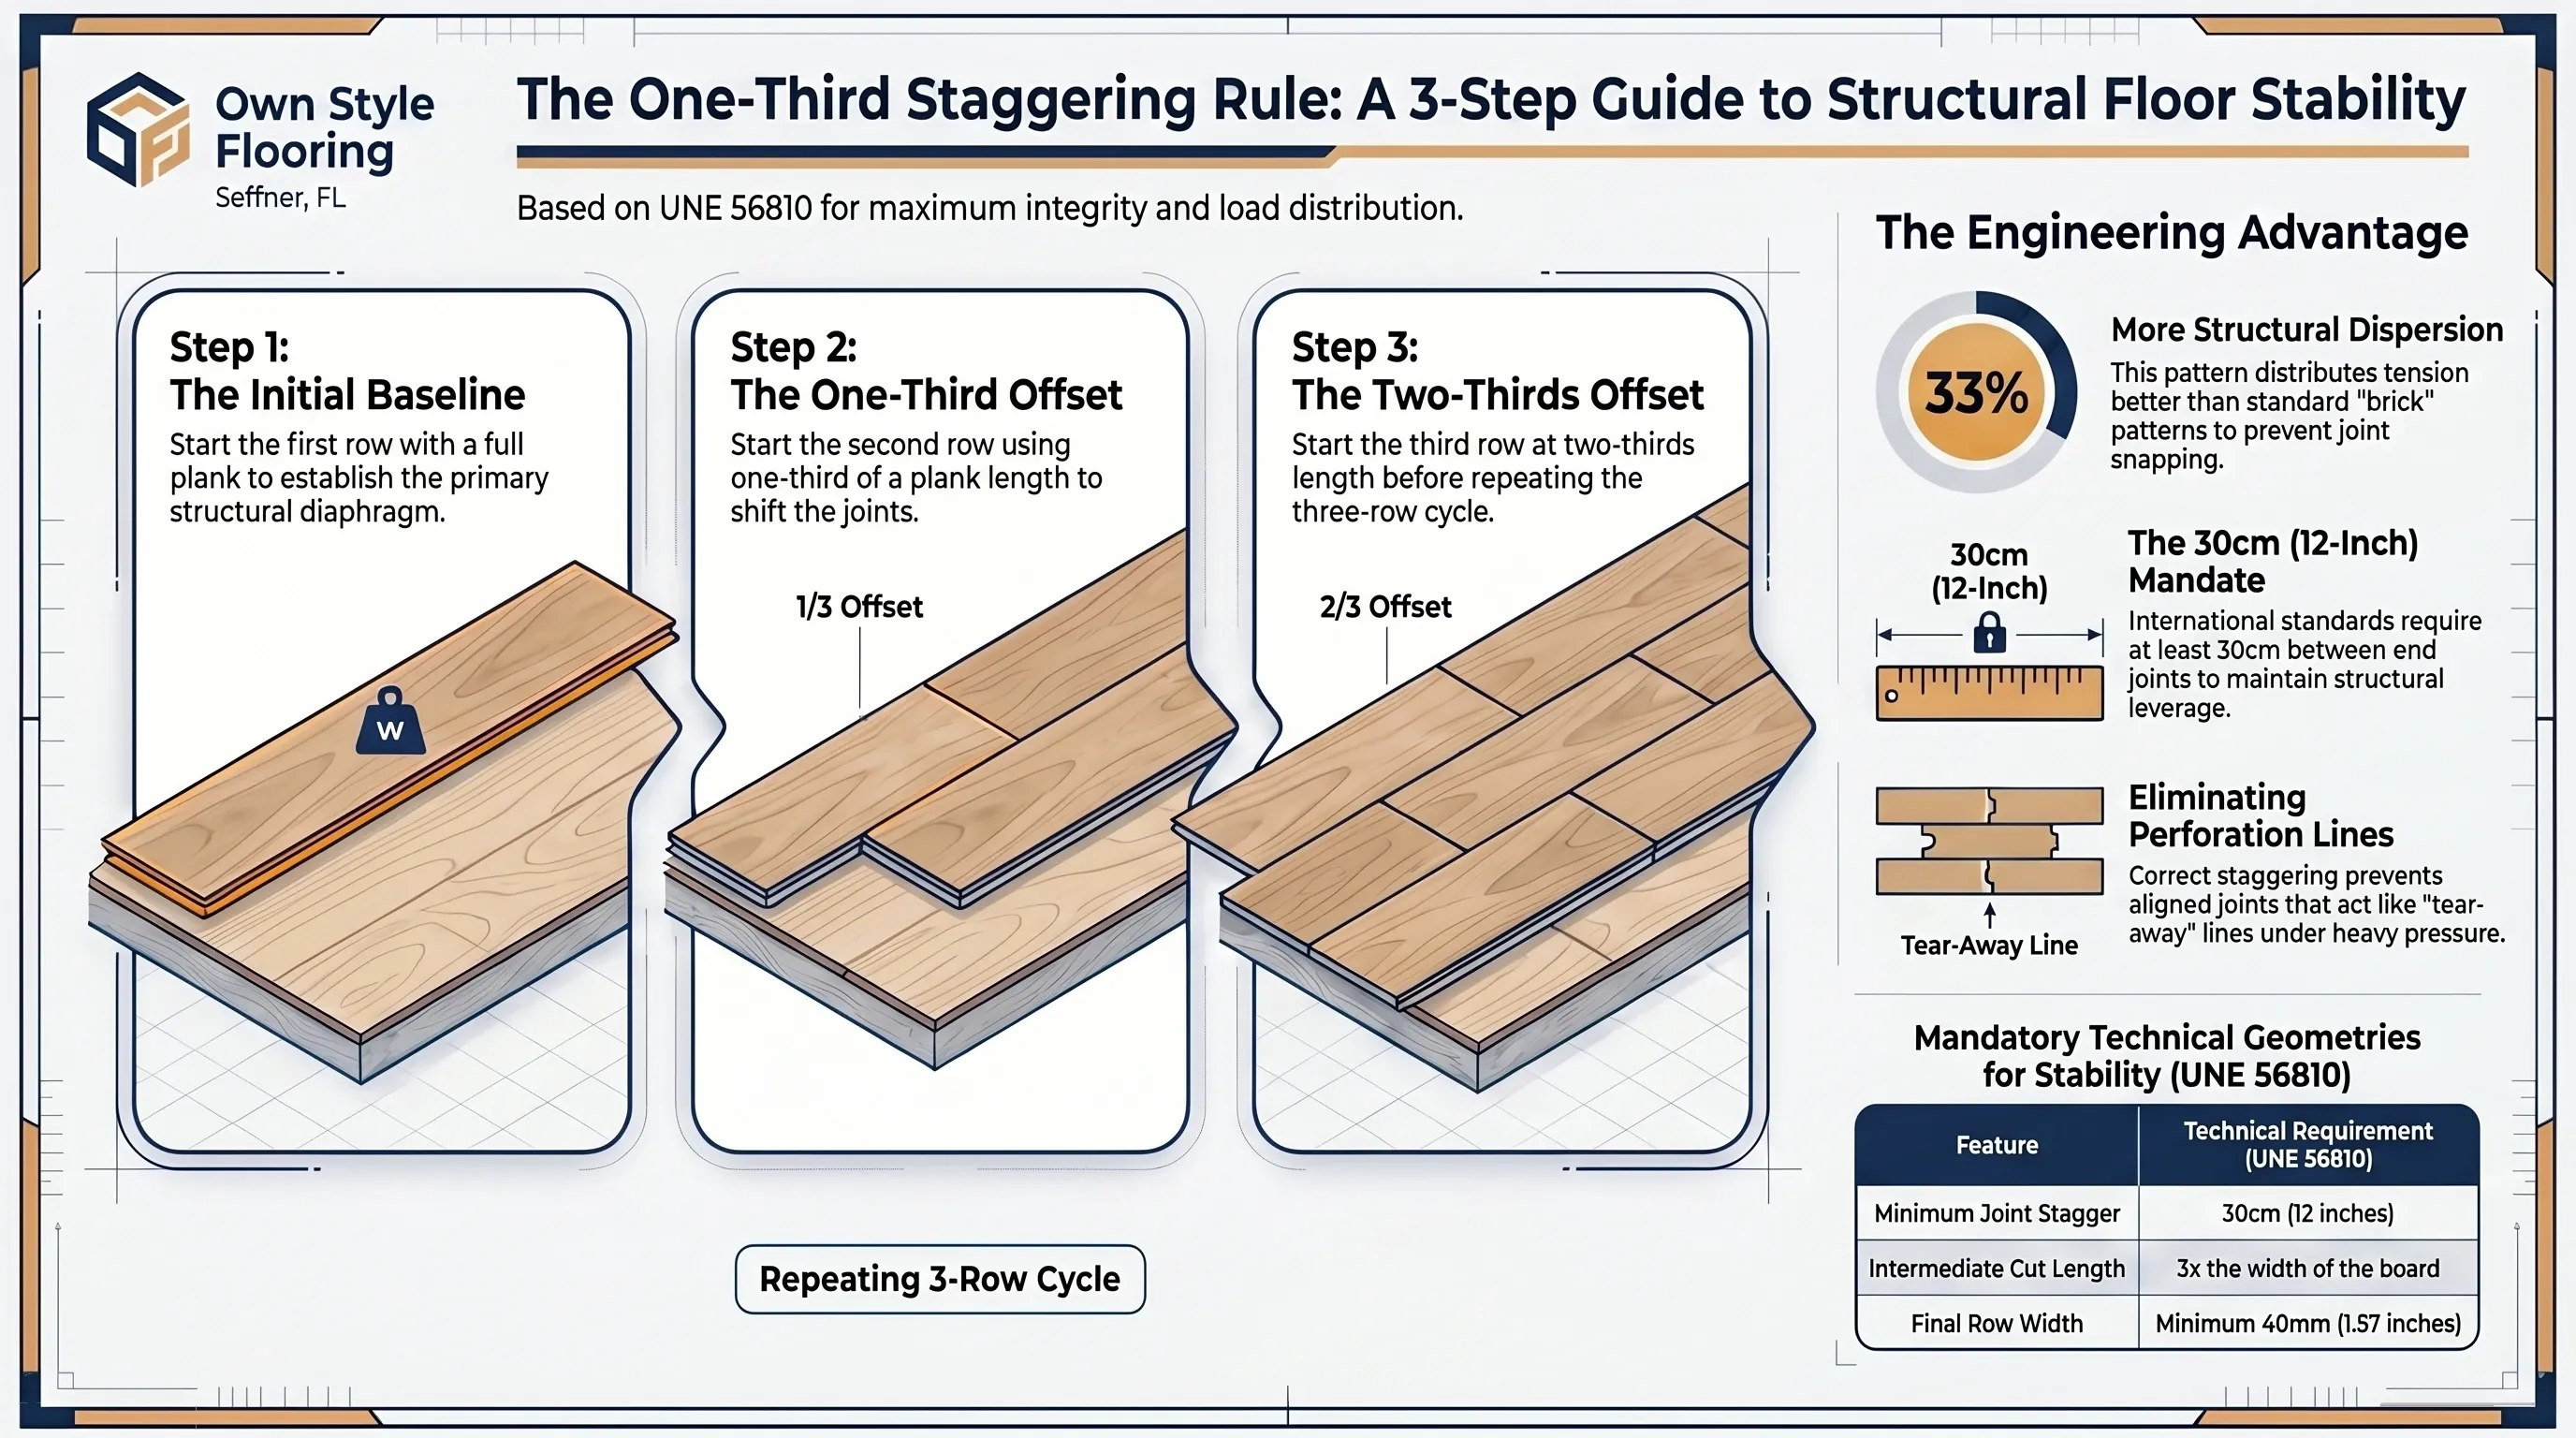
The one-third pattern requires three complete rows to repeat a joint cycle, forcing each joint line to take a long zig-zag path across the floor. The brick pattern (1/2 offset) repeats every two rows, creating joint alignment opportunities twice as frequently.
Engineering analysis of HDF floating floors shows the one-third pattern provides 33 % more joint dispersion than the brick pattern under equivalent dynamic loads — meaning the path a fracture or separation must travel is 33 % longer before reaching another joint line.
How Does Tampa Bay Humidity Amplify the Consequences of Poor Stagger?
Tampa Bay’s relative humidity averages 74 % annually and peaks above 80 % during June through September (NOAA data). A floating laminate floor responds to these cycles as a unified mass: every plank expands toward the perimeter simultaneously, generating internal compression forces that the click-lock system must absorb.
In a correctly staggered floor, those forces distribute across hundreds of overlapping joints. In a floor with H-joints or perforation lines, the same forces concentrate at aligned positions — producing peaking or horizontal gap opening within 6–18 months of the first wet season.
What Subfloor Conditions Cause Correct Stagger to Fail Prematurely?
A correctly staggered floor fails prematurely when the subfloor exceeds the 2 mm tolerance over a 1-meter span required by DIN 18202 and EN 13329. High spots create concentrated contact pressure between the plank back and the subfloor surface, generating micro-movement at the click joints with every footstep.
Subfloor moisture exceeding 2.0% CM (Carbide Method) further compromises click-joint integrity by causing HDF core swelling that exceeds the stagger geometry’s designed tolerances.
The CM (calcium carbide) method is the European reference, standardized under DIN 18560-4. In the United States the governing standards are different instruments measuring different quantities: ASTM F2170 reads relative humidity inside the slab through in-situ probes set at 40% of slab depth, with a ceiling of 75% RH under ASTM F710, and ASTM F1869 measures surface moisture vapor emission with anhydrous calcium chloride, with a ceiling of 3 lb per 1,000 sq ft per 24 hours. The three readings are not convertible into one another.
What Should an Installer Check Before Starting the First Row?
A pre-installation check catches stagger and subfloor problems before they become embedded in the finished floor, when correcting them still just means adjusting a chalk line rather than tearing up planks.
- Confirm plank box count includes enough length variation to avoid running out of full-length boards mid-row, which forces short off-cuts into positions where they violate the 30 cm minimum
- Verify subfloor flatness at multiple points with a straightedge, not just visually, since a 2 mm deviation is often invisible to the eye
- Dry-lay the first three rows without locking them to confirm no joint alignment occurs before committing any plank permanently
- Mark the room’s expansion gap at 0.15 % of total dimension before the first row goes down, not after
- Check that ordered material includes the standard 5–10 % waste allowance for cut pieces that fall under the 30 cm reuse threshold
Does the One-Third Rule Change for LVP or Only Apply to Laminate?
The same structural logic applies to click-lock LVP, though the failure consequences differ from laminate. LVP’s SPC or WPC core does not swell from moisture the way an HDF core does, so poor stagger in LVP produces joint fatigue and eventual click disengagement rather than the peaking and swelling seen in laminate.
Most LVP manufacturers reference the same 30 cm minimum offset and three-row rule from EN 13329, since the geometry of load distribution through a click-lock joint is identical regardless of core material. A Tampa Bay installer who applies the one-third rule correctly on laminate should apply the same standard on LVP without adjustment.
Planning a flooring project in Tampa Bay? Every quote starts with a moisture reading of the slab, at no cost. Get your free photo estimate or call (813) 455-5756.
Frequently asked questions
What is the minimum joint offset required by EN 13329 for laminate flooring?
EN 13329 Point 5 requires a minimum 30 cm (12-inch) offset between end joints in adjacent rows, with no joint alignment within three consecutive rows. Cut pieces used in intermediate rows must be at least three times the plank width in length.
Can I use the cut-off piece from one row to start the next?
Cut-off pieces can start the next row if they meet two conditions: minimum 30 cm length and — for intermediate rows — a length at least three times the plank width per EN 13329 Point 6. A 25 cm off-cut cannot be reused. Reusing short pieces is the most common source of H-joints in DIY installations.
Why does the final row need a minimum width of 40 mm?
A final row narrower than 40 mm lacks the structural depth to maintain click engagement under lateral expansion forces. In open-plan homes where floors span 8+ meters, a thin final row delaminates from its neighbor within one full seasonal cycle.
Does the staggering pattern affect the expansion gap at the perimeter?
The staggering pattern does not change the perimeter gap calculation. The gap is calculated at 0.15 % of the room's total dimension, with an absolute minimum of 12 mm for rooms exceeding 8 meters per EN 13329. Stagger and perimeter gap are independent mandatory requirements.
What happens to a floor with poor stagger during Tampa Bay's wet season?
A floor with H-joints or sub-30 cm offsets develops peaking — vertical lifting at joint lines — within 6–18 months. As June–September humidity exceeds 80 %, the floating mass expands simultaneously, concentrating force at aligned joint positions and pushing planks upward or forcing horizontal gaps.



US standard for measuring relative humidity inside a concrete slab using in-situ probes drilled to 40% of slab depth, read after 72 hours of equilibration.
US standard for measuring moisture vapor emission from a concrete slab using anhydrous calcium chloride, expressed in pounds per 1,000 sq ft per 24 hours.
US standard practice for preparing concrete floors to receive resilient flooring. Covers flatness, cleanliness, and moisture condition before installation.
The building code in force across Florida, including moisture and structural requirements that apply to slab-on-grade residential construction.
European deep-core moisture test that reacts a slab sample with calcium carbide and reads the resulting gas pressure. Supporting knowledge: the applicable US standards are ASTM F2170 and F1869.
Supporting knowledge — not the standard we work toGerman standard series for floor screeds, source of the widely cited 2.0% CM cement and 0.5% CM anhydrite thresholds. Supporting knowledge, not the applicable US standard.
Supporting knowledge — not the standard we work toHigh-Density Fiberboard: the compressed wood-fiber core of most laminate planks. It absorbs water vapor and swells irreversibly, which is why slab moisture matters.
Stone Plastic Composite: rigid vinyl core made of limestone powder and PVC. Dimensionally stable under humidity swings and unaffected by water.
Wood Plastic Composite: vinyl core with wood flour and foaming agents. Softer and warmer underfoot than SPC, and less dimensionally stable.
Luxury Vinyl Plank: multi-layer vinyl flooring in plank format. Fully waterproof as a material, though the subfloor beneath still governs installation.
Abrasion Class rating for laminate wear resistance, from AC1 to AC6. AC4 suits normal residential use; AC5 handles heavy traffic and light commercial.
A sheet layer placed between slab and flooring to block ground moisture vapor. Required over slab-on-grade construction regardless of surface dryness.
Foundation type where the concrete slab sits directly on the ground, dominant in Florida residential construction. Ground moisture migrates upward continuously.
The permitted deviation of a subfloor across a given span. The common benchmark is 3/16 inch over 10 feet; beyond that, deviation transfers into the locking joints.
A pourable cement-based compound that flows to a level surface, used to correct slab deviation. Needs 24 to 72 hours of cure before flooring goes down.
The 8 to 10 mm clearance left between a floating floor and every fixed vertical surface, absorbing seasonal expansion. Bridging it transfers stress to the joints.
Conditioning flooring material inside the room where it will be installed, 48 to 72 hours before installation, so it reaches interior temperature and humidity.
An angle-in locking profile that joins planks without adhesive. The insertion angle is specified by the manufacturer; forcing it deforms the profile permanently.
The raised ridge that forms along plank edges when a floating floor expands without room to move. In Florida the usual causes are slab moisture or a bridged expansion gap.