
Installing Herringbone Laminate Flooring: Technical Alignment Guide

Installing laminate in a herringbone pattern requires purpose-built planks with mirrored locking systems — labeled Type A and Type B — and a precise reference line snapped from the mathematical center of the room, not from a wall. Every other step in the process depends on getting this starting geometry right.
Standard laminate cannot be forced into a herringbone layout without fracturing the click joints. In Brandon, Riverview, and other Tampa Bay homes, where walls are rarely perfectly square due to slab settlement and construction tolerances, starting from a wall produces a drifting pattern that becomes visibly skewed within the first few rows. The center-line approach, combined with a weighted starter row, is the only method that maintains geometric accuracy across a full room and ensures the perimeter triangles close at a balanced width on both sides.
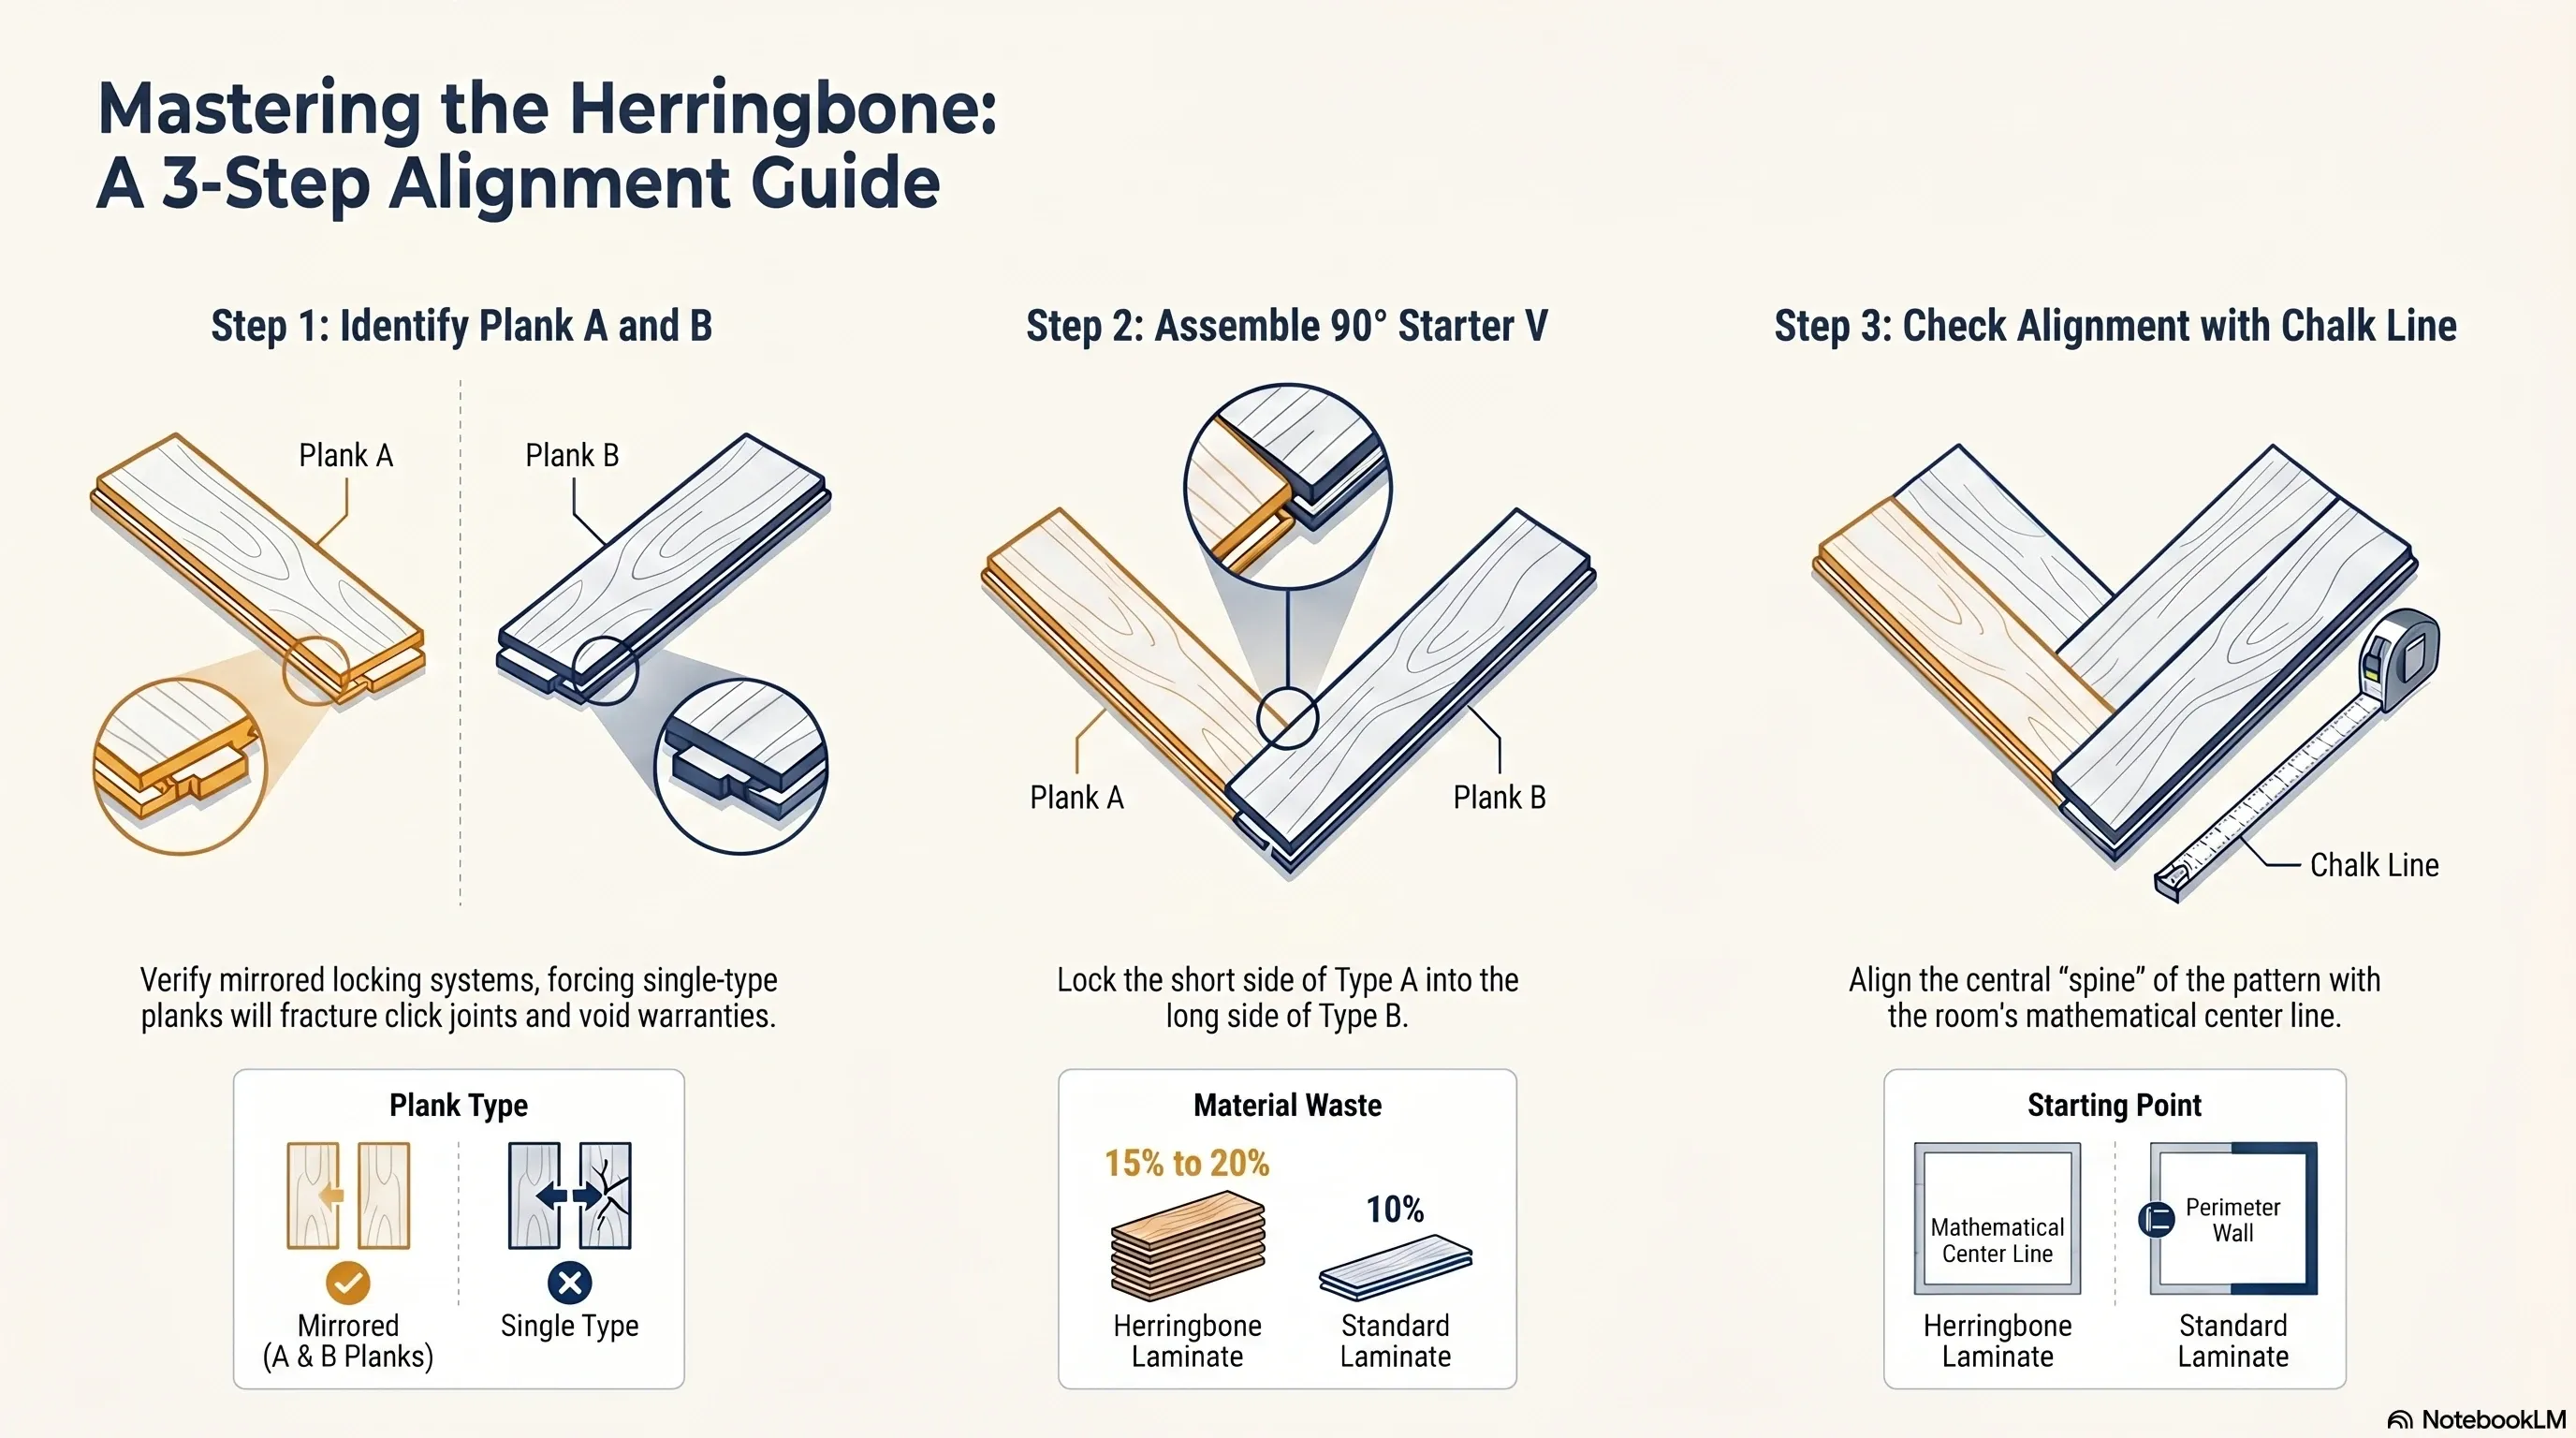
The Geometry of the Pattern: Planks A and B
Modern herringbone laminate requires two different types of planks — mirror images of each other’s locking systems. The first technical check is to verify the ratio of A to B planks in the delivery. Attempting to force a single-type plank into a herringbone pattern breaks the click joints and voids the warranty.
The pattern is created by connecting the short side of a Type A plank into the long side of a Type B plank at a precise 90-degree angle. Each pair forms one “V” element. Consecutive V elements build the characteristic zigzag spine that defines the herringbone aesthetic.
The Center Line Maneuver
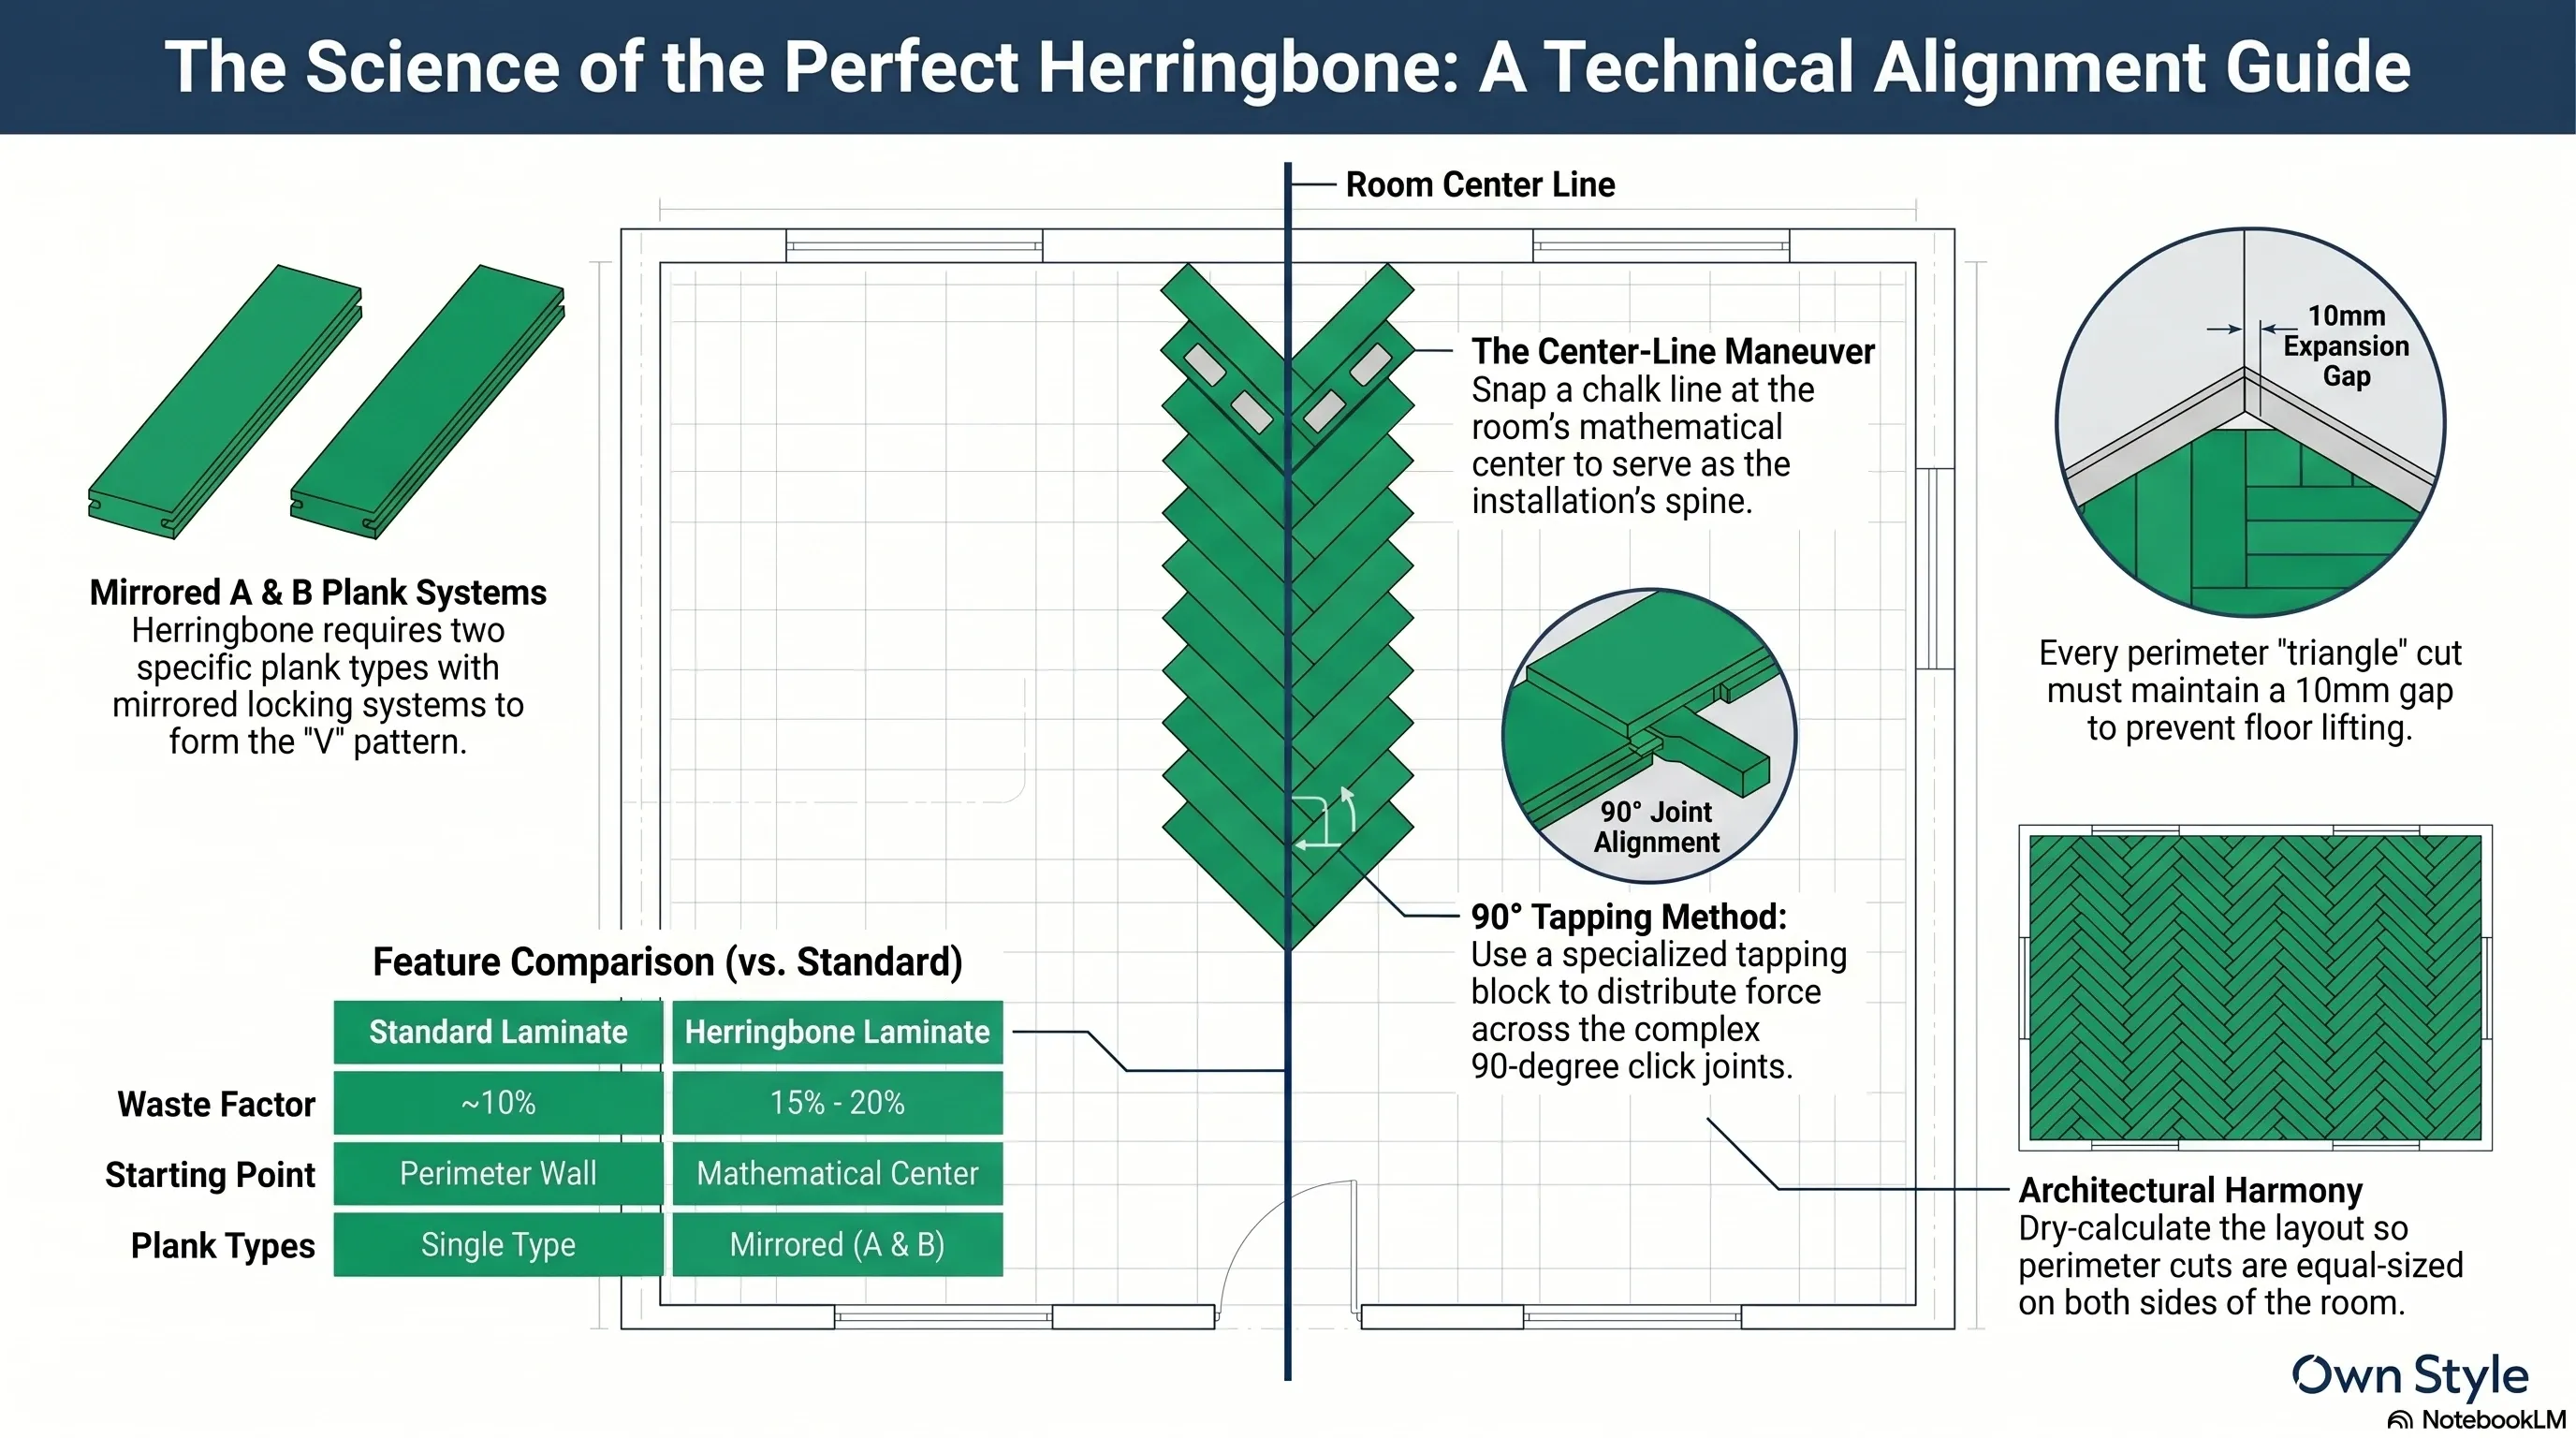
The starting line determines the entire floor’s geometric accuracy. Installation does not begin at a wall because Florida walls are rarely perfectly square. Instead, the mathematical center of the room is located and a chalk line is snapped. This line serves as the spine of the installation.
The first row of V shapes (the starter row) is built exactly along this line. Once the central spine is locked and weighted down, the rest of the floor radiates outward with significantly less risk of drifting. Any cumulative error in the starter row compounds across every subsequent row — making the chalk line the single most critical step in herringbone installation.
Specialized Clicking: The 90-Degree Lock
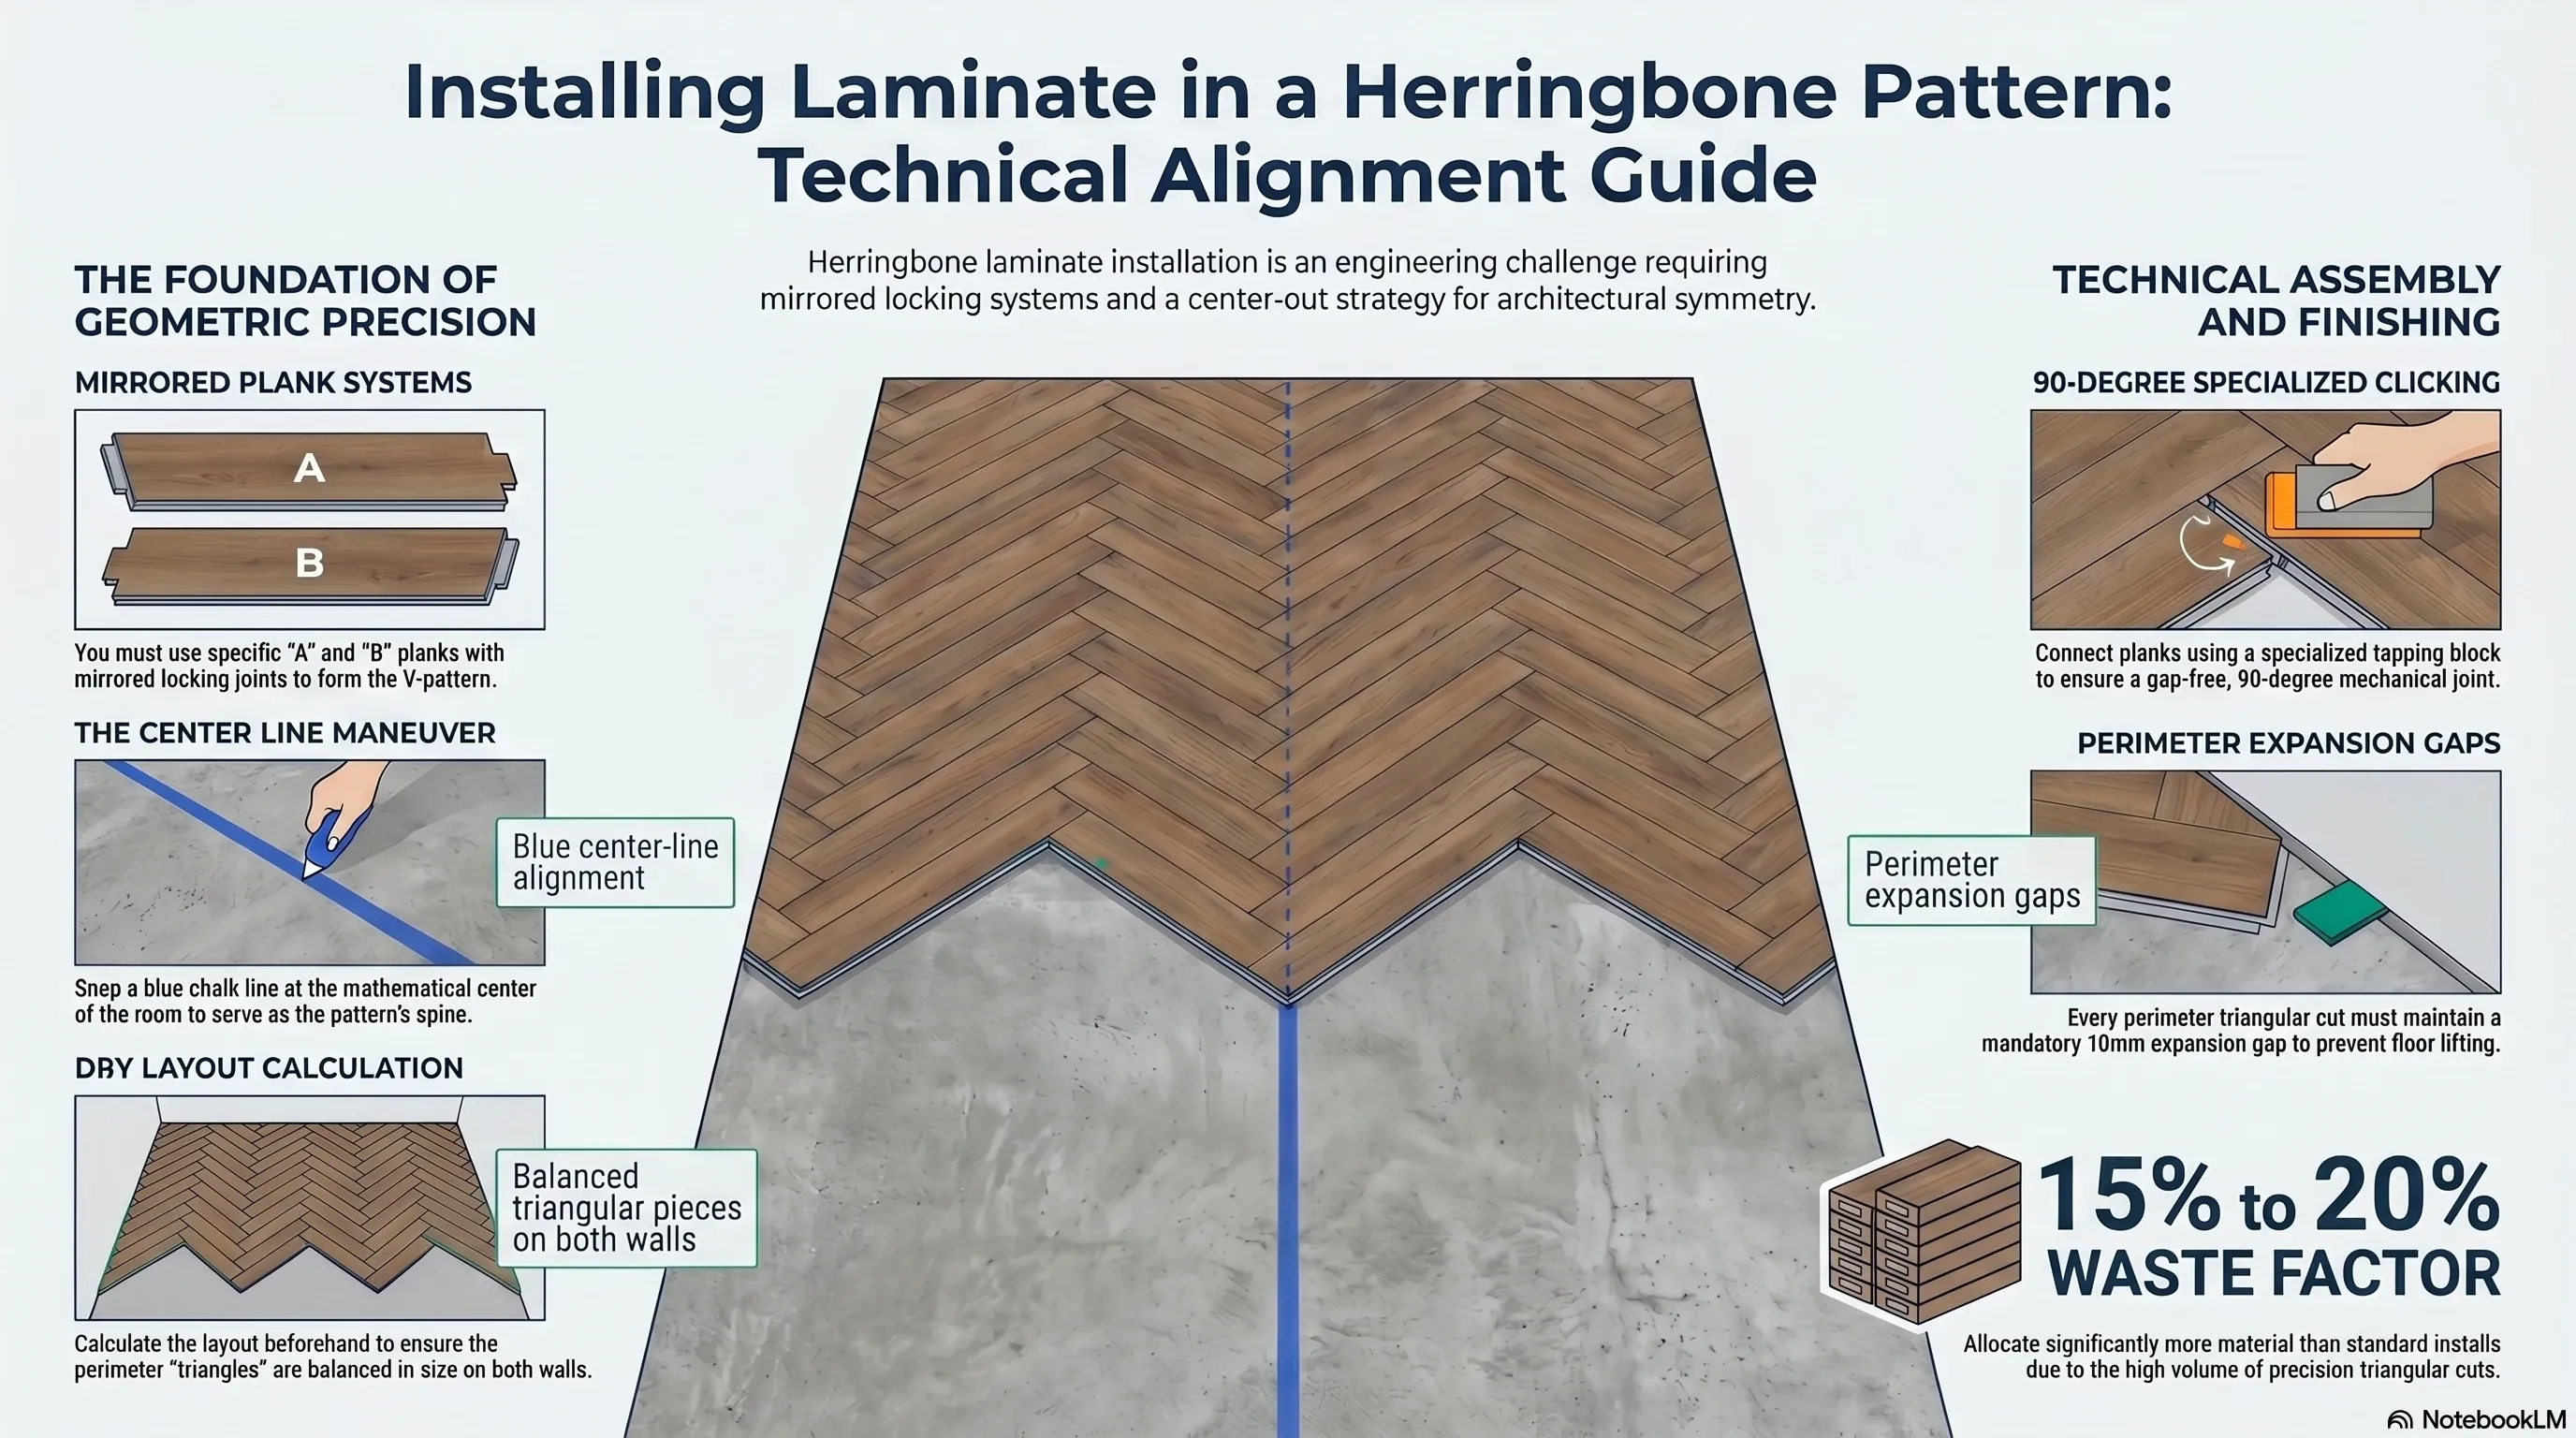
Clicking planks together at a 90-degree angle requires a different mechanical approach than standard flooring. The Method B (Tapping) approach is used for many herringbone joints. Because planks cannot always be angled into place when surrounded by other V shapes, a specialized herringbone tapping block distributes the force of the mallet evenly across the complex joint, ensuring a gap-free connection in every direction.
The tapping block for herringbone differs from standard blocks: it must engage both the short-side and long-side profiles simultaneously without applying uneven pressure that would shift the 90-degree alignment.
Managing Perimeter Triangles
The biggest challenge in herringbone installation is the perimeter. A herringbone floor ends in hundreds of small triangular cuts at every wall. Each triangle must maintain the mandatory 10 mm expansion gap per EN 13329.
Professional protocol involves measuring each triangle individually and using a sliding miter saw for precision. Rushing these cuts leads to locking the floor against the wall, which causes the center of the pattern to lift as humidity rises during the Tampa Bay wet season.
The expansion gap at perimeter triangles must account for the diagonal orientation of the plank — requiring 10 mm measured perpendicular to the wall, not along the plank’s diagonal face.
Visual Balance and Symmetry
In a high-end installation, the pattern must look balanced. If a full V appears on one wall and only a 2 cm sliver on the opposite wall, the room looks crooked. A dry layout calculation is performed before opening boxes — adjusting the position of the center spine so the pattern ends with roughly equal-sized pieces on both sides, creating architectural harmony.
The balancing calculation requires measuring the room width, dividing by the plank’s diagonal footprint, and shifting the center line by half a plank diagonal if the remainder produces an asymmetric result.
The Stability of the Pattern
Because of the alternating direction of planks, a herringbone floor is exceptionally stable against lateral movement. However, this same complexity means that repair is nearly impossible without dismantling a large section. Every joint must be mechanically sound from the start — there is no option for selective plank replacement as there is in straight-lay installations.
The interlocking 90-degree geometry also means that expansion forces distribute in two directions simultaneously, which reduces peaking risk compared to straight-lay patterns of equal area. However, the same two-directional geometry concentrates stress at the V apex points, making correct subfloor preparation — 2 mm over 1 m tolerance per DIN 18202 — even more critical than in standard installations on a Tampa Bay slab.
What Mistakes Most Often Ruin a Herringbone Installation?
Most herringbone failures trace back to one of a handful of repeatable errors, and nearly all of them happen before the first plank locks into place. Catching these during the dry layout stage costs nothing; catching them after installation means tearing out finished flooring.
- Skipping the dry layout and going straight to gluing or locking planks, which hides an asymmetric perimeter until the room is nearly finished
- Starting from a wall instead of the calculated center line, which compounds a small squareness error into a visibly skewed pattern by the far wall
- Using a standard tapping block instead of a herringbone-specific one, cracking the short-side profile under uneven force
- Under-ordering material below the 15–20 % waste factor, then discovering mid-installation that the replacement batch has a visible color shift
- Measuring the expansion gap along the plank’s diagonal face instead of perpendicular to the wall, which under-sizes the actual gap needed
Herringbone vs. Straight-Lay: What Actually Changes?
The pattern changes more than the finished look. Waste, labor, and repair access all shift substantially compared to a standard straight-lay laminate installation over the same subfloor.
| Factor | Straight-lay | Herringbone |
|---|---|---|
| Material waste factor | 10 % | 15–20 % |
| Labor time (300 sqft room) | ~1 day | ~2 days |
| Expansion gap requirement | 10 mm at walls | 10 mm, measured perpendicular to each diagonal cut |
| Spot repair after installation | Straightforward, single plank | Difficult, often requires dismantling a section |
| Subfloor flatness tolerance | 2 mm over 1 m (DIN 18202) | Same tolerance, higher consequence at V apex points |
Tools and Materials Checklist for Herringbone Installation
A herringbone job requires several tools that a standard straight-lay laminate installation does not, on top of the usual click-lock kit.
- Chalk line and a long steel tape measure for the center-line layout
- Sliding miter saw for precise perimeter triangle cuts
- Herringbone-specific tapping block rated for 90-degree joints
- Rubber mallet with Shore A 60–80 hardness, matching standard click-lock protocol
- 15–20 % extra material ordered upfront to cover the higher waste factor
- Painter’s tape to mark and number cut pieces during the dry layout
Planning a flooring project in Tampa Bay? Every quote starts with a moisture reading of the slab, at no cost. Get your free photo estimate or call (813) 455-5756.
Frequently asked questions
Can any laminate floor be installed in a herringbone pattern?
No. Only specifically designed herringbone laminate with mirrored 'A' and 'B' locking systems can be used. Standard laminate planks forced into a herringbone layout fracture the click joints because the locking geometry is incompatible with 90-degree assembly.
How much extra material do I need for herringbone?
Due to the many triangular cuts at the perimeter, a 15–20 % waste factor is required, compared to the 10 % usually calculated for straight-lay installations. Each wall produces dozens of unique angled off-cuts that cannot be reused.
Does herringbone take longer to install?
Yes. Because of precision alignment, specialized 90-degree clicking, and hundreds of custom perimeter cuts, herringbone installations typically require twice the labor time of a standard straight-lay floor of equal area over a concrete subfloor. A 300 sqft room that would take one day straight-lay often takes two full days in herringbone.
Why must installation start from the center line rather than a wall?
Florida walls are rarely perfectly square due to slab settlement and construction tolerances. Starting from a wall produces a drifting pattern that becomes visibly skewed within the first few rows. The center-line approach maintains geometric accuracy across the full room and ensures balanced perimeter triangles on both sides.



US standard for measuring relative humidity inside a concrete slab using in-situ probes drilled to 40% of slab depth, read after 72 hours of equilibration.
US standard for measuring moisture vapor emission from a concrete slab using anhydrous calcium chloride, expressed in pounds per 1,000 sq ft per 24 hours.
US standard practice for preparing concrete floors to receive resilient flooring. Covers flatness, cleanliness, and moisture condition before installation.
The building code in force across Florida, including moisture and structural requirements that apply to slab-on-grade residential construction.
European deep-core moisture test that reacts a slab sample with calcium carbide and reads the resulting gas pressure. Supporting knowledge: the applicable US standards are ASTM F2170 and F1869.
Supporting knowledge — not the standard we work toGerman standard series for floor screeds, source of the widely cited 2.0% CM cement and 0.5% CM anhydrite thresholds. Supporting knowledge, not the applicable US standard.
Supporting knowledge — not the standard we work toHigh-Density Fiberboard: the compressed wood-fiber core of most laminate planks. It absorbs water vapor and swells irreversibly, which is why slab moisture matters.
Stone Plastic Composite: rigid vinyl core made of limestone powder and PVC. Dimensionally stable under humidity swings and unaffected by water.
Wood Plastic Composite: vinyl core with wood flour and foaming agents. Softer and warmer underfoot than SPC, and less dimensionally stable.
Luxury Vinyl Plank: multi-layer vinyl flooring in plank format. Fully waterproof as a material, though the subfloor beneath still governs installation.
Abrasion Class rating for laminate wear resistance, from AC1 to AC6. AC4 suits normal residential use; AC5 handles heavy traffic and light commercial.
A sheet layer placed between slab and flooring to block ground moisture vapor. Required over slab-on-grade construction regardless of surface dryness.
Foundation type where the concrete slab sits directly on the ground, dominant in Florida residential construction. Ground moisture migrates upward continuously.
The permitted deviation of a subfloor across a given span. The common benchmark is 3/16 inch over 10 feet; beyond that, deviation transfers into the locking joints.
A pourable cement-based compound that flows to a level surface, used to correct slab deviation. Needs 24 to 72 hours of cure before flooring goes down.
The 8 to 10 mm clearance left between a floating floor and every fixed vertical surface, absorbing seasonal expansion. Bridging it transfers stress to the joints.
Conditioning flooring material inside the room where it will be installed, 48 to 72 hours before installation, so it reaches interior temperature and humidity.
An angle-in locking profile that joins planks without adhesive. The insertion angle is specified by the manufacturer; forcing it deforms the profile permanently.
The raised ridge that forms along plank edges when a floating floor expands without room to move. In Florida the usual causes are slab moisture or a bridged expansion gap.