
Planimetry Limits in Concrete Slabs: Correcting Uneven Subfloors Before Flooring Installation
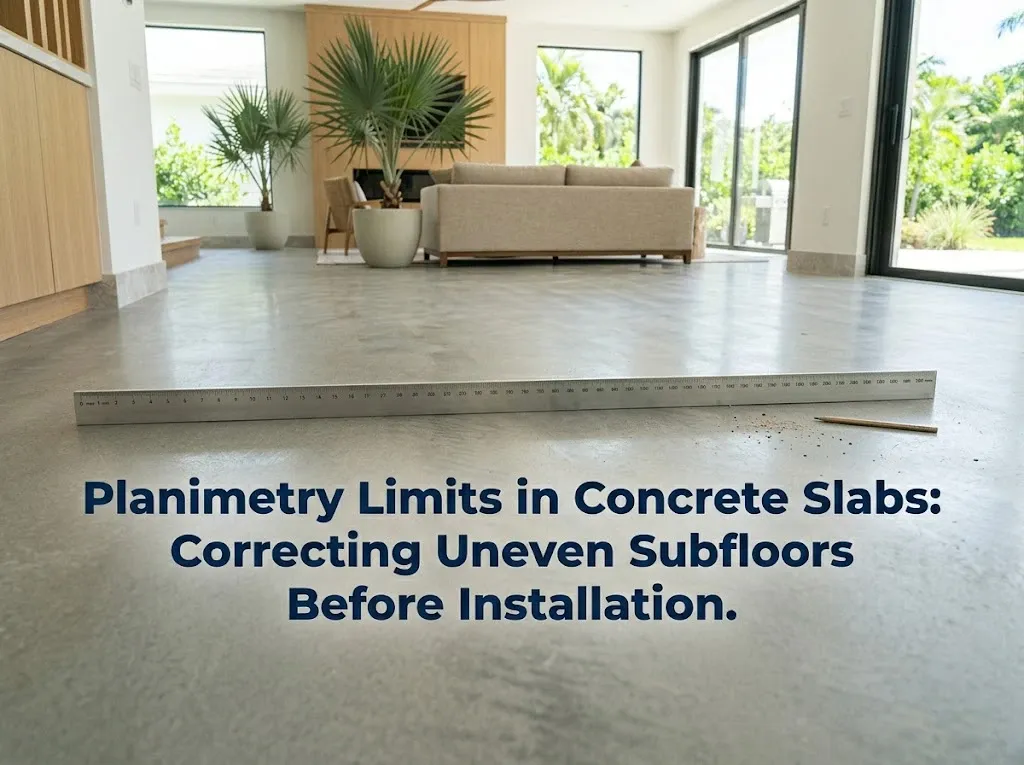
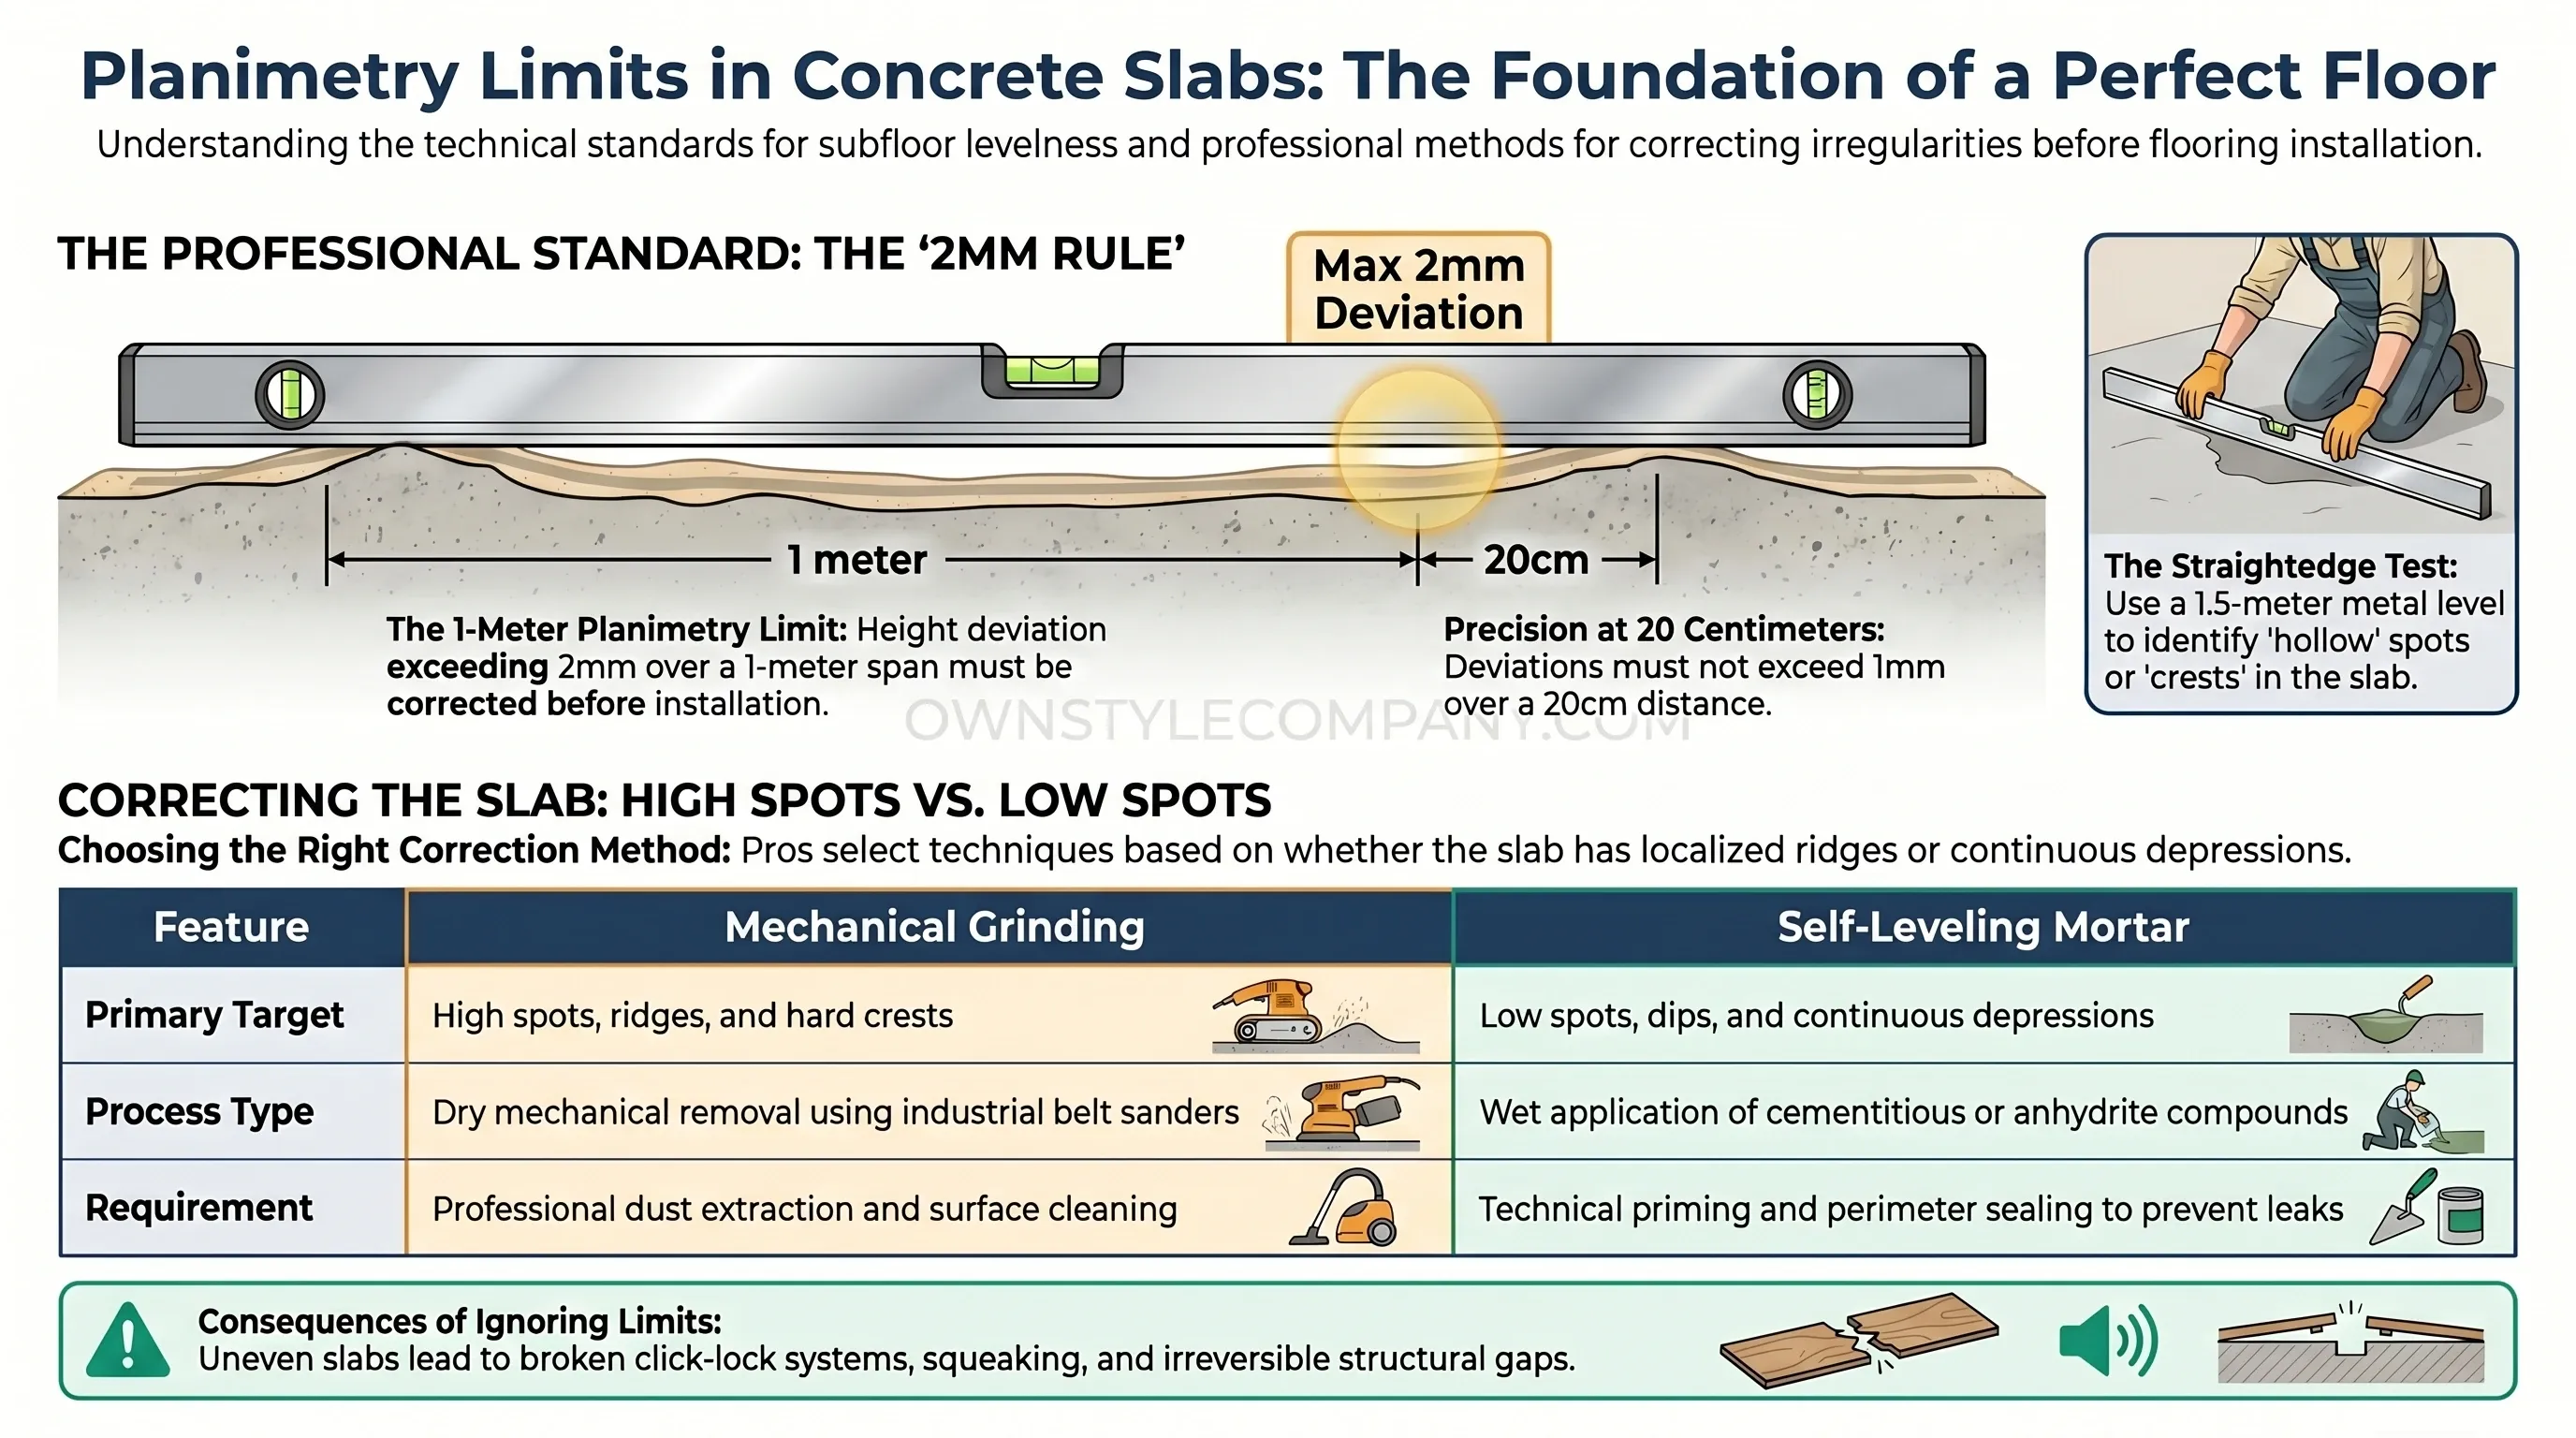
Concrete slabs must meet a planimetry tolerance of 3 mm deviation per 1 meter — or 2 mm per meter for rigid click-lock systems — before laminate installation. Measured with a straightedge per ASTM E1155 and DIN 18202, this threshold protects click-lock joints from the vertical stress created when planks bridge over valleys or ridges.
In Hillsborough County’s older housing stock, planimetry failure is the second-most frequent cause of creaking and joint damage after moisture. Settled slabs, additions poured separately from the original foundation, and patch repairs over old plumbing all produce localized peaks and valleys that a visual inspection cannot detect. A slab that looks flat to the eye regularly fails the straightedge test, because the 3 mm tolerance is tighter than what the human eye can judge.
The Flatness Rule: Why Precision Is Non-Negotiable
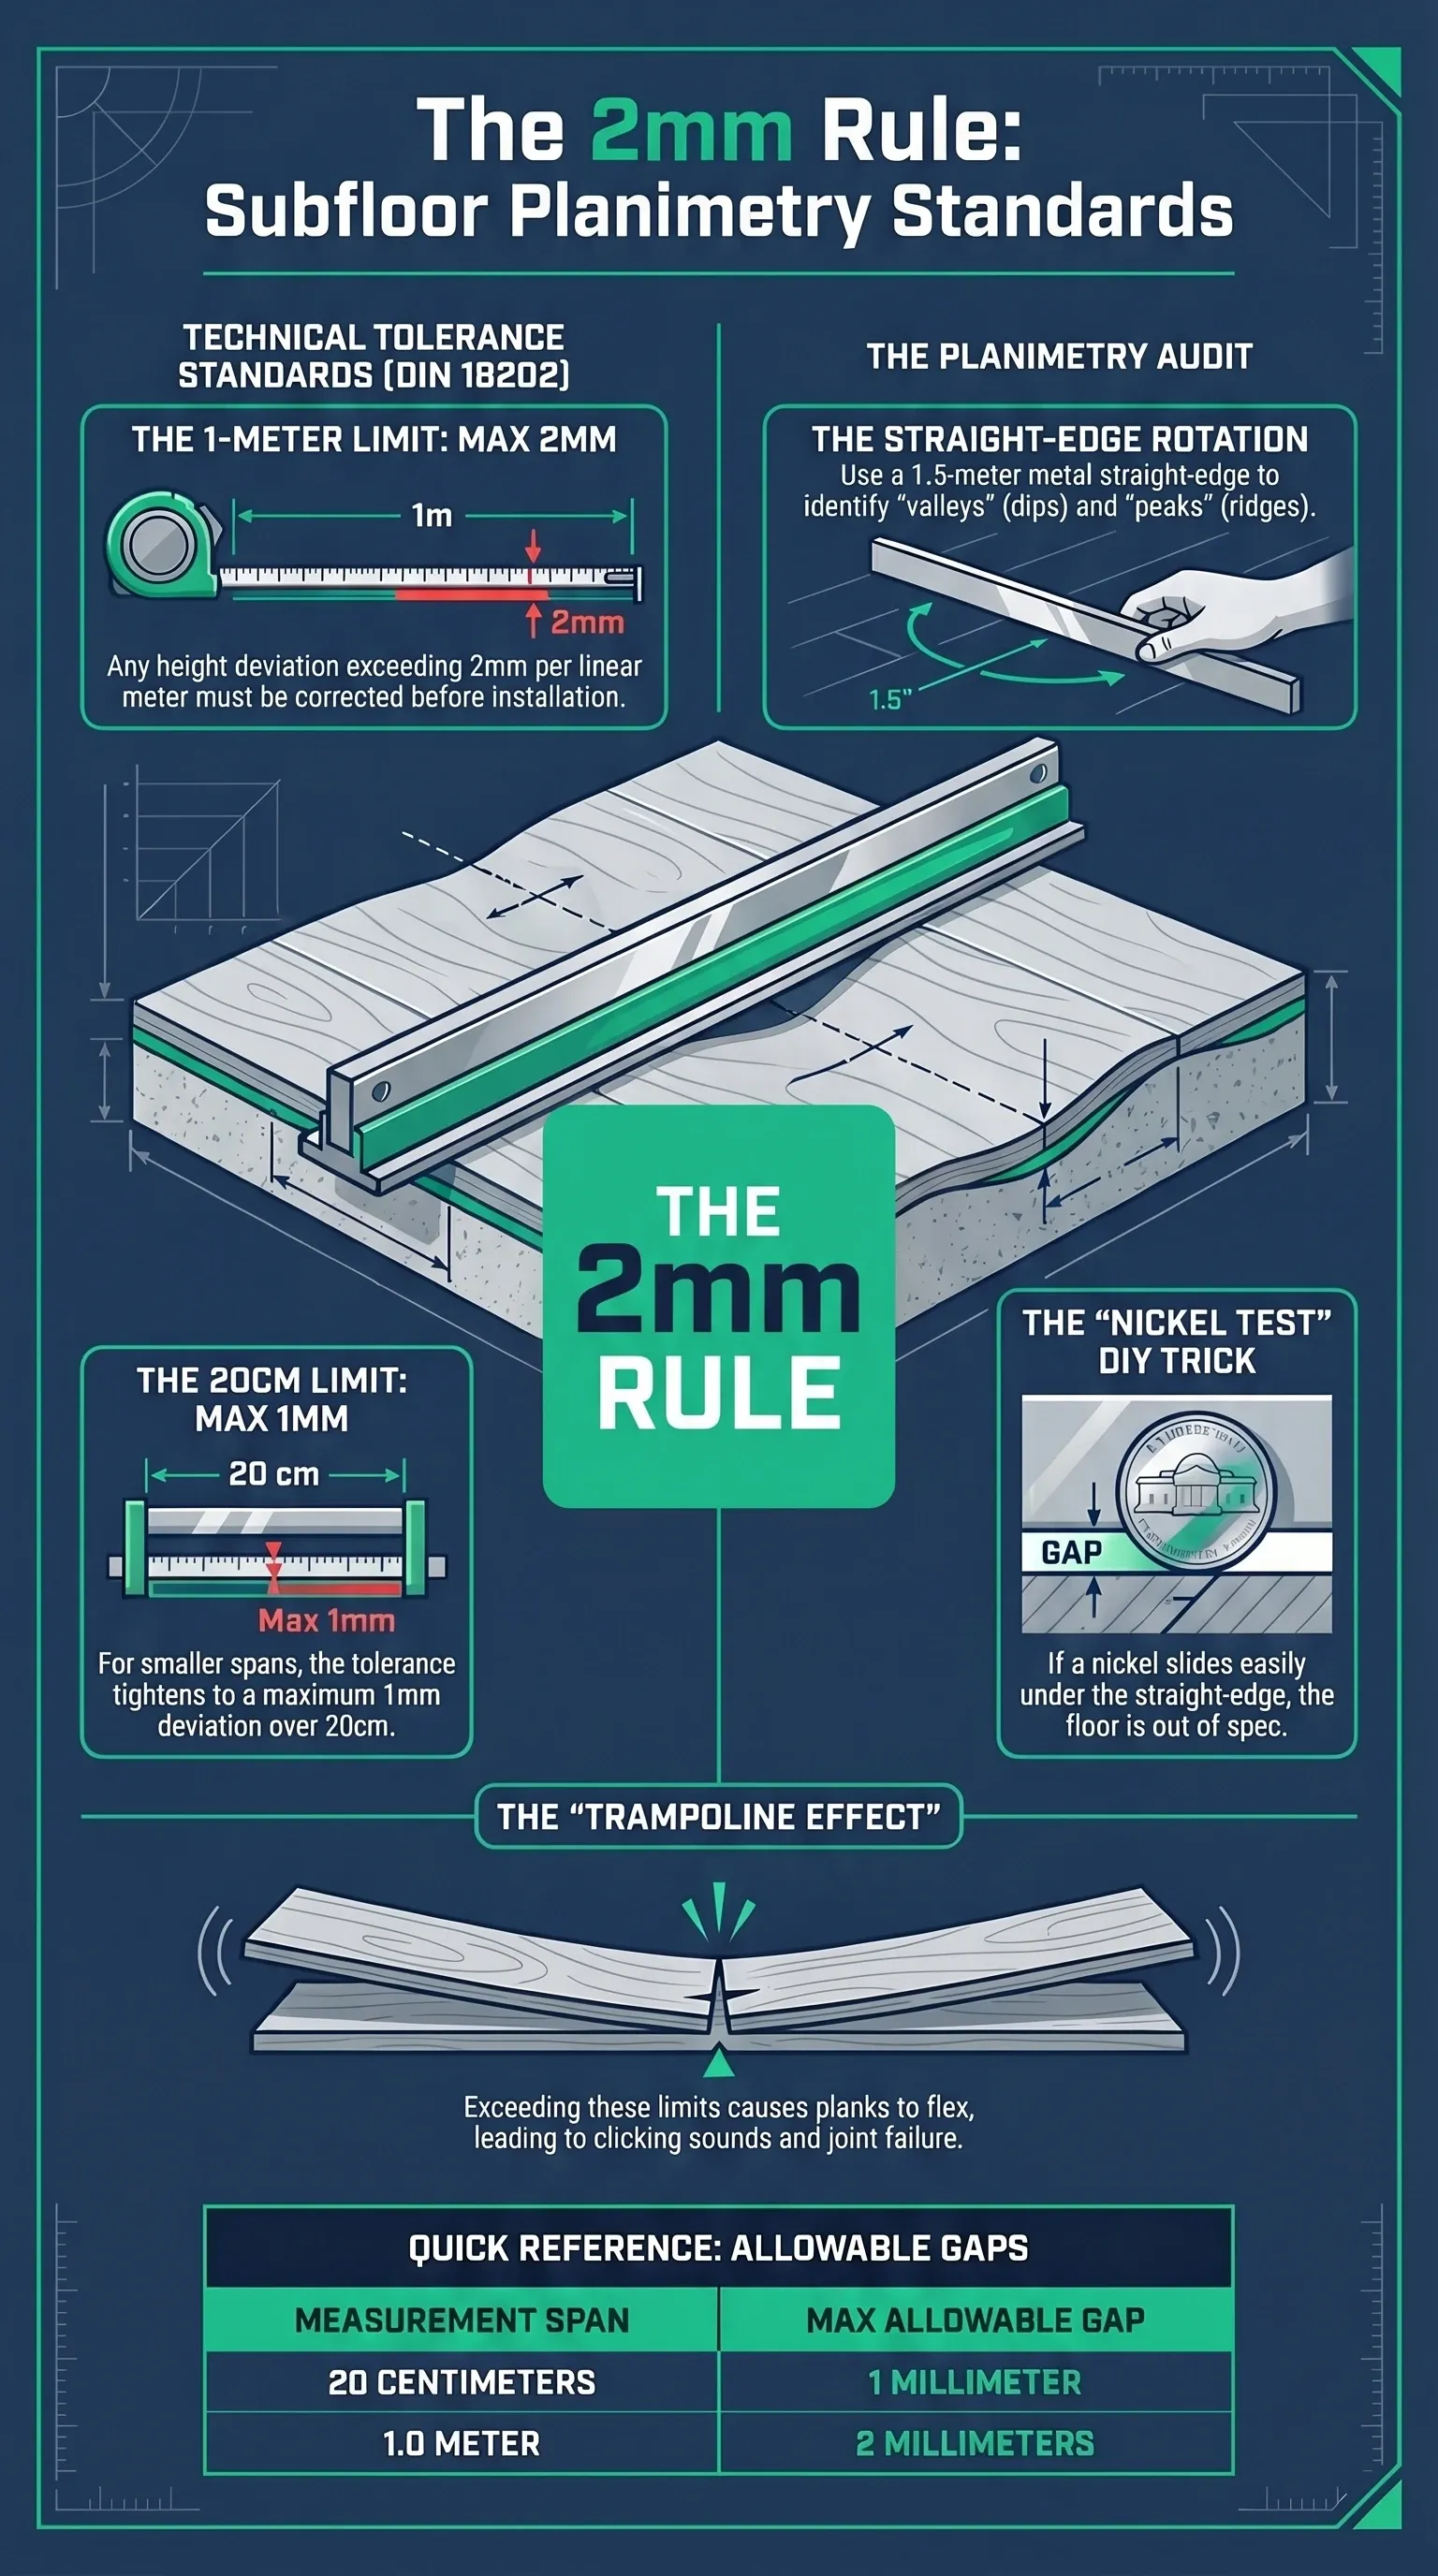
In professional flooring, flat is an engineering requirement, not a visual impression. DIN 18202 Table 3, Row 3 sets the limit at 3 mm of height difference per meter on the finished subfloor. Most laminate manufacturers tighten this to 2 mm per meter in their installation guides, and for shorter spans the tolerance narrows further to 1 mm over 20 cm.
When someone walks across a laminate floor that was not properly leveled, the planks flex into the hollow spaces below. This bridging creates friction inside the locking joints and produces the clicking or popping sound known as the trampoline effect — a mechanical symptom, not a cosmetic one.
Testing the Slab: The Straightedge Method
A planimetry audit happens before a single plank is laid. A professional-grade aluminum straightedge, 1.5 to 2 meters long, is rotated across the room in multiple orientations to map every valley and peak. The straightedge method per ASTM E1155 remains the industry standard for on-site flatness verification in Florida installations.
A single pass in only one direction misses ridges or valleys running perpendicular to it. This is a common shortcut, and it produces an incomplete map that leaves problem areas undetected until planks are already installed over them. A full-room audit takes longer than most homeowners expect for exactly this reason.
A planimetry audit checks for:
- Valleys (dips) that cause planks to bridge and flex under foot traffic
- Peaks (ridges) that concentrate vertical load on the joints of adjacent planks
- Transition zones between the original slab and a later addition poured at a different time
- Sunken or raised patches near old plumbing repairs
Corrective Measure 1: Self-Leveling Mortar for Widespread Depressions
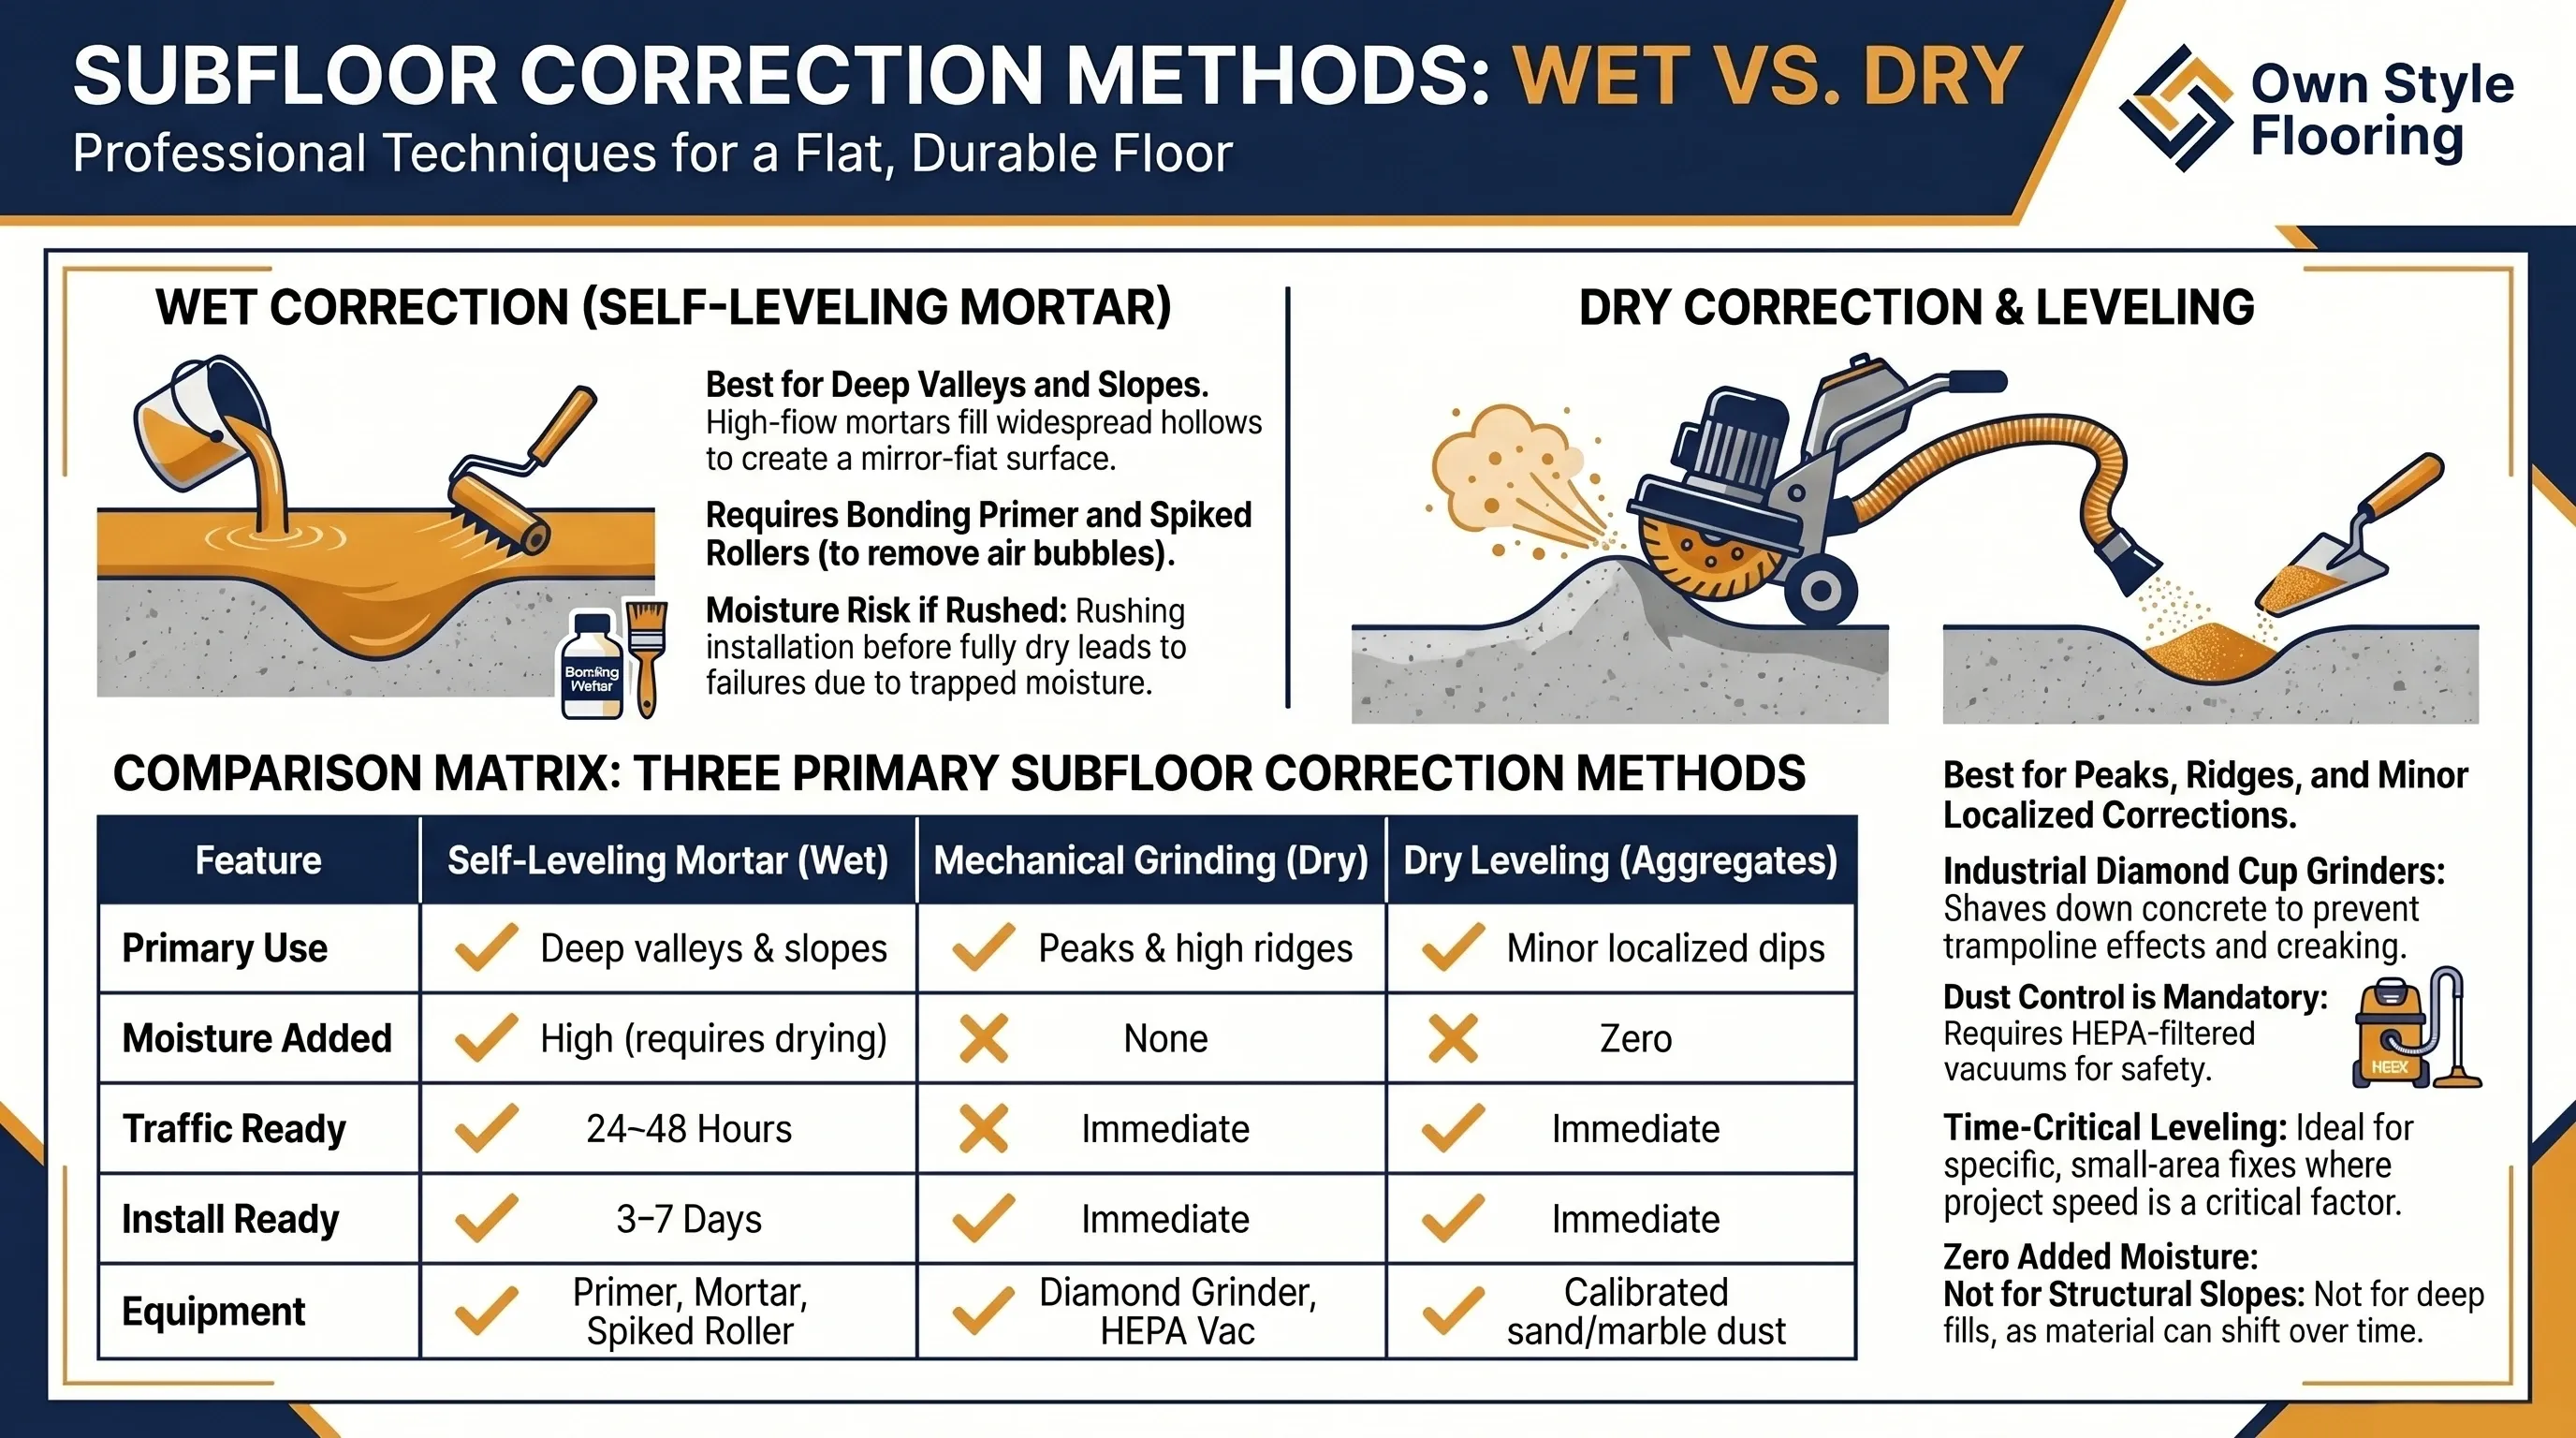
For widespread valleys or sloping floors common in older Tampa Bay homes, high-flow self-leveling mortar is the standard correction. The process follows a fixed sequence, and skipping a step compromises the pour: priming, perimeter sealing, pouring with de-aeration, and controlled thickness across multiple layers when depth requires it.
- Priming — A bonding agent prevents the porous slab from absorbing water from the mortar too quickly, which causes cracking and delamination.
- Perimeter sealing — Closed-cell foam strips seal every edge, preventing liquid mortar from leaking into wall cavities.
- Pouring and de-aeration — A spiked roller removes trapped air bubbles that create structural weak points.
- Thickness control — Most professional-grade SLU products have a maximum single-pour depth of 25 mm per manufacturer TDS. Exceeding this requires multiple pours with 24-hour cure cycles between layers.
Strict drying times apply at every stage. Rushing the cure traps residual moisture under the new floor, creating the exact condition — elevated subsurface humidity — that a moisture barrier and CM testing are meant to prevent in the first place.
Corrective Measure 2: Mechanical Grinding for High Spots
Ridges typically form at concrete pour joints or where plumbing repairs disturbed the original slab. Pouring more leveler over a ridge only raises the surrounding floor height, which risks interfering with door clearances. The correction instead removes material: industrial diamond cup grinders connected to HEPA-filtered vacuums grind the high spot down to tolerance.
Grinding is a dusty, intense process that demands professional-grade dust control. A HEPA-filtered vacuum attached directly to the grinder head keeps fine concrete silica dust from settling into every adjoining room — a standard shop vacuum’s filtration is not fine enough to contain particles this small.
Corrective Measure 3: Dry Leveling with Fine Aggregates
For minor, localized dips where installation time is critical, calibrated sand or marble dust — particles screened to 0.5–2 mm diameter — fills depressions without introducing moisture. This method allows immediate underlayment and plank installation, but it only works for shallow corrections of 3–5 mm in low-traffic areas.
Deeper fills shift under concentrated furniture loads, recreating the original planimetry problem within months. Dry leveling works as a targeted patch, not a substitute for self-leveling mortar or grinding across a wider area of a Tampa Bay slab.
Which Correction Method Fits Which Situation?
Three corrective paths exist, and the right one depends on the defect type, not homeowner preference. Valleys call for self-leveling mortar, peaks call for grinding, and only minor shallow dips qualify for dry leveling. The table below compares moisture impact and installation timeline for each method.
| Method | Best for | Moisture added | Traffic-ready | Install-ready |
|---|---|---|---|---|
| Self-leveling mortar | Deep valleys, sloped floors | High — requires drying | 24–48 hours | 3–7 days |
| Mechanical grinding | High spots, ridges | None | Immediate | Immediate |
| Dry leveling (fine aggregate) | Minor localized dips (3–5 mm) | None | Immediate | Immediate |
Why Can’t High Spots Just Be Filled Along With the Low Ones?
Filling raises the entire reference plane, and a high spot is already at or above where the finished floor needs to sit. Pouring self-leveler over a ridge to even it out with surrounding valleys only works if the ridge is ground down first.
Otherwise the leveler follows the existing high point upward, and the room’s overall floor height climbs enough to interfere with door clearances, transition heights, and cabinet toe-kicks measured against the original slab elevation. This is why a planimetry audit maps peaks and valleys separately — the two conditions require opposite corrective actions, not one pour that treats the whole room the same way.
The Danger of the “Springy” Floor
Ignoring planimetry produces a “springy” or “bouncing” sensation underfoot. This is not merely a comfort issue — it is a structural death sentence for laminate. Floating floors move as a single unit. When one section sinks into a dip while the adjacent section rests on a ridge, the HDF core is subjected to cleavage forces. Within six months, tongue-and-groove joints fracture, and visible gaps form between planks that no amount of re-tapping can close.
Professional Leveling as Investment Protection
Many DIY guides suggest that a thick underlayment can hide an uneven floor. This is a dangerous myth — standard underlayment corrects only micro-irregularities of ≤ 1 mm, the PC conformability value. Using thick, soft foam to bridge a 5 mm gap actually makes the problem worse by increasing vertical plank movement. Professional subfloor correction ensures the foundation is engineered to last. Our subfloor preparation labor is $1 per square foot; see our published prices for the full list.
How Common Is Planimetry Failure in Tampa Bay Specifically?
Planimetry failure is more common in Tampa Bay than in newer-construction markets, largely because of how much of Hillsborough County’s housing stock — from older Brandon and Riverview neighborhoods to slab-on-grade additions poured decades apart — predates current slab-flatness practices. Settled foundations, additions poured at a different time than the original slab, and patch repairs over old plumbing are the most frequent sources of localized peaks and valleys.
A slab that looks visually flat to the eye can still fail the straightedge test, since the 3 mm tolerance is tighter than what normal-looking concrete regularly achieves. That gap between appearance and measurement is exactly why the test is done with a tool, not a walk-through.
Signs Your Slab May Need Leveling
Several warning signs point to a planimetry problem before a straightedge ever touches the slab. None of them confirm failure on their own, but any one of them justifies a professional audit before flooring goes down in a Florida home.
- Visible slope when a marble or ball rolls freely across the room
- A rocking sensation when standing on existing tile or old flooring near a suspected patch
- Daylight visible under a straightedge or long level placed flat on the slab
- A slab section added years after the original pour, especially over a plumbing repair
- Cracks radiating from one point, often a sign of differential settlement
Planning a flooring project in Tampa Bay? Every quote starts with a moisture reading of the slab, at no cost. Get your free photo estimate or call (813) 455-5756.
Frequently asked questions
Can a thick underlayment fix an uneven concrete floor?
No. Underlayment is designed for acoustic insulation and micro-irregularity correction up to 1 mm, not structural leveling. Using extra-thick padding to hide a deeper dip does not fix the slab — it increases vertical deflection at the joint above the depression, which accelerates tongue-and-groove fatigue and joint failure.
How do I know if my concrete floor needs leveling?
Place a 1.5-meter straightedge on the slab and check for light gaps underneath. If a 3 mm feeler gauge fits beneath the straightedge at any point, the floor exceeds tolerance per ASTM E1155 and requires professional correction.
How long does self-leveling mortar take to dry in Florida?
In Tampa Bay's high humidity, self-leveling mortar typically needs 24–48 hours before it can carry light foot traffic, but the full cure before laminate installation runs 3 to 7 days. That longer window ensures residual moisture in the pour drops below the 2.0 % CM threshold required for a safe installation.
Will an uneven subfloor cause my laminate to creak?
Yes. Creaking is one of the most reliable symptoms of an unleveled subfloor, caused by planks bridging over dips in the slab instead of resting flat. The noise comes from the click-lock mechanism flexing under the vertical stress of each footstep, and it typically gets louder over the following weeks as the joints fatigue.
Can high spots and low spots be corrected in the same pour?
No. High spots must be ground down first since pouring leveler over a ridge just raises the whole area with it. A planimetry audit maps peaks and valleys separately because they require opposite corrective actions — grinding for one, filling for the other.
Is planimetry failure more common in older Tampa Bay homes?
Yes. Homes with settled foundations, additions poured separately from the original slab, or patch repairs over old plumbing are the most frequent sources of localized peaks and valleys exceeding the 3 mm/meter tolerance, common across older Hillsborough County housing stock.



US standard for measuring relative humidity inside a concrete slab using in-situ probes drilled to 40% of slab depth, read after 72 hours of equilibration.
US standard for measuring moisture vapor emission from a concrete slab using anhydrous calcium chloride, expressed in pounds per 1,000 sq ft per 24 hours.
US standard practice for preparing concrete floors to receive resilient flooring. Covers flatness, cleanliness, and moisture condition before installation.
The building code in force across Florida, including moisture and structural requirements that apply to slab-on-grade residential construction.
European deep-core moisture test that reacts a slab sample with calcium carbide and reads the resulting gas pressure. Supporting knowledge: the applicable US standards are ASTM F2170 and F1869.
Supporting knowledge — not the standard we work toGerman standard series for floor screeds, source of the widely cited 2.0% CM cement and 0.5% CM anhydrite thresholds. Supporting knowledge, not the applicable US standard.
Supporting knowledge — not the standard we work toHigh-Density Fiberboard: the compressed wood-fiber core of most laminate planks. It absorbs water vapor and swells irreversibly, which is why slab moisture matters.
Stone Plastic Composite: rigid vinyl core made of limestone powder and PVC. Dimensionally stable under humidity swings and unaffected by water.
Wood Plastic Composite: vinyl core with wood flour and foaming agents. Softer and warmer underfoot than SPC, and less dimensionally stable.
Luxury Vinyl Plank: multi-layer vinyl flooring in plank format. Fully waterproof as a material, though the subfloor beneath still governs installation.
Abrasion Class rating for laminate wear resistance, from AC1 to AC6. AC4 suits normal residential use; AC5 handles heavy traffic and light commercial.
A sheet layer placed between slab and flooring to block ground moisture vapor. Required over slab-on-grade construction regardless of surface dryness.
Foundation type where the concrete slab sits directly on the ground, dominant in Florida residential construction. Ground moisture migrates upward continuously.
The permitted deviation of a subfloor across a given span. The common benchmark is 3/16 inch over 10 feet; beyond that, deviation transfers into the locking joints.
A pourable cement-based compound that flows to a level surface, used to correct slab deviation. Needs 24 to 72 hours of cure before flooring goes down.
The 8 to 10 mm clearance left between a floating floor and every fixed vertical surface, absorbing seasonal expansion. Bridging it transfers stress to the joints.
Conditioning flooring material inside the room where it will be installed, 48 to 72 hours before installation, so it reaches interior temperature and humidity.
An angle-in locking profile that joins planks without adhesive. The insertion angle is specified by the manufacturer; forcing it deforms the profile permanently.
The raised ridge that forms along plank edges when a floating floor expands without room to move. In Florida the usual causes are slab moisture or a bridged expansion gap.